


Lighting, and the direction of light, is one of the most important aspects of portrait photography. Directional lighting makes a huge difference to the final image, depending on how you use it. Put simply, directional light photography uses light coming from a specific direction, creating shadows and highlights to add depth and dimension to the subject.
Directional lighting can be created with natural light or artificial light. So it’s not about the type of lighting used, but the actual light direction.
Lighting that has no clear direction is flat lighting and is characterized by a lack of shadows and highlights. An every day example of flat light is what you see on heavily overcast days.
Now let’s take a closer look at how to use directional light in portrait photography…
What’s directional lighting for portraits?
In portrait photography, directional lighting creates depth, texture, and drama by skimming over and defining the subject’s features from a specific direction. Shadows on the subject’s face show the light direction used as they’ll extend away from the direction of the light. You can see this clearly in the photo below.
This play of light and shadow creates form, giving a more three-dimensional look to a two-dimensional surface. It also affects the mood and emotion of an image, depending on how much shadow and how deep the shadows are on a subject’s face.
The 5 types of directional light photography are:
- Front lighting – when the light source is directly in front of your subject, it creates even lighting across the face. If it’s slightly higher and pointing down, it creates a shadow beneath the nose
- Backlighting – the light source is placed behind your subject, creating a halo effect around the edges of the subject
- Side lighting – the light is to the side of your subject, creating dramatic shadows and highlights across their face
- Top-down lighting – is the least commonly used, but is great for emphasizing facial features and curves by placing the light above your subject. Also called overhead lighting
- Uplighting – directional light from below your subject shining upwards, usually used as fill lighting in a clamshell lighting setup. Also called bottom lighting.
Front lighting, backlighting and side lighting are the three main directions of light used in portrait photography.
Each lighting direction has its own unique characteristics and can be used to achieve different effects.

Directional light with direct light or indirect light
This might sound confusing, but stick with me… Directional lighting can be direct light or indirect light. It can also be hard or soft light in portraits, regardless of whether it’s direct or indirect.
What’s direct light in photography?
Direct light is any light that lands directly on your subject. If direct light isn’t diffused or reflected it produces a hard light quality, because there’s nothing between the light source and the subject. Examples of direct light include:
- Sunlight landing on your subject on a sunny day, especially at midday
- Aiming a flash at your subject
Direct light can also be soft, if it’s diffused light or from a large light source placed close to the subject. This applies to both natural light and artificial light, for example:
- Sunlight diffused by an overcast sky
- A flash fitted with a softbox or umbrella with a layer of diffusion to diffuse the light aimed directly at your subject
Remember, a strong light source creates strong shadows and high tonal contrast.
What’s indirect light in photography?
Indirect light produces a soft quality of light, because it lights your subject without light landing directly on them. This is often considered a better light for portrait photography. For example:
- Placing your subject in open shade, such as the shadow of a building
- Aiming the flash at a wall to bounce the light back onto your subject, or fitting a reflective umbrella to the light source, with or without diffusion

Front lighting portraits
Front lighting for portrait photography is one of the most common directional lighting techniques used, because it’s the easiest and the first type of light direction we learn.
With front lighting the light is behind you, or above you and pointed down at a 45 degree angle at the subject.
Front lighting with natural light
Using the sun as frontal lighting makes it difficult for your subject to look towards camera, because they’re looking into the sun and creates hard shadows. So using a diffuser to soften the light creates a more pleasing effect and is more comfortable for your subject’s eyes.
It’s easy to forget how bright the light is for your subject when the sun is behind you.
Late afternoon and the golden hour are the best times to use natural light as front lighting, because of the soft quality of light at this time of day and the lower position of the sun in the sky.
You can also create front lighting indoors with natural light, by positioning your subject facing a window or doorway.
Front lighting with artificial light
On-camera flash creates front lighting, but isn’t particularly interesting. This lighting technique involves using a flash mounted on the camera and pointed directly at the subject. Rather use a speedlight for off-camera flash for a more interesting and flattering light direction.
When you use flash off camera you can position the light higher and angled down towards the subject in a butterfly light position, which is flattering for portraits. This creates a distinctive butterfly shadow beneath the subject’s nose and chin, defining the jawline.
To soften shadows use a reflector for fill light, or any reflective surface, positioned below the subject’s chin to bounce the light back up.

Backlighting portraits
Because backlighting portraits, with the main light source behind the subject, creates a halo effect around the subject, it separates them from the background and adds depth to the image.
Create backlit silhouettes
Backlighting is great for creating dramatic silhouettes in the golden hour and at sunset. However, you could also create a silhouette indoors by placing the subject in front of a window.
To achieve the silhouette effect, expose for the background and let the subject fall into shadow.
Challenge of backlit portraits
Backlighting portraits can create strong highlights on the subject’s hair and shoulders, which adds glamour and sophistication to a portrait. However, be careful not to overexpose the highlights.
Another challenge of backlighting is lens flare, which occurs when light enters the lens and creates a hazy effect on the image. This is why I strongly recommend using a lens hood.
Alternatively, you can embrace lens flare and use it to create a dreamy, romantic effect.

Side lighting portraits
Side lighting in portrait photography creates shadows and highlights on the subject’s face that emphasize and shape the subject’s features.
It’s the most commonly used light direction for portraits, offering the most variety of looks, depending on the position of your subject in relation to the light.
Natural light side lighting
Create side lighting indoors with natural light by positioning the subject next to a window.
For soft light outdoors on sunny day place your subject in the open shade of a building with the light coming from the side. Or for hard lighting outdoors, use the direct light of the sun.
A cloudy day is ideal for natural light portrait photography, because of the soft light, which is kind on skin.
Artificial light side lighting
Artificial light for side lighting can be created with ambient light of a streetlight, for example, or continuous light such as LED lighting or off-camera flash.
To soften flash light use a light modifier such as a shoot through or reflective umbrella or a softbox fitted to the flash.
Benefits of side lighting direction
The two main benefits of side lighting portraits are:
- You can either slim down a wide face or widen a narrow face with side lighting, depending on light position
- Side light creates a dramatic and moody effect in portraits
Disadvantage of side lighting
Because with side lighting the light skims across the surface of your subject’s face, it highlights wrinkles and blemishes. So bear in mind your subject’s skin and age when using side lighting.
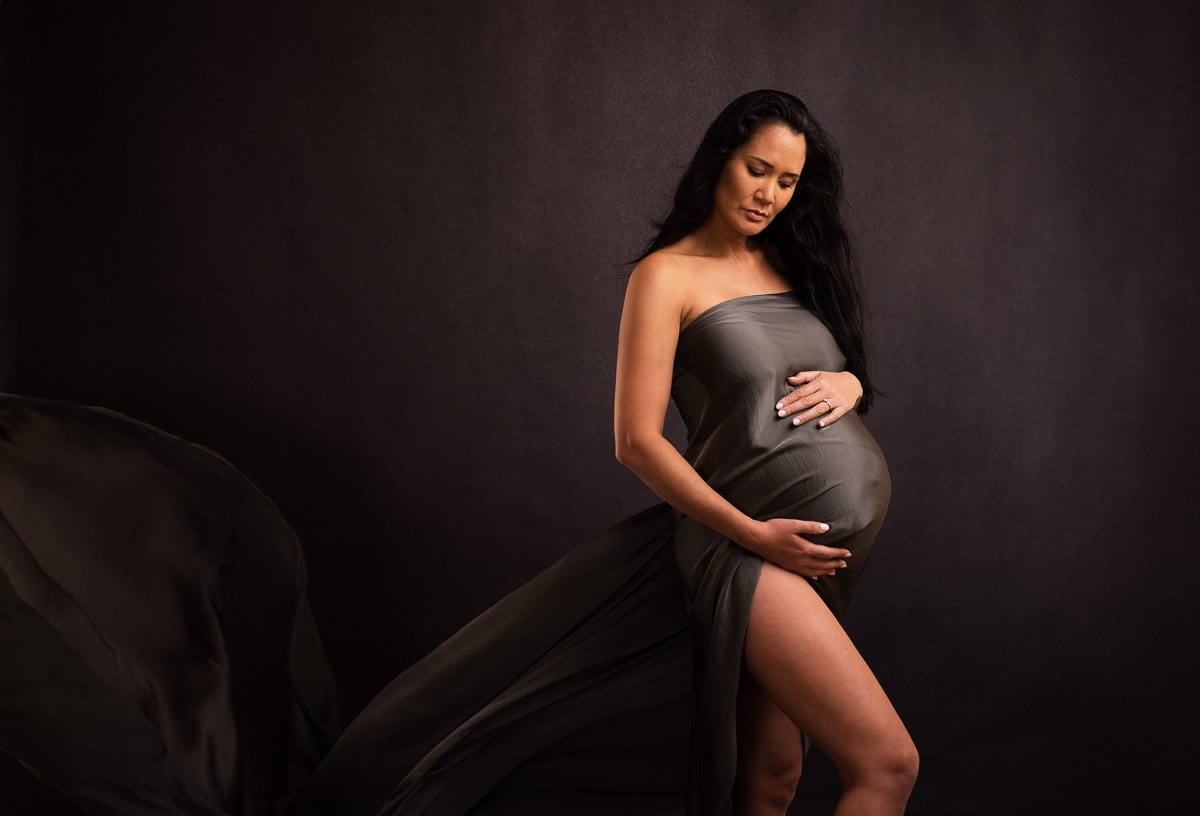
Top-down lighting for portraits
The most famous example of top-down lighting is the Queen II album cover – the one with just their faces.
I use top-down lighting mainly for full body portrait photography, particularly maternity and fitness portraits, because it’s great for emphasizing the shape the body. With this lighting technique you can create deep shadows, which are fantastic for mood and depth in portraits.
Create top-down lighting by placing the main light source above, and slightly forward of, the subject and pointing it downwards. Make sure you position the overhead light in the right place to get catchlights in your subject’s eyes.
The challenge of lighting from above is that it can create unflattering shadows under your subject’s eyes and nose. So take care with light placement.
Uplighting portraits
The last type of light direction used in portrait photography is uplighting, or upward lighting. However, unlike with other directional lighting, you’d never use it as a single light source. Well, not unless you wanted to create “monster lighting”, as it’s jokingly called.
If you’ve ever sat around the campfire telling ghost stories while holding a flashlight shining upwards beneath your chin, you’ve used monster lighting.
And that’s exactly why we don’t use it in portrait photography, except as a fill light with butterfly lighting. This creates a clamshell lighting pattern, which is flattering for portraits.
Advanced directional light photography techniques for portraits
However, there’s more to lighting portraits than just basic light direction.
Portrait photographers use directional light to flatter their subjects with small changes to the angle and position of the light source to create different lighting patterns.
The five most used portrait photography lighting patterns are:
- Rembrandt lighting
- Loop lighting
- Split lighting
- Butterfly lighting
- Clamshell lighting
Of these five, the first three light patterns are a type of side lighting and the other two are a form of front lighting.
Frequently Asked Questions
How can I create directional lighting in my photography?
Create directional light in photography with natural light or artificial lighting, such as a flash. The direction of the light can be from the front, back, side, or above your subject. Experiment with different angles to see what works best for your desired effect.
What are some examples of using directional lighting in portrait photography?
Directional lighting is used in portrait photography for different effects. For example, side lighting creates shadows that emphasize the contours of the face, while backlighting creates a halo effect around the subject. Overhead lighting can be dramatic, while front lighting can be soft and flattering.
What are the benefits of using directional lighting in photography?
Using directional lighting in photography adds depth, texture, and mood to your images. It creates shadows and highlights to emphasize the contours of your subject. By using directional lighting, you can create a more dynamic and interesting image that gets attention.
What are the three main types of lighting directions for photographers to consider?
The three main types of lighting directions for photographers to consider are front lighting, side lighting, and backlighting. Front lighting is when the light source is in front of the subject, side lighting is when the light source is to the side of the subject, and backlighting is when the light source is behind the subject.
How can I use directional lighting to create dramatic effects in my photos?
To create dramatic effects in your photos, use directional lighting to create shadows and highlights to add mood to the image. For example, use backlighting to create a silhouette for drama and mystery. Side lighting creates shadows that add depth and texture to your subject, while top lighting can create dramatic images.
Key takeaways of directional lighting photography
- Directional light adds depth and dimension to the subject in portrait photography
- The five types of directional lighting include: front lighting, backlighting, side lighting, top-down lighting and uplighting
- Choosing the right type of directional lighting for the subject and intention of the image flatters the subject and helps create mood
Leave a comment
If you have any questions about directional light photography, let us know in the comments.
Also, I love good news, so if my direction of light tips have helped you to understand portrait lighting, share that too.