


Butterfly lighting is a portrait lighting pattern that has nothing to do with lighting butterflies. I thought I’d state the obvious from the start – only half joking. When you first hear about portrait lighting patterns, it’s easy to think that it’s for flash photography only, but that’s not at all the case.
Portrait lighting patterns apply as much to natural light photography as they do to off camera flash photography.
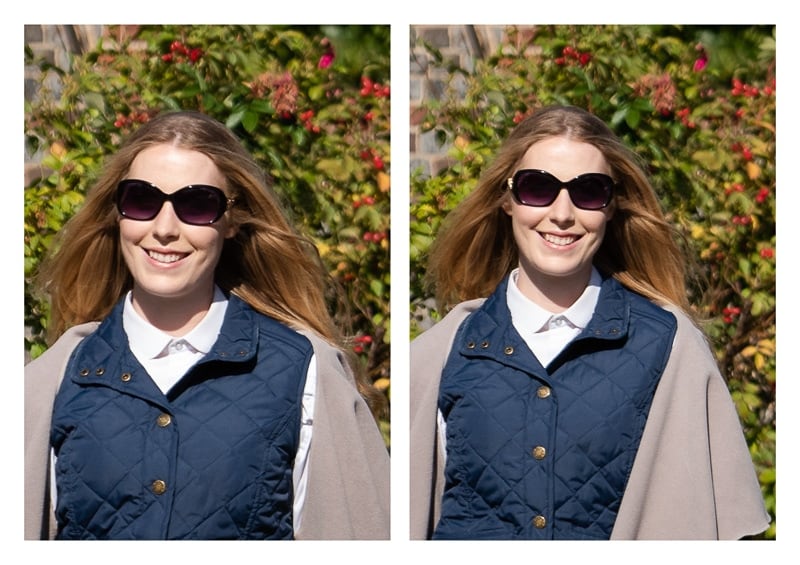
Read all the way to the bottom to see how this first photo was shot. What do you think – natural light or flash?
Different lighting patterns are used in portrait photography for different reasons, but especially to:
- Create atmosphere
- Flatter a particular face shape
Today we’re exploring the benefits of butterfly lighting for portraits – when and how to use it.

What is butterfly lighting?
Butterfly lighting is a portrait lighting pattern where the light is placed in front of the subject for dramatic shadows. It’s also called beauty lighting and paramount lighting, because it was particularly popular in the glamorous, early Hollywood film days for portraits of actresses.
A portrait lighting pattern is simply a way of:
- Arranging lights in relation to the subject, if using flash
- Positioning a subject in relation to the light, if using natural light
What distinguishes butterfly lighting, and gives it its name, is the butterfly shaped shadow below the subject’s nose, created by the position of the light in a butterfly lighting setup. Personally, I don’t think it looks much like a butterfly, unless the butterfly is flying directly towards you.
If you want drama in photos, use the butterfly lighting pattern.
When should you use butterfly lighting?
Although butterfly lighting is used mainly for lighting women, there’s no reason why you can’t use it with men.
The reason it’s used more for women is that it’s the most popular lighting pattern for beauty photography, which is why it’s also called beauty lighting. So most women’s magazine covers feature butterfly lighting.

Facial features affected by butterfly lighting
Aside from the butterfly shadow, the most distinguishing feature of butterfly lighting pattern is the way it sculpts the subject’s face, particularly for subjects with high cheekbones and a defined jawline.
But it’s not just for model like features, butterfly lighting can be used to flatter all faces. For example:
- Double chins – it has a slimming effect for subjects carrying a little weight beneath their chin as it casts a shadow on the area
- Uneven noses – because of the direction of the light, noses that aren’t smooth and straight look better with this type of lighting. It minimizes irregularities by filling in bumps and dents on noses.
However, two facial features that do not suit butterfly lighting are:
- Round faces – don’t photograph well with butterfly lighting as it makes them look heavier. For round faces, rather use Rembrandt lighting, loop lighting or split lighting patterns to slim and define them.
However, in photography there are always exceptions. For me the round face exception for butterfly lighting is babies and toddlers. It’s great for emphasizing their gorgeous little chubby cheeks! Which, of course is not what we want to do for adults. - Deepset eyes – because the eyes are set further back, you need to be careful that the light is not so high that you lose the catchlights in their eyes

What are catchlights?
Lights that are reflected in your subjects eyes are catchlights. Portraits without catchlights in the eyes are lifeless as there’s not sparkle to the eyes. If you want sparkling eyes, you need catchlights.
Most of the time, if you zoom into a photo, you can see the type and/or shape of the light source by examining the catchlights in the subject’s eyes. Catchlights also show you where the light’s positioned in relation to the subject, so they’re great for seeing how a portrait was lit.
Catchlights appear in the subject’s eyes at the 12 o’clock position with butterfly lighting.
How do you use butterfly lighting?
Butterfly lighting is a way of front lighting your subject – so, to state the obvious, the main light source is positioned to light from the front of your subject.
In studio portrait photography the most used light modifier for butterfly lighting is a beauty dish, especially for beauty shots. That said, I’ve also used rectangular softboxes and stripboxes, umbrella lighting and also bare bulb.
Position of the light for butterfly lighting
Unlike flat lighting, which also lights a subject from the front, with butterfly lighting the light is placed higher than the subject’s head and angled down towards the subject.
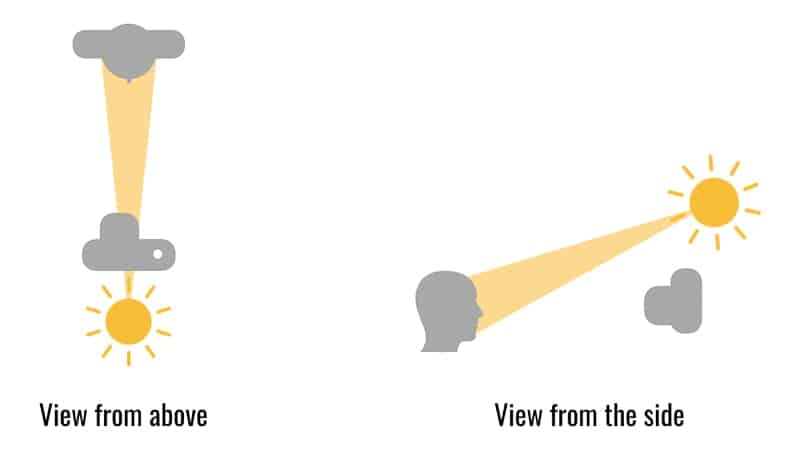
The combination of height and angling the light down creates and controls the butterfly-shaped shadow beneath the nose. Keep a close eye on the shape of the shadow – when it looks like a moustache, you’ve gone too far.
A good starting point for butterfly lighting is to angle the light 45 degrees down towards your subject and then adjust from there.
Remember that all faces are different. So with the butterfly lighting technique the exact angle of the light depends on the shape of your subject’s nose, as well as their brow bones.
Difference between natural light and flash for butterfly lighting
The only difference between using natural light and off camera flash for creating butterfly lighting is that it’s easier with flash. For two reasons:
- You can’t move the sun or a window around the way you can artificial light. Instead, you have to move your subject into position
- Because of the position of this type of lighting, using sunlight can be quite blinding for your subject, especially if their eyes are sensitive to light. To avoid squinting, they’ll either need to wear sunglasses, or keep their eyes closed until you’re ready to take the shot. So you might need to take several shots in case they’re still focusing when you take the shot. Eyes look glazed if they’re not properly.

For this photo I used off camera flash balanced with the ambient (natural) light. The light was placed right next to me on the right, but perfectly in line with the direction Katie was facing.
Controlling butterfly lighting shadows
If you want to lessen the shadows so that they’re not as dark, you can use a photography reflector beneath your subject’s chin at chest height to bounce the light back up and fill in the shadows.
Alternatively, you can position a second light as a fill light (less bright than the main light) below the main light and angled up to your subject. This creates clamshell lighting. The lights are positioned like the top and bottom shells of the clamshell and you photograph from between the two lights, in the “hinge” of the clamshell.
For a softer butterfly shadow, you need to diffuse the light.
Direct sunlight creates a clearly defined shadow. However, if your subject’s in shade or if it’s a cloudy day, there’ll be a gradual fall off of the light so the edges of the shadow won’t be as clearly defined.
With flash photography, the light modifier you use affects the shadows. For example, a flash fitted with a softbox creates significantly softer shadows than a bare bulb.
What if the subject moves?
It’s really important to remember that when your subject moves their head the lighting pattern on their face will change.
Turning so the light is more to their side, changes it to a loop lighting pattern. Even further and their nose will cast more of a shadow on their cheek transforming the pattern into a Rembrandt lighting pattern.
Moving butterfly lighting to the side
As long as the light strikes the subject from the front of their face and at the right height and angle, you’ll have butterfly lighting.
So your position is not what makes a difference here. It’s their position in relation to the position of the light.
As with the image below, I often photograph my subjects slightly from the side when using a butterfly setup.

How the headline image was lit
The answer to my question is that she was lit by natural light. Here’s a pullback shot of the headline photo.
Sophie was sitting on the steps to the front door of the building in open shade for soft light. The entrance is recessed by about a meter or two, so the indirect natural light channeled in from behind me at the right angle for a butterfly effect.

Leave a comment
If you have any questions about portrait lighting patterns, let us know in the comments.
Also, I love good news, so if my portrait lighting tips have helped you to use butterfly lighting share that too.
Thanks for the post, you have an easy style of explaining the techniques, which for my age, makes it easy to follow, besides using this flatform, I am able to search for information easily, when I need it
Thanks so much for your comment, Jennifer. Your feedback means a lot to me.
I love this! I’ve got a shoot with a gorgeous model in a few days and I am gonna sue these tips!