In portrait photography, you need to master a few standard lighting patterns to create different moods and flatter different face shapes. Loop lighting is a popular portrait lighting setup with professional photographers, but is also one of the first portrait lighting techniques beginner photographers learn.
Other basic lighting patterns for portraits include:
- Split lighting
- Rembrandt Lighting
- Butterfly lighting
- Flat lighting

What is loop lighting photography?
Loop lighting is one of the most commonly used lighting styles for portrait photography. Like with all portrait lighting techniques, you can use loop lighting with either natural light or flash.
The aim of loop lighting is to position the light (if using flash) or position the model (if using natural light) at an angle to the key light (in other words the main light source) that creates a shadow leading down from the nose towards the cheek.
But don’t let the nose shadow join up with the cheek shadow. If it does join up, the loop portrait lighting pattern becomes Rembrandt lighting.
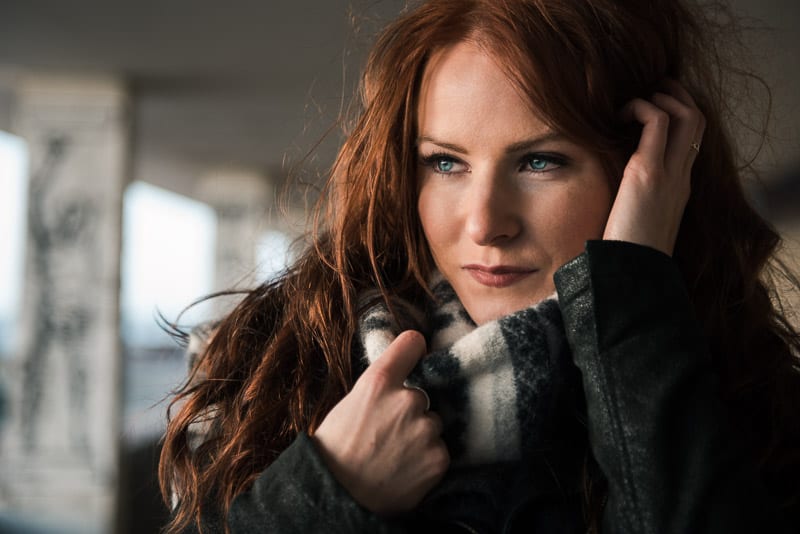
The soft shadows on her face are caused by indirect natural light as we were in the shade of a covered walkway.
Why is it called loop lighting?
The name simply refers to the loop shape of the nose shadow on the subject’s face that’s created with loop lighting. Nothing more complicated than that.
Why use loop lighting in portrait photography?
The loop lighting pattern is subtle, with just a hint of shadow cast across the face. It creates a nice bright look, because there are few shadows, but enough to create more definition in the face than flat lighting. Plus it’s good for creating catchlights in your subject’s eyes, which brings a portrait to life.
Loop lighting ideally suited to a light and airy style shoot. However, it also works well with a dark and moody style image, although not as moody and atmospheric as the more dramatic Rembrandt and split lighting patterns.
Because of its versatility, headshot photographers use loop lighting frequently.
What kind of face suits loop lighting style?
Portrait lighting patterns add definition to faces, because of the shadows that are formed, which is why it’s like sculpting with light. But the thing about people is that we’re all different and our faces are different shapes. So portrait photographers choose different lighting patterns to suit different faces and create different moods.
Loop lighting suits most people and works ideally with oval-shaped faces. The downward sloping shadow created by loop lighting, appears to lengthen the face, so it’s also flattering for round or square faces. In a subtle way it also defines the cheekbones, making them seem slightly higher.
It’s also a versatile type of lighting, because loop lighting can be used in a short lighting setup, which slims down wider faces, or broad lighting setup, which fills out narrow faces. Very briefly, broad lighting is when the shadow side of the face is away from camera and short lighting is when the shadows are on the camera side of the face, like in the image below.
Further reading: Short lighting and broad lighting for portrait photography

How do you get a loop light pattern using flash?
To achieve a loop lighting pattern you need to create a small shadow of the nose on your subject’s cheek. When placing your key light, you must consider:
- Where to place the light
- Height of the light
- Angle of the light
You can create loop lighting with several lights (key light, fill light, hair light etc) and make it as complex as you like, but you can also use just a single light source. For beginner photographers I suggest starting with a single light source and once you’re confident that you know the main lighting patterns start adding additional lights.
Now let’s take a deeper look…
1. Where to place the key light (main light)
The position of the light in relation to the subject is between 30 and 45 degrees. So, if you imagine a clock, with the subject in the middle, the background at 12 and the camera at 6:
- the key light should be coming from between 4 and 5 for a shadow on the left side of the face
- or from between 7 and 8 for a shadow on the right side of your subject’s face
If you want a shadow on the left side of the nose, the main light source must be on the right of the subject. So the shadow is on the opposite side of the face from the key light.
2. Height of the key light
As a rule of thumb, start with the light about a foot higher than your subject’s head and then angle the light down towards your subject. You might need to go higher, depending on your subject’s face and nose shape.
3. Angle of the key light
Your main light source must be above your subject’s eye level and angled down towards your subject’s face. Although as I mentioned, all faces are different, but as a rule of thumb a 45-degree angle down is a good starting point to create a loop lighting pattern.
The exact angle will vary from face to face, so you’ll need to assess the angle of the light for each person to make sure that the shadow is the right size and is falling in the right place.
Further reading: Photography umbrella lighting intro – how to choose and use umbrellas

How do you get loop light with natural light?
You can use either a flash or natural light to create loop lighting. The only difference is that, if you’re using natural light, you’ll have to move the subject into the right position. With flash you simply move the light around.
If you’re depending on the sun to light your subject directly, then you need to be aware of where the sun is in the sky. So time of day is important when planning a natural light shoot. Naturally, sunrise, sunset and midday are not going to work, because at:
- Sunrise and sunset – the sun can be too low in the sky
- Midday – the sun is too high
Also, with bright direct light, the shadows on your subject’s face will be hard shadows, unless the light is softened by an overcast sky.
However, if you’re outdoors in open shade or indoors, using indirect light to light your subject creates soft light so the shadows will be soft. If you’re indoors, using window light or light from a doorway, you’ll also need to pay attention to where the light is coming from. In this instance treat the light source (aka the window or doorway) as you would a studio light.
In other words, the height of a window will affect the shadow cast on your subject and the angle they stand or sit at in relation to the light source will also affect the shadow.

Controlling the shadows in a loop lighting setup
If you don’t want dark shadows, you’ll need to add fill light to soften the shadows. This applies to both studio lighting and natural light photography.
To fill the shadows you can use:
- A second light
- Or a handheld reflector or white wall to bounce light into the shadows
Alternatively, you could diffuse the light to create soft light by blocking it from hitting your subject directly with a diffuser, or thin material. If photographing indoors net curtains work well to diffuse indirect light further for very soft shadows.
Summary of how to create loop lighting in portraits
1. Place the main light slightly to the side of your subject
2. Set the light at least a foot (1 ruler length) higher than your subject
3. Angle the light down at 45 degrees
4. Adjust all positions to suit your subject’s features
5. Control the shadows
Leave a comment
If you have any questions about how to use loop lighting in photography, let us know in the comments.
Also, I love good news, so if my loop lighting tips have helped you to understand how to create a loop lighting style share that too.
I find your articles extremely clear and helpful, particularly the “cheat sheets”. It would be really good if you could do these for the other set-ups (Loop, Rembrandt and split) as well as the three you have done. Would this be possible?