Short lighting and broad lighting are portrait lighting patterns that are as relevant for natural light photographers as for studio photographers and photographers who combine natural light with flash. Lighting patterns are not about the source of the light, but the direction of light and how you use it.
Lighting patterns are used in portrait photography to:
- Create mood
- Flatter your subject
- Bring out your subject’s character
Faces come in all shapes and sizes and the trick to good portrait photography is knowing which lighting pattern is best for your subject and the purpose of the portrait.
Understand how different lighting patterns affect your subject to take your portrait photography to the next level.

What is a portrait lighting pattern?
Put simply, a portrait lighting pattern is created by the play of light and shadow across a person’s face with different types of lighting.
You have almost as much control over lighting patterns with natural light photography as you do with flash photography.
How do you change lighting patterns?
Three ways to change portrait lighting patterns are by changing:
- The height and/or direction of the light
- The position of the subject
- Your position in relation to the subject
With flash photography, you can move the light into the right position, or move your subject. Or you can move and photograph your subject from a different position.
When photographing with natural light, you obviously can’t move the light, but your subject can move and so can you.
Fill in your email below and I’ll send you this handy portrait lighting cheat sheet to print out and keep in your camera bag.
What is the most flattering lighting for portraits?
The most flattering lighting for portraits isn’t just a matter of deciding the type of lighting – natural or flash, soft or hard, bright or dim. It’s about:
- first deciding what type of image you want to create,
- then looking at your subject and deciding on the lighting pattern that will be most suitable for them
Types of portrait lighting patterns
I’ve written previously about the five main lighting patterns, so I’ll just list them here:
- Flat lighting
- Butterfly lighting (also known as beauty lighting)
- Split lighting
- Rembrandt lighting
- Loop lighting
Today we’re looking at short lighting portraits and broad lighting portraits, because four of the above five lighting patterns can be used as either:
- Broad lighting or
- Short lighting
The odd one out is flat lighting, because there are no shadows with flat lighting.
And that’s the first clue to the vital difference between short lighting and broad lighting. Which leads to the obvious question…
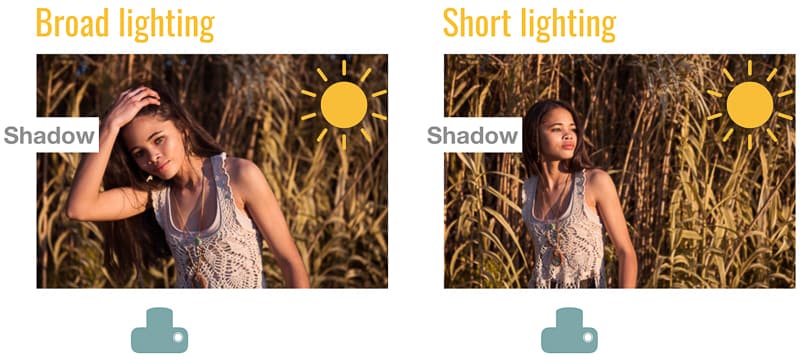
What’s the difference between short lighting and broad lighting?
Short lighting and broad lighting are classic portrait lighting patterns, but the difference is:
- Short lighting is used when the subject is lit from the side of their face furthest from the camera, casting the side closest to camera into shadow. A short area is lit.
- Broad lighting is the opposite of short lighting. It’s when the subject’s face is lit from the side closest to camera, so the shadow is on the side furthest from the camera. A broad area is lit.
Generally speaking, short lighting is much more commonly used in portrait photography as it’s the most flattering portrait lighting pattern for most people. The key word there is most. It’s not always the best lighting pattern to use.
Now let’s look at exactly what is short lighting and broad lighting so that you know when to use each lighting pattern.

This lighting diagram is an overhead view of broad lighting and short lighting. Note that that with broad lighting a broad area of the face is light. With Short lighting a short area of the face is lit. Makes sense now?
Short lighting
Short lighting is when the face is lit from the side furthest from the camera, so the side closest to camera is in shadow.
- Because of this short lighting is slimming, which is why it’s more commonly used than broad lighting
- Short lighting makes faces seem longer, so is ideal for anyone with a round, wide or heavier set face
- Shadows are great for moody photos
I mainly photograph women, so most of the time I use a short lighting pattern, because it’s slimming.
Texture is more pronounced with short lighting by light skimming across the side of the face. So, when placing your light or moving your subject, you need to pay attention to:
- Imperfections in the skin, such as acne
- Wrinkles – lines will be more obvious
Make small adjustments in position of either the light or your subject to overcome both challenges.
The setting sun was the only source of light. Obviously, the sun couldn’t be moved, so the lighting pattern was changed by the model moving. On the left her face is turned away from the sun and her cheek closest to camera is lit, so it’s broad light. On the right, she’s facing towards the sun, and her cheek closest to camera is in shadow, creating short lighting with a butterfly lighting pattern. This defines and slims her face in comparison to the image on the left.
Broad lighting
With broad lighting the light is on the side of the face closest to camera, so shadows fall on the opposite side of the face.
- Because there are no shadows on the camera side of the face, it’ll appear fuller
- Broad lighting is ideal for very narrow faces
- Broad light creates a lighter mood in photos than short light, because there are fewer shadows
- If someone has a side they’d like deemphasized for whatever reason (scars, eyes of different sizes, receding hair on one side etc), broad lighting is ideal as you can position them so that the side of their face that they feel conscious about is in shadow, furthest from camera
I like using broad lighting for babies and little children, because it accentuates their chubby cheeks.

See the location shot below for this example of how to create portrait lighting patterns with natural light. I lit the model from light flooding in at the spectator stand opening on camera left. Her cheek closest to camera is in shadow, so this is an example of short lighting with the loop lighting pattern.

Short lighting and broad lighting in the same photo
When photographing more than one person, you need to think through the best lighting pattern to use and how to pose your subjects so that all look good.
With the light coming from one side if they’re facing:
- the same way, the lighting pattern will be the same for both – either both short lit or both broad lit
- towards each other, or in opposite directions, one will be short lit and one will be broad lit
As with the mother and baby photo at the top of the page, sometimes you have to decide on the main subject of the photo and prioritize them.
Taking lighting patterns a step further
What makes lighting infinitely fascinating, apart from adapting different lighting patterns to create mood and flatter people, is controlling the shadows. So, not only are there a huge number of ways to light a person, but by controlling the shadow areas you can entirely change the mood of an image.
Consider light and airy vs dark and moody…and everything in between.
Filling in the shadows
Controlling shadows is done with fill lighting. And, as with portrait lighting patterns, fill lighting is not just for studio photographers.
- Natural light photographers use reflectors to bounce light back into the subject to control the shadows
- Flash photographers use reflectors and/or additional lighting to lift the shadows
- Combining ambient light with flash gives the most control over shadows by using reflectors, additional lighting and natural light as fill light
As photography is all about light, learning how to manipulate light to create mood, bring out character and flatter your subjects, is key to great portrait photography.
Leave a comment
If you have any questions about when to use short lighting or broad lighting, let us know in the comments.
Also, I love good news, so if my portrait lighting tips have helped you to understand how to manipulate light for flattering portraits, share that too.