When it comes to overexposure and underexposure in photography, there are a few different ways of thinking. There’s the technically accurate version of a well exposed image, with details retained in both the shadows and the highlights.
The other view on overexposure and underexposure is the idea that there’s no such thing, only the photographer’s intention. In other words, if the photographer chooses to technically overexpose or underexpose a photo, then it’s neither overexposed nor underexposed, merely exposed as intended.
Then there’s also the point that if you capture as much detail as possible, you have greater leeway for artistic expression with your exposure in post production.
The more detail you capture, the more detail you have to play with in the image.

Does overexposure and underexposure matter?
Regardless of how you feel about overexposed or underexposed images, if you don’t know how to capture a technically accurately exposed image, you can’t intentionally make the exposure decision.
In theory a photo that was overexposed in camera could look the same as a photo that was exposed correctly in camera and then overexposed in post production. Or vice versa. The end result appears the same.
But was it intended? And does it really look exactly the same?

To find out, we’ll look at the overexposure and underexposure issues:
- Dynamic range
- Technically accurate exposure
- Overexposure
- How to fix overexposed photos in Lightroom
- Underexposure
- How to fix underexposed photos in Lightroom
- How to get a balanced exposure in camera
- Using Exposure To The Right – ETTR
- Using Exposure To The Left – ETTL
- How personal style influences exposure decisions
Before I go any further, I should mention that I’ve written this tutorial from the standpoint of shooting in RAW. If you shoot JPEG, your camera won’t capture as many highlight and shadow details as RAW and you won’t be able to regain as much information in post production.
Dynamic range with overexposure and underexposure
Before we even consider capturing all the tones in a scene, we have to be aware that our eyes can see roughly 20 stops of tonal range, whereas full frame cameras see about 11 – 15 stops of light.
Knowing that, helps you to understand that in a high contrast scene, you won’t be able to capture all the tones you can see in one image.
You can use HDR (high dynamic range) technique of capturing several frames of the scene at different exposures so that you can then combine them into one image in post production. However, HDR is a style choice and doesn’t look natural, so if natural is what you’re going for, capturing the full range of tones through HDR is not the answer.
Technically accurate exposure
The contrast of a scene is going to have a huge impact on your camera’s ability to record the tonal range.
A high contrast scene, such as a bright sunny day, will have a far greater dynamic range than a low contrast scene, such as an overcast day. So it will be easier to meter for middle grey on an overcast day and have a photograph that is neither overexposed, nor underexposed. Both ends of the dynamic range can be recorded.
On a sunny day, however, if you expose for middle gray, the highlights might be overexposed and the shadows might be underexposed. If you meter for the shadows in a high contrast scene, your highlights will be overexposed. And vice versa when metering the highlights.

Knowing your limitations means that you can decide how you want to record the scene. So, you potentially have three choices:
- Underexposed shadows with highlights preserved (most popular choice)
- Overexposed highlights with shadows preserved
- Exposed for middle gray with highlights overexposed and shadows underexposed
If left up to your camera, it would go for the least favorable option in a high contrast scene – to expose for middle gray. This is why it’s important to understand how exposure works, how to control it and shoot in:
- Aperture priority
- Shutter priority
- Manual mode
You can then make the choice on which is the best shoot mode to use one way or the other.
Overexposure in photos
Not all overexposure is extreme, but at the extreme end of overexposure highlights are too bright for the camera’s sensor to record detail, so they’re shown as pure white.
Sometimes it’s easy to see that a photo is overexposed, even if the highlights are not blown out. Overall the photo just appears too bright.
Other times, you might need to rely on various tools to determine if a photo is overexposed.
Tools that help to see overexposure in photos
In camera it helps to have “blinkies” selected so that, when you look at the LCD screen, overexposed parts of the image flash black. You can then decide if you find the overexposure acceptable or not.
Just remember that the image you’re looking at is a JPEG, so is not 100% accurate. Sometimes, once imported to your computer, the areas that appeared overexposed on your camera are in fact okay.
Other times you might think that the overexposed parts aren’t “that overexposed” and you can regain the lost detail in post production, but the overexposed highlights might be too blown out. This is why it’s so important to really know your camera.
You can also see overexposed areas in Lightroom when you select “show highlight clipping” in the histogram panel. The overexposed areas show as red.

Something to watch out for with overexposure and recovering details in post production is that if you push recovery of highlights too far, it leads to posterization. You can see it when the transition between tones is not smooth and it’s obvious that it’s been adjusted in post production.
Highlights that are too overexposed will look white or gray when you try to recover them (as you can see in the purple t-shirt below).
Here’s a perfect example of posterization and an image too overexposed to save in post production. I took this shot before I realised that I’d forgotten to reset my exposure compensation back to zero at the end of a previous shoot.


The photo above has been adjusted unsuccessfully in Lightroom. Below you can see the original image.


How to fix overexposed photos in Lightroom
The great thing about shooting in RAW is that you can regain a lot of detail in post production, as long as you haven’t overexposed photos too much, like the example above.
In Lightroom you can easily fix overexposure that isn’t blown out using the sliders in the basic panel and/or the tone curve tool.
To reduce the global exposure on an image, just drag the exposure slider in the basic panel to the left until:
- you feel the exposure is correct, or
- if you prefer, until the data in the Lightroom histogram is no longer touching the right edge, indicating that the highlights are no longer clipping, or
- with highlight clipping selected, until the red areas go
To reduce just the highlights, without reducing the overall exposure of the image, drag these sliders to the left:
- Highlights
- Whites
In the tone curve panel, recover overexposed areas by dragging the line down or these sliders to the left:
- Highlights
- Lights
Underexposure in photos
On the other hand, underexposure is when the exposure is so dark that the camera’s sensor doesn’t record any detail in the darkest parts of the image, so they’re completely black.
In Lightroom, you can select “show shadow clipping” in the histogram panel and the underexposed areas will show as blue.
Underexposure doesn’t have to be extreme at all. Just a small amount of underexposure could preserve highlights that might otherwise be blown out.
For example, underexpose in camera by as little as -0.3 and then, in post production, increase the exposure by +0.3 to bring the exposure back up to an accurate exposure.
Fixing underexposed photos in Lightroom
As with an overexposed image, for an underexposed image, increase the global exposure until:
- you feel the exposure is correct, or
- the data in the histogram is no longer touching the left edge, indicating that the shadows are no longer clipping, or
- with shadow clipping selected, until the blue areas go
In the basic panel, just drag the exposure slider to the right to lighten an image globally.
To lighten just the shadows, without affecting the highlights, drag these sliders to the right:
- Shadows
- Blacks
You can also do this in the tone curve panel by either dragging the line up or these sliders to the right:
- Darks
- Shadows
Just remember, as with overexposure, if the image is too underexposed, no amount of lightening it will bring back detail that wasn’t captured.
And another thing… You need to watch out when lightening shadows, as digital noise becomes more obvious. As with overexposure, posterization can appear in underexposed areas that have been pushed too far.
How to get a balanced exposure in camera
If at all possible, I highly recommend using some form of fill light to lift shadows on your subject. This will help to balance the exposure of your subject with the background so that you don’t have any underexposed or overexposed areas. You can do this with:
- A handheld reflector, or any reflective surface
- Flash – preferably off camera flash

I used off camera flash to light the subject so that the exposure balanced with the background exposure.
With landscapes of course it’s different. Here, you would use a neutral density filter fixed to the front of the lens to bring down the bright areas and so avoid overexposure of the image.
Then there are the times when you don’t have a choice. If this is the case, exposing the subject correctly is the priority, one way or another.
Using Exposure To The Right – ETTR
Another way to ensure that a photo is not overexposed or underexposed is to use a technique known as exposing to the right (ETTR) when setting your exposure in camera. Exposing to the right refers to the histogram graph on your camera pushing up to (but not touching) the right edge of the histogram. The highlight side.
The idea behind exposing to the right is that you capture as much detail as possible, because in digital photography it’s easier to regain details hidden in the shadows than details lost in the highlights.
Not all cameras handle ETTR well
Some camera sensors are able to capture a greater dynamic range than others.
Full frame cameras capture more detail than crop frame cameras, which is one of the reasons why wedding photographers favor full frame over crop cameras. Two words are enough to explain why: dark venues.
Added to that, if you’re using a Sony or a Nikon, especially an advanced one, you’ll be able to recover shadow details far better than if you’re using a Canon, for example, or another brand. This is because Sony and Nikon have a better dynamic range.
With other cameras if you have to brighten the shadows in post by any significant amount, the color will be off in the shadows when you recover it in post and digital noise can be an issue. So it’s best to do your best to avoid noise at the time of capture.
But getting back to underexposure with exposing to the right…
So you retain details in the highlights, which is important for a technically accurate exposure. Then in post production you can keep the highlights as captured and darken the shadows, increasing the dynamic range of the image.
So this would seem to be a great solution. Just expose to the right, adjust in post and you’re good to go.
Not so fast!
Disadvantages of ETTR
- With ETTR, if you overexpose by just one stop, you’ve lost 50% of the details in an image…even if it’s not immediately obvious
- The problem with exposing to the right is that you have to be careful not to go too far and accidentally overexpose images
- If the graph touches the right side of the histogram, you’ve gone too far and have started to lose details in the highlights
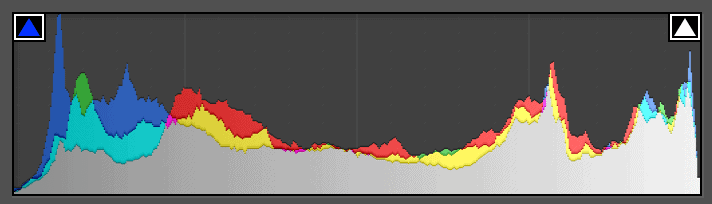
- Also, bear in mind that exposing to the right does not mean that your image is “technically” well exposed, the midtones and shadows in the image could still be underexposed, as in the photo on the left below
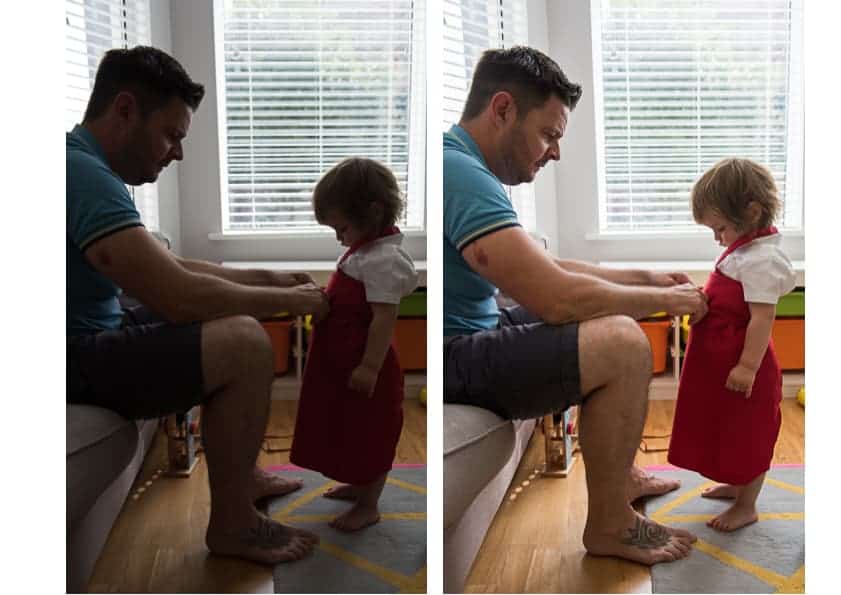
In the image on the right only the shadows have been increased in post production, so the highlights are the same. The histogram below shows the adjusted, balanced exposure.
Before we move, on…
- If you’re photographing a landscape or architecture, or anything that’s not moving about, you can check the histogram after each shot if you want. Portrait photography of an adult would also be fine as you can rely on them not moving from the spot you’ve chosen and metered for. Children, animals and people at any event, however, are another story and would make it very difficult to use ETTR as a technique.
Using Exposure To The Left – ETTL
On the other side of the coin is ETTL. Some photographers underexpose their images intentionally using exposure to the left. They’re underexposing images to then adjust the exposure in post production and lighten the shadows.
The expression, exposing to the left, refers to the histogram image in camera. The graph is bunched to the left, the shadow side of the histogram.
A good example of this style of photography is Dani Diamond. He’s well known for his style of photography and has perfected his post production workflow over time. What took him a very long time to do initially, now takes him very little time. Everything about his photography is designed with this workflow in mind, including:
- location
- time of day
- subject position
- what colors the subject is wearing in relation to the background
- exposure settings
- and then processing
So every one of his photos is technically underexposed in camera, but the final image appears “correctly exposed”.
Whether you like this style of photography or not, I’d say that his in camera images are correctly exposed for his style.
Disadvantages of ETTL
- The danger of exposing to the left is that when lightening the shadows in post production, you run the risk of noise becoming obvious in the underexposed shadows
- If the graph touches the left side of the histogram, you’ve gone too far and have started to lose details in the shadow
What ETTL and ETTR have in common
- As the whole scene is considered with both ETTL and ETTR, you need to use matrix or evaluative metering
- You need to do a test shot then analyse the histogram to see if any adjustments need to be made
- The image in camera is technically not correctly exposed
- You need to rely heavily on the camera’s histogram (which isn’t accurate), which slows down a shoot
- However, you can’t rely on the image on your LCD screen, because that’s a JPEG. What you see on the back of your camera is not what you’ll see when you import a RAW file into Lightroom, for example. Or any other post production software you might use
- With both styles the photographer is “shooting to edit”. It’s not about getting the final image right in camera as this is done in post production
Personal style influence on exposure
How you choose to photograph a scene depends entirely on you as the creative. The key is to do so intentionally, knowing what result you’re going for and how you intend to process the image. Or to work towards being able to to do so consistently, whether you choose:
- overexposure
- underexposure
- or balanced exposure
Where I stand on overexposure and underexposure
For me it very much depends on what I’m photographing, even though I tend to like a well balanced exposure. Also, as I’ve mentioned before, I don’t like spending any extra time on the computer than is absolutely necessary.
I love blue skies, but there’ve been times that I’ve had to blow out the sky, because it came down to a choice of capturing the moment with an overexposed sky or missing the moment completely.
When photographing outdoors I prefer to use off camera flash to light my subject/s and balance them with the background. This way both subject and background are accurately exposed with no overexposure or blown out highlights.
However, I’m not about to drag my lighting out on a family walk or even a family shoot for a client. It spoils spontaneity and fun. Besides, try tell a 5 year old not to run in that direction, because the light doesn’t work. That’s exactly where they’re going to go.
Instead, I plan for the best case scenario by choosing photography locations carefully. It’s far from a perfect science though when pets and little ones are involved.
For all other photography, especially commercial, flash is very much a part of my kit.

I like high contrast lighting for dramatic boudoir and maternity photography. I love deep shadows, especially for maternity and boudoir, as the shadows both hide areas of the body and accentuate curves. But, I don’t want blown highlights. This is why I enjoy studio lighting so much – you have complete control over the exposure.
For a soft, romantic style my lighting is lower in contrast. The transition between shadow and highlight is less extreme and the shadows are much lighter.
I also intentionally blow out highlights if I’m photographing my subject against a window (with net curtains) as I don’t want to record the details outside, and I like the look.

Leave a comment
If you have any questions about overexposure and underexposure in photography, let us know in the comments.
Also, I love good news, so if my photography exposure tips have helped you to understand overexposure and underexposure, share that too.
Love your tutorials. They really are the best out there. How come you are not on You Tube?
Hi Simona
Thank you so much! Time is my biggest issue for developing a YT channel. I’ve actually recorded several videos for YouTube, but just have to edit them and get them up there. I’m cutting back on client shoots so that from the new year I’ll have time for YouTube. So keep checking in and make sure you’ve subscribed to my newsletter so that you know as soon as I upload videos to YouTube!