What are shooting modes?
Shooting modes are camera settings that you select for the look of an image depending on subject matter, light, if your subject is moving or still and if you want a sharp or blurry background.
All digital cameras have the following shooting modes:
- Program mode (P or Ps)
- Shutter priority mode (S or Tv)
- Aperture priority mode (A or Av)
- Manual mode (M)
Entry level cameras have additional shooting modes to choose from.
These are scene modes, and with these the camera selects the best shutter speed and aperture. Sometimes it automatically activates the flash as well. They’re camera setting presets for certain types of photographs, so are a handy shortcut for beginner photographers.
Scene modes include:
- Portrait mode
- Landscape mode
- Sports mode
- Macro mode
- Night portrait mode
- Flash off mode
- Beach or Snow mode
- Child mode
We’ll get into how and when to use each of the scene modes in more detail in a moment.
You’ll also notice Auto mode is available on entry level cameras, but I strongly advise against using this shooting. I’ll explain that too in a moment.
Some digital cameras can record video, which you also select with the shooting mode dial.

How do you select a shooting mode?
To set the shooting mode simply turn the mode dial to the one you want.
Once you’ve decided on what’s most important for a particular photo, set the best shooting mode to use to capture the image.
Why are there so many shooting modes to choose from?
Scene modes are ideal for when you first pick up a camera and you don’t know how the exposure settings works. It’s a way to just get started rather than being stuck in overwhelm.
The more advanced modes, such as program mode, aperture priority, shutter priority and manual mode each have a purpose and an ideal time to use them. We’ll look at these after scene modes.
Auto mode is exactly that – it does everything, just like a compact camera. But it’s not reliable for getting the results you want, so rather use any other shooting mode and leave auto alone.
Scene modes in detail
As I said, scene modes are programmed camera settings designed to use the best exposure settings for the type of scene you want to photograph. All you have to do is tell the camera what you’re photographing by selecting the relevant icon.
Here’s a quick run down of each scene mode:
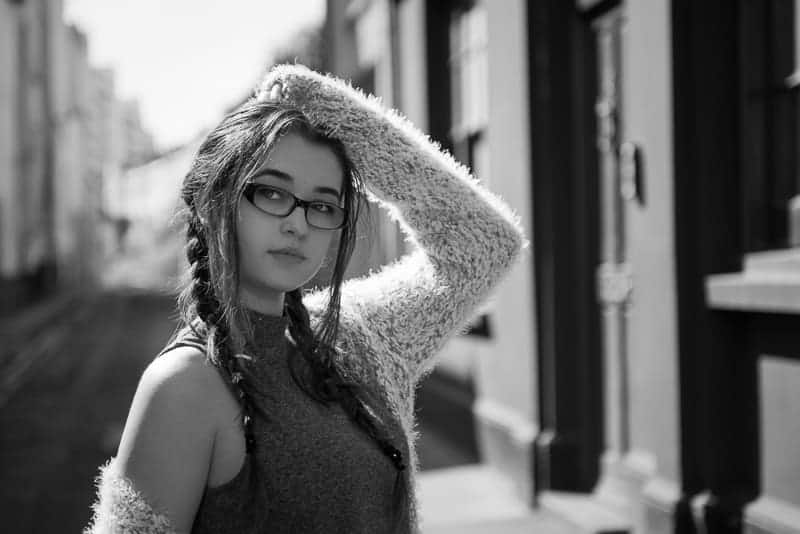
1. Portrait mode

Sets a wide aperture for a shallow depth of field so that you can have the person in sharp focus with a blurry background.
In portrait mode your camera assumes you’re photographing one or two people, not a group. It also assumes that you’re taking a head and shoulders shot, rather than a full length photo from further away.
Sometimes, when the camera senses that it’s dark, it automatically activates the flash to fill in the shadows.
When to use portrait mode
Use for portraits with soft, natural-looking skin tones. If the subject is far from the background or you use a telephoto lens, background details will be blurred to create a sense of depth in the image.
2. Landscape mode

Sets a small aperture for deep depth of field and ensures flash and AF-assist illuminator is off.
Landscape mode is good in daylight. If the light is low or it’s dark, use a tripod as the shutter speed will be too slow to hand hold the camera, and camera shake will blur your photo.
In landscape mode the aperture will be small (high f-number) for a deep depth of field (front to back sharpness). This means that both the foreground of the photo and the background will be in focus.
When to use landscape mode
The most obvious use of landscape mode is of course for photographing landscapes. However, because the camera settings create deep depth of field, it’s also useful for photographing groups of people.
3. Sports mode

Sets a fast shutter speed to freeze action.
The built-in flash and AF-assist illuminator turn off.
In sports mode your camera automatically uses a high shutter speed of at least 1/500 – 1/1000 of a second to freeze movement so that the subject is in sharp focus.
When using sports mode, it’s also a good idea to shoot in continuous shooting mode.
When to use sports mode
Sports mode isn’t just for sports. It’s ideal for using with any fast moving subject, like young children and pets.
4. Macro mode

Sets a wide aperture for shallow depth of field to blur the background.
Macro mode is great for close-up shots of subjects smaller than your hand, such as flowers and insects. You need to get really close to your subject, so you’ll need a macro lens that can focus at really short distances. If your lens isn’t a macro lens and it’s struggling to focus, it’s because you’re too close.
When using macro mode make sure to photograph in good light.
Also, remember when photographing up close to pay attention to your focusing. The advantage of photographing just inches from your subject is that you can capture all the tiny details that you wouldn’t see from a few feet away. However, it’s also more obvious when an image is out of focus.
5. Night portrait mode

Sets a slow shutter speed so that lights in the background is visible in shot, but also fires the flash so the subject is clearly exposed.
Night portrait mode tries to strike a balance between exposing for the dark background, as well as the focal point of the photo (the subject).
In this shooting mode the shutter stays open a little longer than usual before the flash fires. This makes it possible to capture some of the background as well, because the longer the shutter is open, the more light can be recorded.
You might need a tripod, depending on how dark it is.
When to use night portrait mode
Because your camera can’t see as well as you can in low light, the scene might not appear all that dark to you, but to your camera it is. So night portrait mode isn’t just for night time portraits. You’ll also find it useful photographing in, for example, a dark forest on an overcast day.
6. Flash off mode

This is the same as auto mode, but with the flash disabled.
7. Beach Mode and Snow Mode

Camera sets a brighter exposure knowing you want a bright scene.
Some cameras also have beach and snow modes, but not all. A beach scene and a snow scene are similar as far as the camera is concerned, because they’re both very bright white scenes.
A snowy environment and a sandy beach can confuse the camera’s metering system and result in under exposed images. This happens, because the camera thinks the very bright tones should be less bright. It wants to make bright white tones gray, also referred to as medium gray.
By setting beach or snow mode, you’re telling the camera that the very bright areas are actually bright and that it’s okay to capture it like that. It’s the same as using exposure compensation in the more advanced modes.
8. Child mode

Sets a fast shutter speed to freeze action and a wider aperture for blurry background.
Not all cameras have the child mode setting, which is ideal for capturing moving subjects.
When to use child mode
Child mode is useful for snapshots of busy children and pets, because of the fast shutter speed and wide aperture.
Focus and scene modes – an important note
Many beginner photographers get confused by the difference between metering and focus camera settings. It’s important to remember that scene modes don’t automatically focus your camera as well.
Regardless of what shooting mode you use – a scene mode, auto mode, one of the semi- automatic modes or manual mode – you still need to focus on your subject to take the shot.
In P, S, A and M modes you can choose the type of autofocusing you want to use. In the other modes the camera has more control over autofocus settings. You nevertheless still have to focus separately from metering the exposure.
What shooting modes should you use?
I haven’t included auto mode, as it’s the least useful shooting mode to use for a DSLR. Using auto mode works the same as a simple point and shoot camera – it does everything, including deciding on whether to use flash or not.
You’d think that would be a great way of getting sharp, well exposed photos, but you’d be wrong. The camera doesn’t know what it’s photographing. It only thinks in terms of accurate exposure and sometimes even that gets confused.
Although the functions are the same across all brands, the shooting mode labels vary according to camera make:
- Nikon’s shooting modes are P, A, S and M
- Canon’s shooting modes are Ps, Av, Tv, and M.
To understand when and how to use what shooting mode, we must first understand the advantages of each.

Shooting modes – the more advanced ones
1. Program (P or Ps) mode
In program mode the camera decides on your aperture and shutter speed settings.
Although program mode is an improvement on auto mode in that it doesn’t automatically use flash or change ISO, I wouldn’t advise using it. When you rely on your camera to decide on the exposure, you’ll never learn how to photograph in difficult lighting conditions, or how to create a particular effect.
Plus, sometimes you might need a fast shutter speed, but the camera doesn’t know that. It only knows how to create an accurate exposure, so it might use a shutter speed that’s too slow for your needs.
In program mode the camera sets the best handheld option for the lighting conditions, so ensures that the shutter speed isn’t too low. That means that it might set a wider aperture than you want to use.
If you want to know how to consistently take great photographs, you have to take control of your camera.
However, if you’re not comfortable with taking control, choose program rather than auto.
2. Aperture priority (A or Av) mode
Aperture priority mode is the next most popular shooting mode after program mode for beginners. It’s also the most popular choice for portrait photographers who don’t want to shoot in manual mode.
With aperture priority you prioritise aperture as the most important exposure setting. You set the aperture of the lens and the camera will select the correct shutter speed for an accurate exposure.
Aperture priority gives you creative control over the depth of field for a sharp or blurry background when you change the f-stops up or down. It then sets an appropriate shutter speed for a correctly exposed image (but can get confused).
An aperture of f2.8 will have a shallow depth of field and a blurred background, while f22 will have a deep depth of field with more front to back sharpness.
Just remember to keep an eye on the shutter speed your camera sets to make sure that it isn’t too slow for your needs. Your camera doesn’t know if you’re handholding it, or have it fixed to a tripod, so it could set a shutter speed that’s too slow to avoid camera shake in photos.
Alternatively, you might be photographing fast moving subjects, but the camera doesn’t know that. So the shutter speed might be too slow to freeze subject movement. In both instances you’ll end up with a blurry image.
 Camera settings: aperture f2.8, shutter speed 1/640, ISO 200
4. Shutter priority (S or Tv) mode
When using shutter priority mode you set the shutter speed and the camera sets the aperture for a correct exposure.
Why use shutter priority mode?
- Freeze action with a fast shutter speed
- Show movement blur with a slow shutter speed
- Set a slow shutter speed for a long exposure to capture a very dark scene
When shooting in shutter priority, be aware that the camera doesn’t take into account the maximum f-stop of your lens. So, if you’re not aware of what’s happening with the change in aperture, you could get an underexposed image.
This would happen if you set the shutter speed too fast for the maximum aperture to allow enough light in for a correctly exposed image. The camera can only go to the maximum (or minimum) f-stop of your lens. If you set a shutter speed that requires an aperture beyond that, your photo won’t be correctly exposed.
 Camera settings: aperture f5.6, shutter speed 1/1000 , ISO 200
5. Manual (M) mode
Manual mode beats all the other shooting modes for putting you in creative control of your camera and the end result of the shot.
You may wish to slow down the shutter speed or widen the depth of field from one shot to the next to get variety from the scene in the shortest amount of time. If you’re shooting in manual mode, this is easily done.
By looking at the exposure indicator you can read the correct exposure determined by the camera’s exposure metering system. It’s then up to you to adjust the shutter speed and set aperture for the look you want.
Manual mode isn’t always best
While manual mode gives you complete control over your camera and the outcome of your image, sometimes the situation determines the best shooting mode to use.
So I’m going to contradict myself about manual mode, because sometimes ease of use and the ability to get the shot done quickly, with the correct exposure, is most important.
In a fast moving situation, such as the confetti toss at a wedding, where you don’t have the time to keep an eye on the exposure indicator, as well as adjust the aperture or shutter speed accordingly, aperture priority mode can be helpful.
If you’re photographing cyclists for example, and the light keeps changing, because of clouds passing in front of the sun, it could be better to use shutter priority mode.
As long as you know that the aperture will change within acceptable limits for your needs, you can then concentrate on the action. By not having to constantly adjust your aperture and shutter speed for the changing light conditions you won’t miss a shot.
Photography is all about options
That’s the great thing about modern cameras is that we have options. Lots of options! So put yourself in a position to be able to use all those options and learn how to use all the shooting modes.
Once you’ve tried program mode and scene modes and you’ve got a bit more comfortable with your photography, I strongly recommend moving on to either shutter priority or aperture priority. Or jump in at the deep end and give manual mode a go.
If you rely on the automated settings you’ll never learn how to control your camera. It’s tempting at first to take the easy route, but it’s so much better to persevere and learn your exposure settings. You’ll be thankful that you did.
Leave a comment
If you have any questions about what shooting modes to use, let us know in the comments.
Also, I love good news, so if my shooting modes tips have helped you to understand how to use the scene modes and more advanced shooting modes, share that too.
This has helped my understanding of the shooting modes, very clear and precise instructions make it easy to take it all in.
Thank you,
Barry
That’s great to hear, thanks Barry!
Can you use auto focus when using manual mode?
Thank you.
Yes, absolutely. Manual mode is a shooting mode where you set aperture, shutter speed and ISO manually, although you can use auto ISO in manual mode. It’s completely separate from setting focus. Your focus options are autofocus or manual focus and are adjusted with different controls on the camera and sometimes also on the lens.