Shutter speed and exposure
Shutter speed is an essential part of exposure and forms one of the three elements of the exposure triangle. To capture a well exposed photo, it’s important to strike the correct balance between these elements.
Apart from being essential to exposure, you can use shutter speed for creative photography. But first, you need to understand how shutter speed and exposure works. So we’ll look at:
- What’s a shutter?
- Shutter speed and exposure
- What’s a fast shutter speed?
- What’s a slow shutter speed?
- How shutter speed fits into the exposure triangle
- An example of using shutter speed in manual mode
- What’s shutter priority?
What is a shutter?
The shutter on your camera works like curtains, or blinds, on a window.
When you open the curtains light passes in and when you close them again, the light is prevented from entering. To take a photo you need light to hit the sensor of the camera, so the image is created while the shutter is open and letting light in. So it makes sense that the longer the shutter is open, the longer the sensor will be exposed to light.
The button you press to take a photo is called the shutter, or shutter button, as it sets in motion the action of opening the camera’s shutter and then shutting it.
What is shutter speed and exposure?
Another term for shutter speed is exposure time. When you set the shutter speed on your camera, you’re controlling how long the sensor is exposed to the light you’re allowing into the lens.
Shutter speed, or exposure time, is measured in seconds – either whole seconds or parts of seconds. So for example, you could set your exposure for 60 seconds or 1/60th of a second.
When we talk about:
- 1/60th of a second (you’d say one sixtieth), on your camera you’ll see it as 60
- 125 on your camera is 1/125th of a second (you’d say one one-twenty-fifth)
Different DSLR camera makes have different layouts, but you’ll always see shutter speed information in the settings display somewhere, as you can see on the two different cameras below.
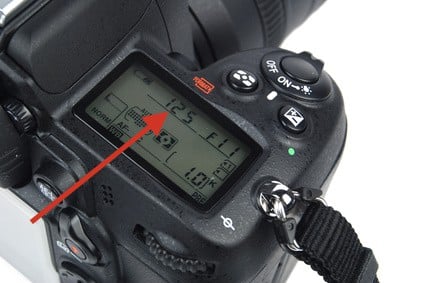
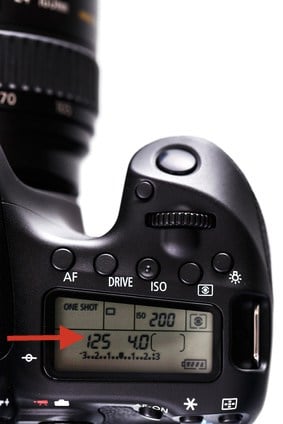
When you shoot at shutter speeds of a second or more, you’ll see the number followed by the “ symbol. In other words, when you see:
- 1” indicates a shutter speed of one second
- 15” is fifteen seconds
- 60″ is sixty seconds
Obviously there’s a big difference between 1/60th of one second and 60 whole seconds. So, the next thing to ask is what difference does that make to the exposure?
To answer this we must first look at what’s a fast shutter speed and what’s a slow shutter speed.
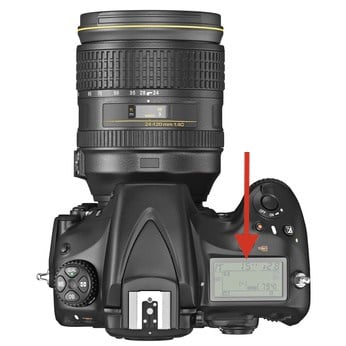
The ” following 15 indicates that the shutter speed is 15 seconds.
What is a fast shutter speed?
When we talk about fast and slow shutter speeds we’re referring to how long the shutter is open.
I consider a slow shutter speed to be anything below 1/60th and I personally consider a fast shutter speed to be anything above 1/300th.
This is because I’m a portrait photographer and when I photograph children, I shoot at 1/250th to 1/400th. They move a lot and fast, so to avoid recording their movement as a blur, I don’t want the shutter to be open for too long.
For adults, or anyone not running around, I use a slower shutter speed of about 1/125.
A motorsport photographer would consider 1/250th slow, because racing cars are a lot faster than children. So, the exact speed is not definite.
The important thing to remember is that the whole time you have the shutter open, your camera is recording. If something moves in that time, it becomes a blur. If you didn’t want a blur, then the shutter speed was too slow.
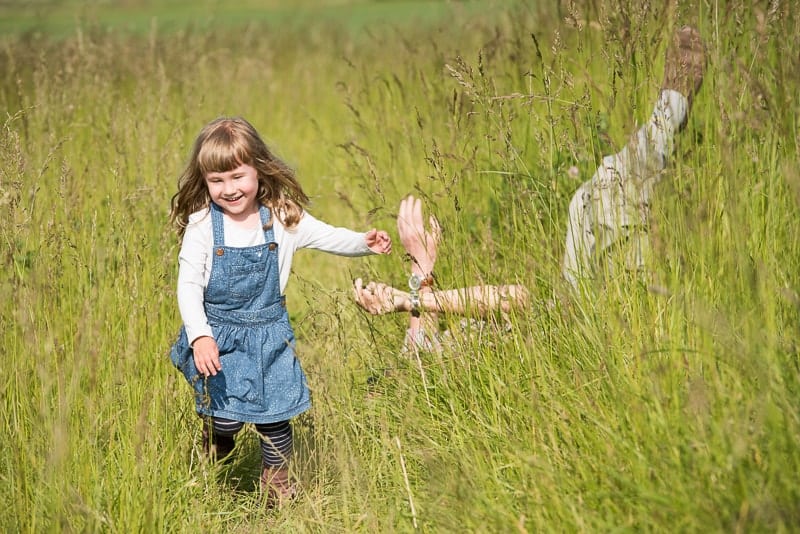
Here’s an example of shutter speed being too slow.
This little boy was having a great time running away and then running back to me. He stopped when he reached me and quickly lifted his hands as I took the shot. As you can see, his hands, particularly the left one, look like a smudge. The shutter was set to 200 (1/200th of a second) so the shutter was open too long to freeze the movement and resulted in motion blur of his hand.

If there’s movement in a photograph, you need a fast shutter speed to freeze the action and prevent motion blur. The faster the movement, the faster the shutter speed needs to be.
Further reading:
What is a slow shutter speed?
On the other side of that, is slow shutter speed. You’d use slower shutter speeds in low light conditions, so that the sensor is exposed for longer to make up for the lack of light entering the lens to create an image.
Alternatively, you might want to purposely capture movement as a blur, for example, if you want a blurry waterfall or milky smooth sea. In which case, slower shutter speeds are essential.
How slow you go depends on what you’re photographing.
Setting shutter speed to avoid camera shake
I can’t handhold a camera at speeds lower than 1/60th without camera shake affecting the sharpness of the image. In reality I don’t handhold at less than 1/80th.
In other words, for anything below 1/80th I need a tripod or something to rest my camera on.
Further reading: Why are my pictures blurry? 5 ways to avoid blurry photos
Many photographers can shoot safely at 1/60th and still get sharp photos, but most of the time I can’t. I have weak wrists and the strain of holding my camera with my favourite lens (70-200mm f2.8) makes my hands start to shake. Because of the length of time the shutter is open, this movement shows up in the photograph and slightly blurs image. I can’t settle for an image that’s not perfectly sharp.
There are other factors that impact camera shake and influence the shutter speed decision, such as the focal length that you’re using. I won’t get into the details here, but the rule of thumb is that if your focal length is for example 200, your shutter speed should be at least 1/200th.
Further reading: What is focal length and how to use it in photography
So, to prevent camera shake, a faster shutter speed or a tripod is needed.
How shutter speed fits into the exposure triangle
Now that you know what shutter speed does to either prevent movement or capture movement, let’s see how it impacts the exposure of a photo.
In other words, how shutter speed affects how bright, or dark a photo is.
Taking a great photograph starts with deciding what you want as an end result. In order to achieve that result consistently (i.e. on purpose, every time, and not by some lucky accident), you have to know how the exposure triangle works. Once you know this, you can control the exposure.
Exposure is controlled using the exposure triangle and it’s made up of three elements:
Each one of these elements affects the exposure, how bright or dark your photo will be. However, they each have other factors that they control and it’s these other factors that influence your decision most.

Every time you take a photograph you decide on your priority (shutter speed, aperture or ISO) and the order of your priorities.
- Shutter speed – movement
- Aperture – depth of field (background blur)
- ISO – noise (graininess in the image)
Juggling the three elements to suit what you’re photographing is what the exposure triangle is all about.
Further reading:
Exposure Triangle – what is it and how does it work?
An example of shutter speed in manual mode
To put the role of shutter speed in the exposure triangle into context, here’s a made up situation:
Today is a cloudy day and you want to photograph two young kids playing.
Let’s break it down…
- Remember kids always move, so you have to shoot at 1/250th at least
- You’ve set your ISO to 200, because you don’t want noise
- Your camera says then if that is the case, today, at this time, with the clouds overhead, you have to shoot at an aperture of f4 to achieve a correctly exposed image. There’s less light than normal on a cloudy day
If you’re photographing one of the kids on his own and you’re happy with f4… well, you can go ahead and start shooting.
Juggling the elements of the exposure triangle
BUT you want to photograph the kids together, positioned slightly one behind the other (i.e. not on the same focal plane). For this, f4 is not going to work for you. You might need f8 to ensure that they are both sharp.
BUT if you shoot at f8, your image will be underexposed by two stops (f8 is two stops less light than f4). What are you going to do? Where are you going to find those two stops?
You have only one option – increase your ISO two stops from 200 to 800. Why?
- You have to have f8 and a minimum of 1/250 shutter speed, so you can’t change it
- But the shot will be two stops underexposed
- So, you up the ISO by two stops for a correct exposure
See how the subject and the light dictated what you needed to do? The exposure triangle is give and take and you decided what was important:
- No motion blur (shutter speed) and
- everybody sharp, even though they’re not exactly next to each other, (aperture)
The light had the final word and said, “Well, okay you can have those two things, but then you have to change your ISO”.
In summary, for today’s pretend shoot you decided:
- Shutter speed was your priority – it had to be at least 1/250th, so there was no wiggle room for change there
- Aperture was next important – it had to be at least f8, which is two stops down from f4
- ISO was the least important, so ISO had to be the one to change – it had to go up by two stops from 200 to 800
But you don’t have to shoot in manual mode to make shutter speed your priority in the exposure triangle. An easier way for new photographers is to use shutter priority.
You’re the boss of your camera, but the light is the boss of the shoot
What is shutter priority mode?
Sometimes there’s so much going on in a shoot that you don’t have the time to change shutter speed and aperture constantly. Or maybe you’re still learning the ropes and want to concentrate on changing just one thing, like shutter speed.
To make your life easier you can use shutter priority mode. This gives you a little more time to concentrate on the shoot itself.
When you set shutter priority on your camera, you’re telling your camera that the shutter speed you’ve set is the most important part of the exposure triangle for the shot. So, once you’ve set your ISO, your camera is left to decide on the aperture (f-stop) that’s needed to achieve a well exposed image with the settings you’ve selected.
That doesn’t mean that you can say “Well that’s it, I need to shoot at 1/250th, so, camera, you’re just going to have to make that happen.” The ultimate boss is the light and your decisions are going to be determined by:
- The quality of the light
- Your subject
- The look you want to create
Further reading:
How to set shutter priority mode
The exact method for setting shutter priority mode on your camera depends on your camera make and model. Even the name differs between brands:
- On a Nikon, Sony or Olympus you’d select “S”
- On a Canon or a Pentax you’d select “Tv”, which stands for “time value”
Leave a comment
If you’re struggling with shutter speed and exposure, you can be sure that many others are struggling too, so please share it below and we’ll give you some help.
If this article has helped you to understand shutter speed and exposure in photography, share that too – I love good news!
Thanks – Enjoyed this blog post, can I set it up so I receive an update sent in an email when you publish a fresh post?
Hi Gale. Thanks for your comment. Yes, you can receive our weekly bulletin of helpful photography tips and advice. Just fill in your name and email address in the sign up box at the top of this page or at the top of the Tutorials page.
Great tips! One of the easiest to understand I’ve seen. Thanks!
Thanks, Rachel! That’s really great to hear.
Keep working, wonderful job! Exactly the info I had to know.
What a totally amazing website. You’ve got something special going on here!
That’s great to hear – thank you!
One of the best blog
These are great tips about shutter speed!
This is really amazing !