What is exposure compensation?
This is where you get to tell your camera that you know better to avoid underexposed or overexposed photos. Exposure compensation alters the exposure value selected by the camera in situations where its metering is fooled by conditions.
In other words, exposure compensation makes the exposure either brighter or darker, because you said so.
- What this means is that when photographing in snow (a very bright scene), the camera will naturally underexpose the image. This is because it thinks that the bright snow is a midtone that’s too bright, so it wants to underexpose it.
- For a dark scene, the opposite is true – such as when photographing a black labrador against a dark background. Your camera thinks there’s not enough light, so it tries to overexpose the scene.
How to use exposure compensation in a nutshell:
+ to expose the image brighter,
– to expose the image darker.

2 things you need to know about exposure before we can get into how and when to use exposure compensation:
- What is exposure – the exposure triangle
- How to measure exposure – exposure value (EV)
1. What is exposure – the exposure triangle
The exposure triangle is a way of explaining the relationship between aperture, shutter speed and ISO.
These three elements of the exposure triangle each contribute to the exposure of an image. I think of them as three inseparable friends that go everywhere together, taking it in turns to be in the lead.
When you adjust one of the elements of the exposure triangle, the other two need to compensate for the change.
So, let’s say your ISO is 100 and you set an aperture of f5.6 and a shutter speed of 1/125.
You would have the same exposure of the same scene if you kept your ISO at 100 and instead set the aperture to f2.8 (2 stops wider = more light) and the shutter speed to 1/500 (2 stops faster = less light).
Why?
- The aperture moved by two stops, from f5.6 (less light) to f2.8 (more light).
- So the shutter speed had to move by two stops in the opposite direction, from 1/125 (not so fast, therefore more light) to 1/500 (faster, therefore less light) to maintain the same correct exposure value (more on this below).
Less light/slower shutter speed vs more light/faster shutter speed.
Although correctly exposed, the image will appear different. With the second settings you’ll have a smaller depth of field to blur the background and a faster shutter speed to freeze movement (depending on how fast the subject is moving).
You could also have adjusted the ISO, instead of the aperture or shutter speed.
2. How to measure exposure – exposure value (EV)?
We talk about adjusting aperture, shutter speed and ISO in stops.
The brightness of a scene is represented by the EV (Exposure Value) in a numeric scale measured in stops from 1 (really dark) to 18 (really bright). EV numbers, therefore, express the brightness of a scene in a scale that combines shutter speed and aperture for a particular ISO setting into one number.
Each EV number represents one stop of brightness and we talk about adjusting the EV by a stop. So EV 4, for example, is one stop brighter than EV 3.
In practice what this means is that you adjust the elements of the exposure triangle (aperture, shutter speed and ISO) to correctly expose the image for that particular scene’s exposure value.
It’s like watching TV and adjusting the volume up and down.
Chances are you probably know the volume that you usually have the TV set to. Sometimes the actors might be whispering and you can’t hear, so you adjust the volume up. Maybe it’s a battle scene and is really loud, so you turn the volume down a bit.
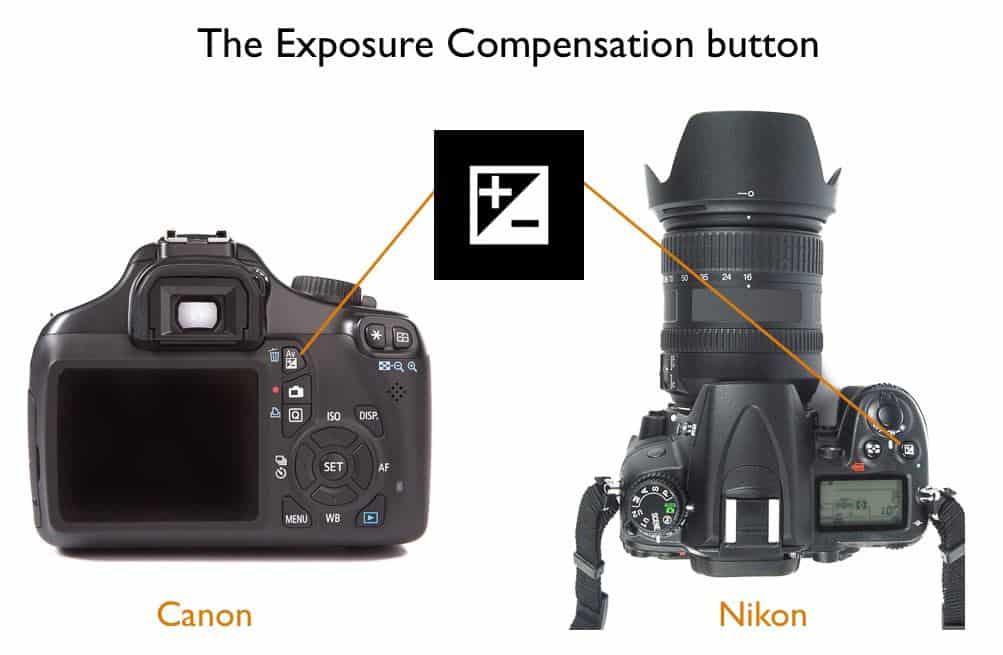
How to set exposure compensation
On some digital cameras exposure compensation is set with a separate button, on others the button might share another function. Look for the plus minus exposure compensation symbol on your camera.
- Nikon – set exposure compensation by depressing the button and turning the command dial
- Canon – depress the exposure compensation button and turn the main dial
TOP TIP 1: The exposure compensation setting doesn’t automatically cancel when you turn your camera off, so remember to reset it to zero. It can easily be overlooked!
If you review a photo on the back of your camera and wonder why the exposure looks wrong, even though it should be correctly exposed, check your exposure compensation setting before you do anything else.
Why use exposure compensation?
Exposure compensation alters the exposure value selected by the camera in situations where the camera’s metering will be fooled by conditions.
The exposure meter in your camera is programmed to average out an exposure to medium gray, also called 18% gray. If you think in terms of black and white, this measurement is half way between white and black. Average.
When your digital camera looks at a scene and measures how bright or dark it is, it wants to help you create an exposure that falls in the middle of too bright or too dark.
- On a sunny day it says okay, based on the ISO that you’ve set, we need to have a faster shutter speed, or a narrower aperture, or both, to capture this accurately.
- Or at night it says right we need take in all the light we possibly can, so let’s slow the shutter down or widen the aperture. Or both.
Your digital camera is brilliant, but it’s not as advanced as your eye. Sometimes it needs your help, which is why we have exposure compensation.

When to use exposure compensation
Unless you photograph in manual mode, there are times when you need exposure compensation. I’ll explain why you don’t need it in manual mode in a moment, but first…
Here are examples of when to use exposure compensation, because you know better than the exposure meter on your camera.
Add exposure compensation when photographing:
- In snow
- At the beach
Let’s take the first example – snow.
When photographing in snow, your camera will naturally underexpose the image as it’ll be a very bright scene. Knowing this, you set the exposure compensation to +2 or +3 EV to compensate by two or three stops so that the image is brighter.
You can also adjust exposure compensation in 1/3 or 1/2 stop increments for greater accuracy.
Decrease exposure compensation when photographing:
- A black cat on a dark background
When you photograph a black cat on a dark sofa, the camera will want to over expose the image, because the scene is dark. You know this, so you decrease your exposure compensation to -2 or -3 EV.
Further reading: Using the zone system in photography for perfect exposure

Results of my exposure compensation exercise in program mode, with camera settings
Exposure compensation exercise to try at home
I used a white piece of paper for the top row and a black table for the bottom row. It was slightly reflective so you can actually see my reflection in the first black image. Anything black would work, like a sheet of black paper or material.
- Set your camera in program mode
- Photograph from above the surface
- Then fill the frame with the white or black and take your first shot
The first square in each image is how the camera thought it should be exposed. As you can see it tried to make both the white paper and the black table gray.
- Next, adjust your exposure compensation by 1 stop. If you’re photographing the white go + (increase by a stop) and if you’re experimenting with the black go – (decrease by a stop)
- Take a shot and then adjust by another stop
- Repeat the exercise one last time and review the results

Do the different metering modes affect exposure readings?
Yes, metering modes affect exposure readings. In a nutshell.
Trick question – what do you do when photographing a subject indoors in front of a window and it’s bright outside?
- Increase the exposure compensation when using matrix metering, because it meters the entire scene and the brightness outside will fool the exposure meter.
OR
- If you use spot metering with the spot positioned on your subject, you won’t need exposure compensation, because it meters your subject only and not the entire scene. In this example the subject will be well exposed and the background will be blown out.
What if you metered a scene, adjusted your exposure settings for the correct exposure, but when you view the image on your LCD it doesn’t look right?
- Check which metering mode you used. It might be that, for example, you used matrix metering instead of spot metering.
- Check your exposure compensation setting in case you didn’t reset it to zero after the last photoshoot.
How does exposure compensation work in the different shooting modes?
Now you know how to adjust exposure compensation and why you might need to use it. Let’s look at how exposure compensation works in the various shooting modes. These modes are:
- Manual mode
- Aperture priority mode
- Shutter priority mode
- Program mode
- Auto mode
TOP TIP 2: If you use Program, Aperture Priority or Shutter Priority mode the exposure indicator won’t show, because you don’t need the exposure meter to tell you if the exposure is okay. The camera will decide.
UNLESS, you set your exposure compensation to anything other than 0.
In this instance it’ll show. Your camera’s exposure indicator (aka exposure meter) will show either over or under, depending on whether you set it to plus for a brighter image or minus for a darker image.
1. Exposure compensation in manual mode
Using exposure compensation in manual mode is pointless as it does nothing useful.
It’ll show in the exposure indicator (exposure meter) by however much you set the compensation.
So if you measure a bright scene and it appears to be correctly exposed in the exposure indicator…
- but you know that the camera will be fooled in that situation,
- so you set your exposure compensation to +1,
- the exposure indicator will show an underexposed reading
- so you up the exposure by one stop to bring the exposure indicator to zero
As you can see, it’s a long-winded way of going about setting exposure.
Also, if you forget that you have exposure compensation set and move onto another scene, you won’t have an accurate exposure reading and your images will be overexposed (been there, done that, scratched my head like an idiot until I figured out what was wrong).
The only exception for using exposure compensation in manual mode is when you use auto ISO. In this instance, the camera will adjust the ISO by however much you set the exposure compensation to. So, if you’ve set it to +1, the camera’s auto ISO will increase the ISO by 1 stop.
Basically, don’t use exposure compensation in manual mode.

2. Exposure compensation in aperture priority mode
When adjusting exposure compensation in aperture priority, the camera adjusts shutter speed accordingly.
If you know that the camera will underexpose the shot, adjust the exposure compensation up. As soon as you move the exposure compensation from 0, the exposure indicator shows (it wouldn’t otherwise be visible) and it indicates overexposed.
It doesn’t mean that your shot will be overexposed, only that the camera thinks it will be. There are times when you know more than the exposure meter.
One example is snow…
Snow fools digital cameras and it’ll naturally want to underexpose the scene.
Remember, the camera meter wants to expose everything at medium gray (also known as 18% gray). Snow is very white, so the meter thinks it’s too bright and tries to make it gray, instead of white.
Who wants gray snow? So you need to tell the camera to go ahead and up the exposure.
3. Exposure compensation in shutter priority mode
By the same token, if you use shutter priority mode and set your exposure compensation to -1, the exposure indicator will show that the image is underexposed by one stop.
The shutter speed stays the same, but the aperture narrows by 1 stop.
4. Exposure compensation in program mode
When you use exposure compensation in program mode the camera will adjust either the shutter speed or the aperture or both.
Like with shutter priority and aperture priority modes, if you adjust exposure compensation by -1EV (-1 stop) the exposure indicator will show that the image will be underexposed by one stop.
5. Exposure compensation in auto mode
Because in auto mode your camera makes all the decisions, you can’t use exposure compensation in auto mode.
I suggest you don’t use auto mode. It leaves far too many decisions up to your camera and, as you can see, your camera doesn’t always know best.
Rather use program mode. It’s like auto mode, but you get to make a few of the decisions, like using exposure compensation.
If you missed Parts 1 & 2 of controlling exposure…
Read Part 1 – Understanding the exposure indicator
Read Part 2 – Metering modes and how exposure metering works
Next up – how to control exposure in all shooting modes
Maybe you want a faster shutter speed or shallower depth of field?
The camera doesn’t know how to achieve creative results, it only knows how to give an accurate average exposure reading for the area that’s metered.
In the next tutorial we look at when and how to use program mode, aperture priority mode, shutter priority mode and manual mode for creative results and controlled exposure.
Part 5 – pros, cons and how to use auto ISO
Sometimes there’s so much going on that we could do with some auto help. So this tutorial is an in-depth look at the benefits and limitations of using auto ISO. Even in manual mode!
Don’t miss out
If you don’t want to miss when new photography tutorials are published, pop me your email address. You’ll receive my aperture cheatsheet instantly as a bonus and I’ll also send you helpful photography tips and tutorials every week.
Leave a comment
If you have any questions about how to use exposure compensation, let us know in the comments.
Also, I love good news, so if my photography tips have helped you to understand exposure compensation, share that too.
I have a question in the article “How and when to use exposure compensation – controlling exposure part 3”. A section of the article reads as follows:
So, let’s take the first example – snow. If you are shooting in snow, the camera will naturally underexpose the image as it will be a very bright scene. Knowing this, you set the exposure compensation to +2 or +3 EV to compensate by one or two stops so that the image is brighter.
It seems to me that the exposure is being compensated by two or three stops instead of one or two stops. Am I right or wrong?
Hi Anthony
Thanks for pointing that out. You’re right. My fault – my eyes weren’t paying attention to what my hands were typing. I’ve fixed it now.