There’s no question that Adobe Lightroom presets speed up the editing process, which is why they’re so popular with professional photographers. But what about when you don’t have a suitable preset for a series of images? If you’re used to using presets for all your Lightroom editing, you could have a problem. Unless you know how to create a preset in Lightroom!
The good news is that once you know how, it’s really easy to create your own presets and preset packs to suit your editing style and where you shoot. I photograph in lots of different locations and create presets to suit the locations. For example, I might hire an Airbnb venue for a week of boudoir shoots or I might hire a studio for a maternity shoot or photograph outdoors.
Rather than adjusting every image individually, when I start editing in Lightroom I create my own presets that suit the lighting, colors, location and vibe of the shoot. Then I apply my new presets to all relevant images from the shoot. This way it takes so much less time to process a photoshoot in my own style!
Plus, when I use that location again I’ll have relevant presets saved to use again, which not only saves time, but easily maintains a consistent look to similar photoshoots in the same location.

Lightroom Classic vs Lightroom presets
Lightroom Classic is a desktop only version of Lightroom (and offers the most comprehensive set of tools). Lightroom (previously called Lightroom CC), on the other hand, offers fewer tools, but includes a desktop version, mobile version and web version.
There’s a slightly different approach to creating presets in Lightroom Classic than there is in Lightroom. This post is about how to create presets in Lightroom Classic.
Plus, you can sync presets made in Lightroom Classic to Lightroom, but you can’t sync presets made in the Lightroom desktop version (or mobile app or web version) to Lightroom Classic. To move them to Lightroom Classic you’ll need to import presets instead.
I know – really confusing that there are different versions of Lightroom with similar names! If you’re wondering, Lightroom Classic is the version favored by professional photographers.
How do I make a preset in Lightroom for free?
Here’s you how to create a preset in Lightroom Classic for free in just three easy steps. The first preset I’m using in this step by step guide is designed around the October 2022 Lightroom Classic update using AI for processing portraits.
Don’t worry, it’s so much simpler than it sounds! The process is the same regardless of what setting the preset is for.

Step 1 – edit an image
To create a Lightroom preset from scratch you must first edit an image. Creating a preset isn’t a one click process. And while we’re on the subject, applying a preset isn’t usually a single click fix either, but we’ll get to the finer points of Lightroom presets in a moment.
- Select the image to edit to create your preset
- Click to Develop tab to open the Develop module
- Make the edits that suit your signature style. If you haven’t yet developed a style, don’t worry, just make the edits that you think the image needs
Settings not to include in a preset
Bear in mind that certain settings won’t translate well from one image to the next. As a rule of thumb, you shouldn’t include these Basic panel settings and local adjustments in a preset:
- White balance
- Exposure
- Local adjustments – healing, crop, non-adaptive masks
If you’re creating your own preset specifically for a series of similar images from one shoot taken in the same light with the same colors, that of course will be the exception.
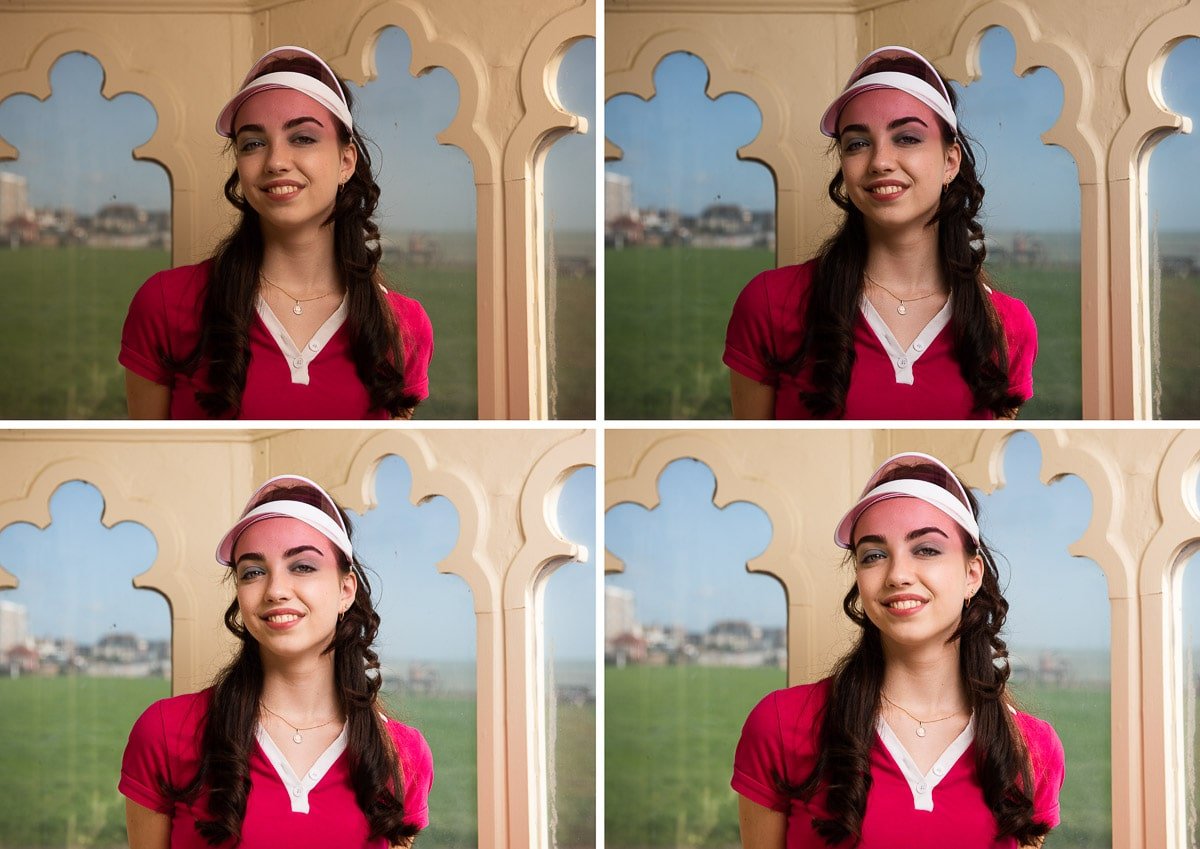
Step 2 – create preset from the edited image
Now that you’ve edited the first image you can create your preset.
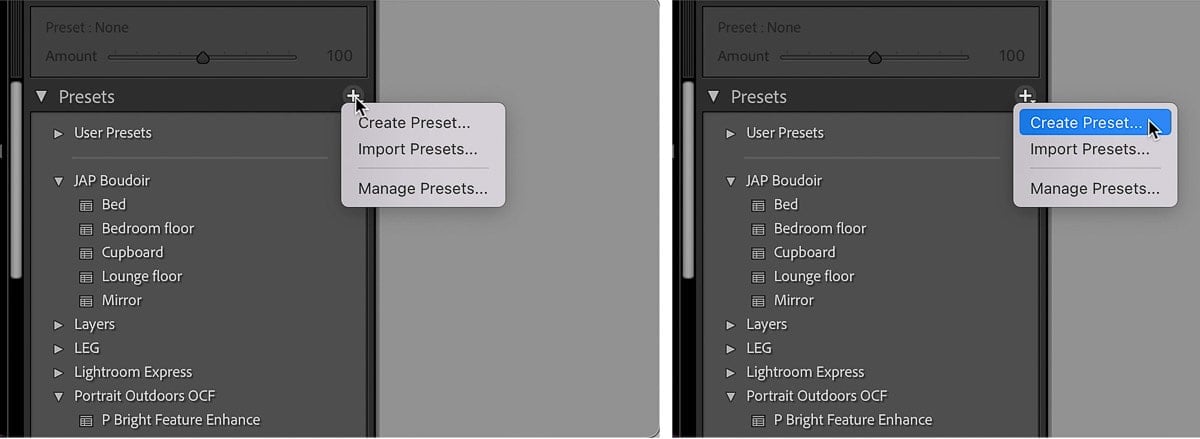
Where is create preset in Lightroom?
To create a preset, in the Develop module:
- Click on the plus sign at the top right of the presets panel on the left side of the screen
- Select “Create Preset” from the drop down menu to open the New Develop Preset dialog box

How to select and save preset attributes
You’ll see the text “Untitled Preset” in the Preset Name box at the top is automatically highlighted on opening, so you can just type in the name of your new preset. I’d suggest not getting too creative with names as you want it to “say what it does on the tin” to make it easy to remember. So it needs to describe what it does.
- If you want to create a group of presets that this will fit into, open the Group box by clicking on the “User Presets” box.
- Click New Group and when the New Group dialog box opens type in a name for your new group of presets.
- Or save your new preset under the default “User Presets” group by simply leaving it as it is.
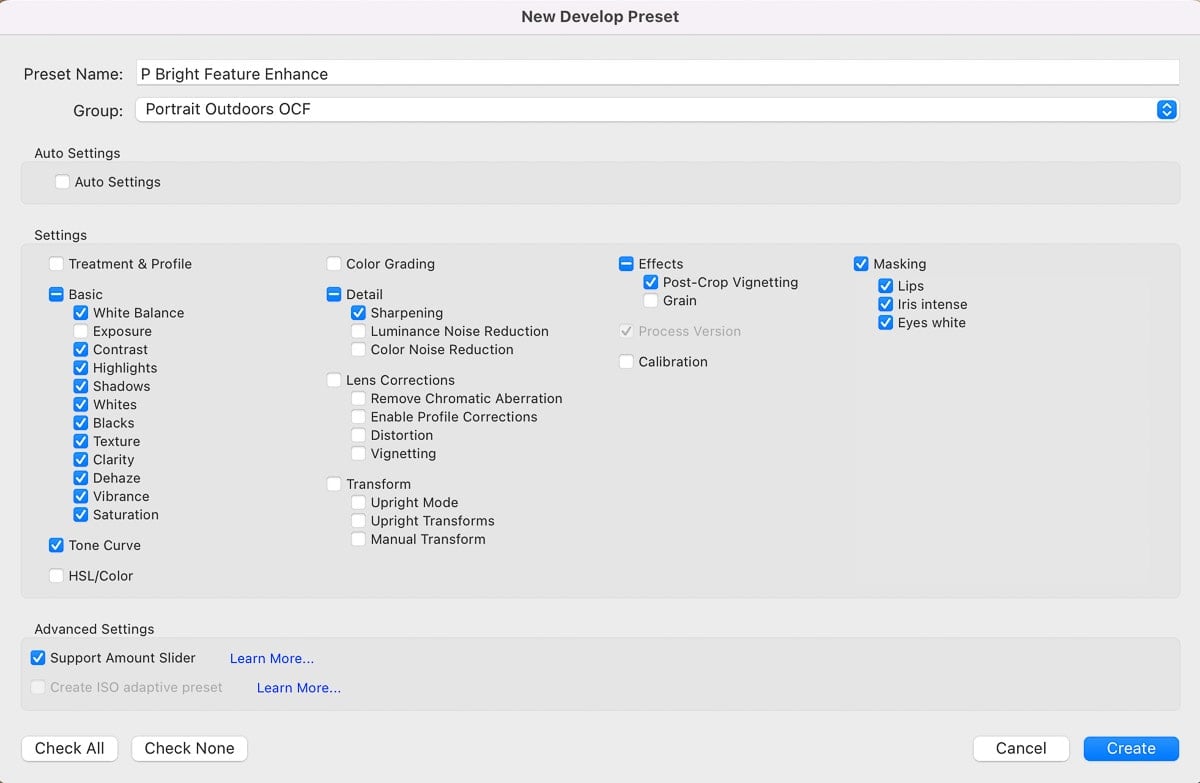
Select Lightroom preset attributes
Before closing the new preset dialog box you need to select the attributes you want in your preset.
To avoid possibly including something I don’t want included I always click the “Check None” button first to clear all checkboxes. Then I check the boxes of the attributes I want in my preset.
The “Support Amount Slider” box under Advanced Settings checks automatically as soon as you check an attribute box. This will allows you to decrease or increase the strength of a preset’s settings when applying the preset to other images. It’s really handy!
Step 3 – save preset in Lightroom Classic
Lastly, click “Create” to save the preset in Lightroom Classic.
Now, you’ll see your new preset in the Presets panel grouped under Users Presets, unless you created a new group for your preset.
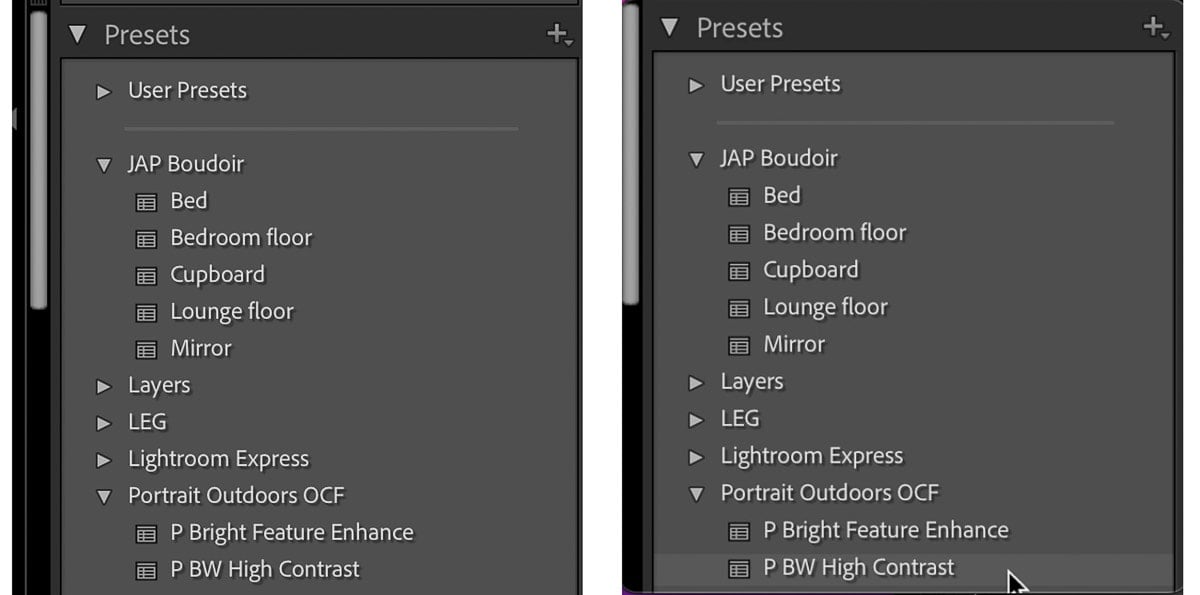
Apply Lightroom preset to one or more of photos
Your own Lightroom preset is ready to be applied to your photos! So, in the Develop module, select a photo that’s similar in lighting and colors to the one you used to create the preset.
When you mouse over your new preset, or any preset for that matter, you’ll see that your image changes. It’s a really handy way to preview the impact of a preset on a photo without actually applying it. So you can test out a few presets before applying the one you want.

There are two ways to apply a preset in Lightroom Classic, depending on whether you’ve selected a single photo or multiple photos to apply it to.
Apply a preset to a single photo
If you want to apply a preset to just one photo, select a new image and then click on the preset you want to use. The edits will be applied with this single click.
Most presets require a bit of tweaking, which is why it’s good to know how to create a preset and how to edit photos without the use of presets.
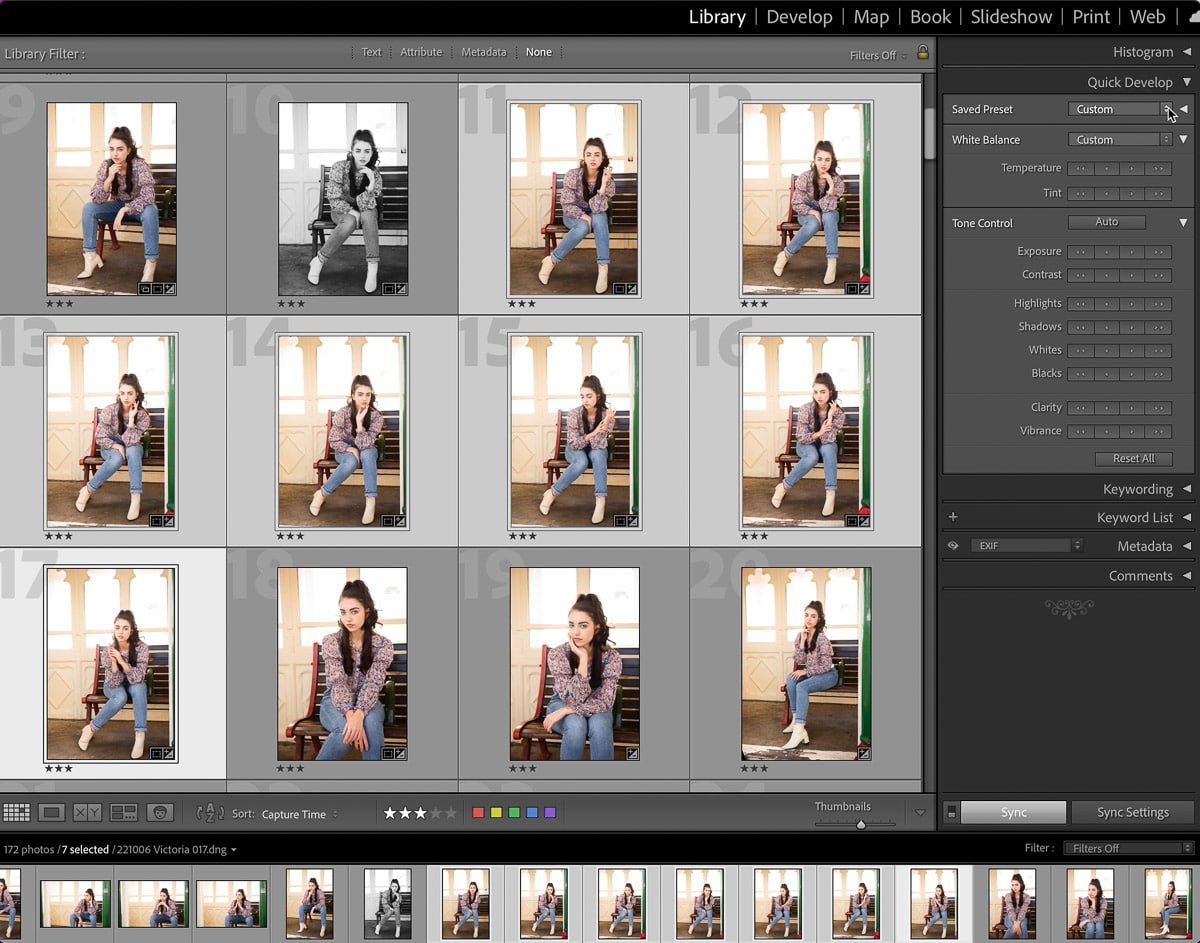
Apply a preset to multiple photos
To apply a preset to multiple photos at once (the ultimate time saver for batch editing!):
- Select all the photos you want to apply the preset to
- Click on the Library tab to open the Library module and select Grid View (or click G for the shortcut)
- Under the Quick Develop panel on the right-hand side of the screen click on the two triangles at the top next to the Saved Preset box to open the list of presets. The list will include several default presets that come with Lightroom, as well as any you’ve imported or created
- Select your chosen preset from the list and it will immediately be applied to all selected photos


How do I create a preset pack in Lightroom?
The natural progression to creating a preset is then to create a preset pack, or set of related presets, in Lightroom. If you find as part of your unique style you always, or very often, apply the same edits to photos, creating a collection of presets is a great way to save time in post production.
For example you might regularly use a particular:
- Type of tone curve (like a gentle s-curve) for contrast
- Color grading mix (called split toning in older versions of Lightroom Classic)
So to create a preset pack that will allow you to apply a particular look, for example a light and airy style, to images with a just a few clicks:
- Create a new preset group and give it a good descriptive name
- Create and save presets to the preset group that will help you to achieve the look you want
Your preset collection will appear in the preset panel with Lightroom’s default preset packs.
Another way of grouping presets is by subject. So, for example you might want presets that change the blue of water. You could create a preset pack titled water and then create presets with the HSL sliders, RGB tone curve and color grading panel for different blues, teals and turquoises.
4 must know Lightroom preset tips
As I mentioned at the beginning using presets in Lightroom makes the editing process so much easier and saves a lot of time. But to make the most of editing in Lightroom, you really should shoot in RAW and not JPEG. A RAW file contains so much more data than a JPEG file so you’ll be able to do so much more with in in post production.
The Adobe file format for RAW files is DNG (digital negative). So when you import photos to Adobe Lightroom, it’s a good idea to convert to select the option to convert to DNG files on import.
Applying a Lightroom preset is often just a good starting point in the editing process. Often you’ll need to tweak the preset to suit the lighting and colors in a photo, rather than getting the exact look you want with just the click of a button.
If you constantly make the same adjustments to a preset that you’ve bought, save time by creating your own preset from the bought preset with your adjustments and save it under User Presets, or create a new group.
Lightroom presets are different from Lightroom preset brushes. Although they’re both presets, preset brushes are for making local adjustments instead of global adjustments of Lightroom presets.
Leave a comment
If you have any questions about how to create presets in Lightroom Classic let me know in the comments.


