What is blue hour photography?
You might be more familiar with the golden hour. Well, blue hour photography is closely related and just as magical for photographers.
Unlike the golden hour, when we have warm golden tones for photos, during blue hour the light is a very cool, deep blue.
So photos take on a very different feel during the blue hour.

When is the blue hour?
The blue hour occurs twice each day – in the twilights before sunrise and after sunset, which is why it’s also referred to as twilight hour.
During the blue hour light changes:
- In the morning, from deep blue purple to a dark blue and then light blue before the sun rises above the horizon.
- In the evening the opposite happens – when the sun dips below the horizon the light changes from light blue, to dark blue and then to a deep blue purple.
The morning blue hour is before sunrise and golden hour and in the evening the order is golden hour, sunset and then blue hour.
Why are blue hour photos so blue?
There are two reasons why blue hour photos have such vivid blue colors:
1. Indirect sunlight
The blue of blue hour is because when the sun is below the horizon, only its indirect light is visible. The shorter wavelengths of blue light, results in blue light being scattered in the earth’s atmosphere while the longer red wavelengths pass through space.
2. Technology
Cameras see light differently from our eyes. Our eyes are so much more advanced than cameras, so we adapt to the color temperature of light and don’t notice these color shifts as much.
We can also adjust settings on our cameras to alter how we record the world. For example, just underexposing blue hour photos slightly creates a more intense blue.
Why photograph in the blue hour?
Photographers are always looking at creative ways to capture the world around them. Blue hour photography is irresistible, because the blue hour offers such a brief opportunity to record dramatic light in a way that our eyes don’t see it.
- During blue hour the light is soft with no harsh shadows, so photos feel peaceful.
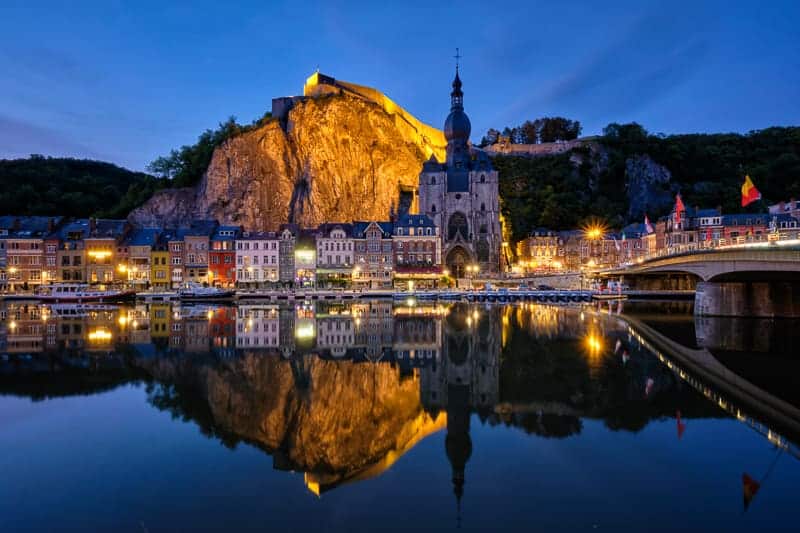
- Colors are deep and interesting, ranging from deep blue high in the sky to oranges closer to the horizon. This palette makes a wonderful backdrop for silhouette photos.
- City lights are on during the blue hour and the warm tones contrast beautifully with the blue hour tones in the sky.
- The light is low, so it’s easier to do long exposures without the need for a neutral density filter.
- Reflections during the blue hour look great, which opens up so many possibilities that are not around during the middle of the day.
- It’s the perfect time to photograph a moonrise, particularly at full moon as the moon will be warmer in tone, lower in the sky and not as bright. Again the warmer tones contrast with the deep blue sky.
How long does blue hour last?
This may seem like a crazy question to ask, because you’d think that something called the blue hour would last an hour, but it doesn’t.
Like the golden hour, the duration of blue hour depends on where in the world you are and how quickly the sun rises and sets there.
If you’re in the Arctic, the blue hour could last several hours, but if you’re at the equator it’ll be shorter than anywhere else on earth.
As a rule of thumb for most places on earth, you can expect the blue hour to for last 20 – 30 minutes. So, nothing like an hour!
You’ll find that 10 minutes before the sun rises the blue will fade very quickly. So you’ll need to work fast and change shutter speed continuously to keep up with the changing conditions.
The opposite happens at sunset – 10 minutes after sunset the blues will rapidly deepen until it’s dark.
Apart from the amazing colors, this is what makes blue hour photography so exciting! We all know how quickly twilight disappears and the night becomes black. You have very little time to catch the light and create the shot you want. Too slow and you’ll have to wait until the next day for your blue hour photos.

How does weather affect blue hour photography?
Not every day is going to be ideal for blue hour photography.
- Clear skies are ideal
- Overcast skies can completely wash out blue hour
How can you plan for blue hour?
Because it passes so quickly, planning is key to blue hour photography success.
In fact, it’s a good idea to scout a location before the blue hour, so that you’re ready for action and know the shots you want when blue hour arrives.
There are a few websites specifically for planning blue hour photography wherever you are in the world.
- The first is the aptly named Blue Hour Site
- Alternatively, there’s The Photographers Ephemeris, which also shows you where the light will fall at your chosen location, wherever that is. So, it’s a great tool for planning your blue hour photo shoot. It is free to use the web based blue hour app, or you can purchase the blue hour app for your phone.
Blue hour photography examples
The main challenge with blue hour photography is the low light conditions, but the rewards are worth the extra effort!
1. Cityscapes in the blue hour
Even though the light is low, for good cityscapes with starburst shaped city lights smaller apertures are needed, such as f11 or f16. If you need to, you could open up a bit more to f8.
Keep ISO as low as possible to avoid noise, so ISO should be at 100 or 200.
With these settings you will absolutely need a tripod.
Just remember to switch off vibration reduction / image stabilisation if your lens is affected by being used on a tripod. Not all VR / IS lenses are affected, but with some using a tripod with VR/IS turned on will actually cause blur in your image.
Ideally, you need a remote release as well to avoid camera shake when pushing the shutter button. Alternatively, set your camera to timer.
If you’re photographing on a mirrorless camera, you won’t have to worry about mirror slap, but on a DSLR the mirror’s movement during capture could cause camera shake.
To avoid mirror slap you could either photograph in live view or lock the mirror up. In live view the mirror is automatically locked up.

2. Portrait photography in the blue hour
With portraits you would need to use either street or other artificial city lights or light that you’ve brought with you. This need not necessarily be a flash.
Wider apertures are ideal for blue hour photos to blur background, especially when you can include city lights in the background – the out of focus spectral highlights create amazing bokeh.
This combination of factors means that your shutter speed can be higher than if you were photographing a cityscape. You could potentially handhold the camera without causing blur in the photos from camera shake.
I’ve listed just two examples, but don’t limit yourself to this. If you’re lucky enough to be at a fairground at blue hour, you could experiment with slow shutter speed exposures to blur the colorful lights of the rides and create light streaks.
Blue hour photography tips
For the best blue hour results, here are two handy tips:
1. Shoot in Raw for maximum data
It’s best to shoot in Raw rather than Jpeg for blue hour photos so that you have more leeway for adjusting the images in post production.
It’s not always easy to see on the back of the camera if your images have been correctly exposed, so check your camera’s histogram. Bear in mind that your histogram will be different from a daylight type of histogram as you’ll have extremes of light and dark in your images.
Check for blown out highlights and under exposed shadows so that you can try to reduce the extremes as much as possible.
2. Exposure bracketing for HDR
For cityscapes and landscapes you might want to bracket your shots so that you can combine them in post production. This would allow you to capture both dark and light extremes accurately for blending together in one image later.
You will of course need a tripod for this.

3. Consider using live view to focus
If your camera is struggling to focus in the low light conditions, try using live view for sharp photos. Focusing works differently in live view and your camera will be able to lock autofocus more easily.
Leave a comment
If you have any questions about blue hour photography, let us know in the comments.
Also, I love good news, so if my blue hour photography tips have helped you to understand how to photograph during blue hour, share that too.
Jane, I have been enjoying your articles tremendously and recently I tried using reflectors encouraged by your article. I did mention that article on using reflectors in my latest blog article (and the link to the article). As I am perusing the Blue Hour article, I found a mistake. I think the text should read as planning blue hour and not planning blur hour.
“There are a few websites specifically for planning blur hour photography wherever you are in the world.”
Thanks for pointing out the typo! Lovely to hear that you’re enjoying my articles and you’re encouraged to try new things.