What is exposure bracketing?
In photography exposure bracketing is a way of hedging your bets to ensure you get the correct exposure, which is particularly handy when lighting conditions are difficult to control.
It’s also a lot easier than it sounds. When you bracket exposure you take a series of three frames of the same scene at different exposure settings:
- Underexposed
- Correctly exposed
- Overexposed
Before digital, and the ability to check the camera’s LCD or histogram for an accurate exposure reading, exposure bracketing was widely used in tricky lighting conditions.
Although you can bracket exposures manually, you don’t have to.
Exposure bracketing isn’t the only type of bracketing. I’ve listed the other types of bracketing at the end of this article.
Why use automatic exposure bracketing?
Bracketing exposure manually takes time, but if you use automatic exposure bracketing (AEB) it happens instantly with each push of the shutter.
So you won’t lose the shot while you’re changing your camera settings.
Bracket exposure for HDR
Some photographers bracket exposure for the express purpose of creating an HDR image.
Whether bracketing manually or automatically, exposure bracketing is ideal for scenes with a higher dynamic range than your camera can handle. With this technique you can capture detail in both shadows and highlights of a scene.
Exposure bracketing is the basis of HDR photography (high dynamic range). All three exposures are blended into one image on the computer using Photoshop or similar software.
Can you use exposure bracketing in manual mode?
Yes, you have two ways to use exposure bracketing in manual mode:
- Alter exposure manually by changing any of the exposure settings (shutter speed, aperture or ISO) in consecutive frames
- Use the exposure bracketing camera setting to automatically bracket exposures in any shooting mode. In manual mode the shutter speed setting changes with each frame.
Using your camera’s exposure bracketing setting is faster than doing it manually, but only if it’s already set up. If you have to set it up first, and events are unfolding in front of you, you might miss the shot.

Camera settings: Shutter speed 1/250, ISO 200, f11 (above image) and f16 (below image)
How do you use automatic exposure bracketing?
Setting automatic exposure bracketing (AEB) varies from one camera manufacturer to another and even from one camera model to another of the same manufacturer. Some camera makes are easier to use than others with a button labelled BKT for AEB.
The good news is that automatic exposure bracketing makes the process really easy, so it’s well worth finding out how your camera’s system works. For me, the best way to figure something out is just to play with it.
If you prefer to follow directions, your camera manual will help you.
How to set automatic exposure bracketing
There are two parts to setting up automatic exposure bracketing on your camera. You must decide on the:
- Exposure difference of each frame
- Number of frames
On my Nikon D810, the steps to set automatic exposure bracketing I:
- Push the BKT button
- Select the number of shots to take (i.e. how many photos to bracket it by) by turning the main command dial (the one at the back)
- Turn the sub command dial (the one at the front) to select the exposure value difference of each frame (i.e. to change by a full stop or a third of a stop etc)
I can bracket in differences of 1 stop, 2 stops or 3 stops, and at as little as a third of a stop at a time.
I can also set the number of frames to 3, 5, 7 or 9 frames of bracketing.
So, as an example of automatic exposure bracketing, if I set my camera to:
- A 1 stop difference with each shot and then select 9 frames
- My camera will take shots at -4, -3, -2, -1, 0, +1, +2, +3 and +4 stops
NOTE: if you’re photographing with single servo it’s not just one press of the shutter button. If you select 9 frames of bracketing, you need to press the shutter button 9 times for your camera to cycle through the full range of exposure bracketing you’ve chosen.
Exposure bracketing in one direction
You can set your camera to bracket exposure in just one direction, either over or under. Instead of capturing one stop of exposure difference on either side of the “correct” exposure, which is the usual way of exposure bracketing. In other words, you can capture the correct exposure, then under expose and then a bit more under.
If you set exposure bracketing to -2, your camera will:
- Take a shot at the correct exposure
- Then -1 stop (under expose by 1 stop)
- Then -2 stops (under exposure by 2 stops)
This applies to overexposing photos as well. So if you select +2, you start with the correct exposure and the next two shots go up a stop in exposure each time.
Not all cameras have a BKT button
My D700 doesn’t have a dedicated BKT button for setting AEB, so I changed one of the other buttons to work for exposure bracketing.
Also, it can’t bracket by more than a 1 stop difference at a time, only 0.3, 0.7 or 1 stop. It can, however, bracket up to 9 frames like the D810. The same is true for my very old D300.
The basic AEB technique is similar, but as you can see auto exposure bracketing varies slightly between camera models.
What shooting mode to use for exposure bracketing?
As with all things exposure related, something has to give when you change the exposure. So, once you’ve set your exposure bracketing, you need to decide which shooting mode you want to use.
- Manual mode – the shutter speed changes with each frame.
- Shutter priority – the aperture changes with each frame and your shutter speed will stay as set.
- Aperture priority – the shutter speed changes with each frame and your aperture will stay as set.
- Program mode – both the aperture and the shutter speed change with each frame.
How fast do you need the exposure bracketing to happen?
Not every scene is the same so your AEB settings will vary.
Sometimes you have all the time in the world to get the correct exposure and at other times you have to work really quickly. This impacts how you use exposure bracketing.
AEB technique for changing scenes
Set your drive mode to continuous, either high or low, depending on how quickly you need to work through the frames.
Continuous allows you to press the shutter once and hold it down while the camera clicks through the frames.
AEB technique for still scenes
When photographing something still, such as a bowl of fruit, architecture or a landscape, here’s how to avoid any possibility of camera movement between shots:
- Put your camera on a tripod
- Set it to self timer
- Then set your self timer to a delay of 2 seconds
- Set the number of photos you want it to take (It varies from camera to camera – I can do a maximum of 9 on my Nikons).
This way you push the shutter once and your camera cycles through the bracketing according to how you set it up.
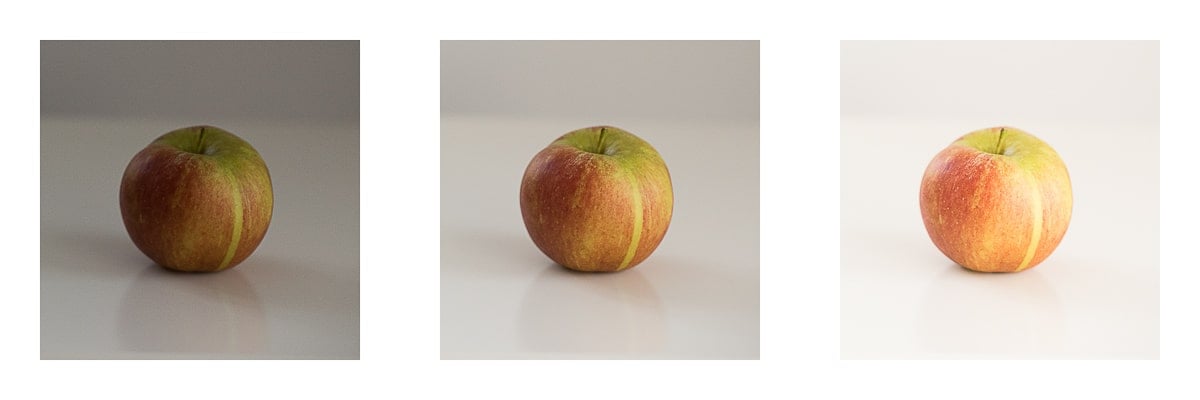
Aperture and ISO remained the same throughout.
Recap on setting AEB
- Set the number of frames you want to take.
- Set the exposure difference you want for each frame.
- Decide on which shooting mode to use.
- Decide on how fast or slow you want to cycle through the exposure bracketing and set your drive mode or self timer accordingly.
When is exposure bracketing not helpful?
If there are moving elements in a scene and you plan to combine your exposure into one, it’ll be difficult to blend the images together. Each image will be slightly different from the others.
However, if you plan on blending images, ensure that the aperture stays the same throughout your images so that your depth of field is constant. To do this, shoot in aperture priority or manual mode so that the shutter speed changes instead.
When photographing action the scene change between each shot. So the chances of the best composition being the best exposure as well is small in shutter priority.
There’s more than one type of bracketing
You’ll have noticed that I didn’t just say bracketing throughout this article, but exposure bracketing. It’s by far the most common form of bracketing and when photographers refer to bracketing, they usually mean exposure bracketing.
However, there’s more than just one type of bracketing. There’s also:
- Flash bracketing
- Focus bracketing
- Depth of field bracketing
- White balance bracketing
Sometimes bracketing is referred to as stacking. Focus bracketing for example, is more often referred to as focus stacking.
Last important note…
Remember to switch bracketing off when you’ve finished with it as it doesn’t reset itself back to zero.
Been there, done that. Was very confused for a bit.
Leave a comment
If you have any questions about using AEB camera settings, let us know in the comments.
Also, I love good news, so if my photography exposure tips have helped you to understand bracketing, share that too.
Ok once i have my shots made how do i combine them together to have my HDR PHOTO
great post, great explanation. thanks. Only one remark. There might be a mistake in a section “What shooting mode to use for exposure bracketing?”. You wrote “aperture priority – the shutter speed will change with each frame and your aperture will change as set.” I guess you meant that aperature would “stay as set” ;). Br, Adam 😉
Thanks, Adam – for the lovely comment and for pointing out the error. I’ve fixed it now.