Focus bracketing and focus stacking are your new best friends if you’re into any kind of photography that needs maximum depth of field. This photo stacking technique is so easy for creating images with tack shop focus from front to back!
I’ve included a step by step tutorial on stacking photos so that you can get started straight away. But first, what is focus bracketing and focus stacking?
What is focus bracketing?
When we talk about bracketing, most often we’re talking about exposure bracketing, which is when you take a series of photos at 3 different exposures so that you can combine them later to get details:
- in the dark areas
- as well as the highlight areas
Well, it’s the same with focus bracketing. Except with focus bracketing, you take a series of photos focused at different focal planes within a scene – say, front, middle and back.
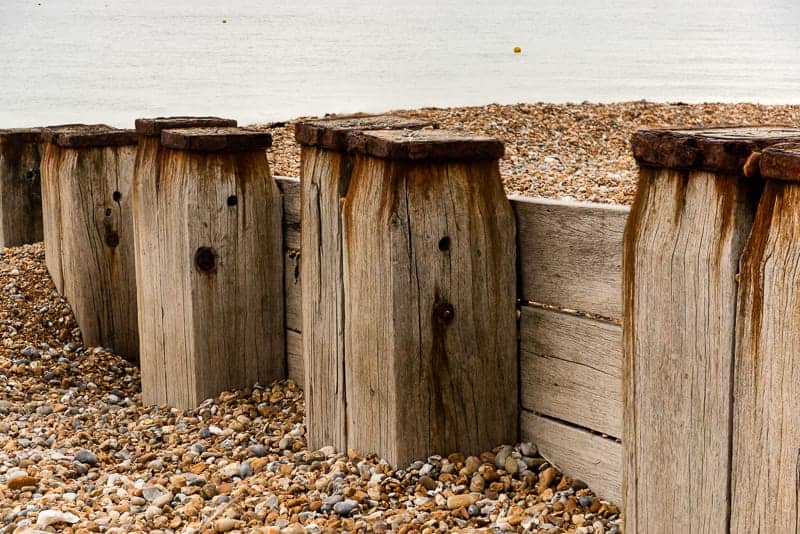
Here’s a gif of 3 of the photos I used to create the image at the top of the tutorial. If you watch it cycle through, you’ll notice the focus change from one image to the next.
What is focus stacking?
Focus stacking is the process of combining a series of photos of a scene with different areas in focus, after photographing them using focus bracketing.
Focus stacking is done on the computer (more on this later) and is the process of combining the sharpest part of each image in the series into one image so that you have maximum depth of field. It’s like HDR photography, but for focus.
Some cameras, especially mirrorless, are able to do focus stacking in camera. In which case there’s no need to process the images into one on the computer.
If your camera doesn’t have in-camera focus stacking, don’t be put off. As you’ll see, it’s really easy to do manually.
Photography genres ideally suited to focus stacking
Any type of photography is suited to focus stacking, as long as you can keep your subject still. However, there are certain photography genres, where focus stacking is more widely used for achieving maximum depth of field. They are:
- Landscape photography
- Macro photography (shallow focus area)
- Architecture photography
- Product (especially jewellery) photography
- Food photography
- Low light photography (wide aperture)
Because some lenses create a shallow depth of field in images, focus stacking is particularly useful when using a:
- Long lens
- Macro lens
Likewise when photographing in low light.
Because of the need to use as wide an aperture as possible when photographing in low light, which results in a shallow depth of field, using focus bracketing and then focus stacking is ideal for deep depth of field in low light photos.

What extra equipment do you need for focus bracketing?
You don’t need a load of fancy equipment for focus bracketing, or even a fancy camera. You will, however, need to ensure that your camera doesn’t move during the process. Ideally you need:
- Tripod
- Shutter release cable
Although I’d definitely recommend a tripod, a shutter release cable isn’t actually essential.
If you don’t have one, use the self timer on your camera. This way you won’t cause camera shake when you push the shutter button.
When you don’t need focus bracketing
When using a wide angle lens to capture a landscape the depth of field might be deep enough so that focus bracketing isn’t necessary to achieve front to back sharpness.
If that’s the case, to double check the focus and rule out the need for focus bracketing, use live view to zoom in and check the foreground and background for sharpness.
Why not just increase the depth of field?
It seems logical that if you want a deep depth of field, you should just use the smallest aperture, such as f22, instead of going to all the trouble of bracketing and stacking focus.
The problem with this is lens diffraction, which happens when light passes through a very small aperture.
So, instead of a wonderfully sharp photo with deep depth of field, you could end up with soft focus. I’d suggest a maximum of f16 to avoid it.
How do you take focus stacking photos?
The number of photos you take in a series for focus bracketing depends on your subject and how shallow your depth of field is. Three images are usually enough for landscapes, but macro images could easily require several more.
It varies with each photo, depending on the depth in the image and how much you want in focus.
You can use as many as you like for more complex focus bracketing, just remember that the more photos in your series, the more you’ll need to combine when focus stacking on the computer. This will make the process longer for shooting and editing and will of course impact on the size (in memory) of your photo.
Some cameras have automatic focus bracketing in-camera
Nikon has another name for it – focus shift – but it’s the same thing and it’s a feature of the D850. The Nikon mirrorless range also has focus bracketing in-camera.
The Canon EOS RP offers focus bracketing, which you then composite manually (i.e. focus stack) in Photoshop. Likewise for Sony
Some cameras do the entire focus stacking process in-camera
The Olympus OM-D E-M1 Mark II, for example, has focus stacking in camera. This means it’ll automatically focus bracket, capture and composite all the images in-camera.
PS – you get a gold star if you noticed that I missed a little bit as I was rushing to get the shot done this afternoon for this tutorial and rain was threatening. Now you’re going to look for it, aren’t you?
Steps for focus bracketing if your camera doesn’t have in-camera focus stacking
- Put your camera on a tripod
- Attach a shutter release cable, or set your self timer to the minimum time
- Frame the scene
- Meter the scene and set the exposure
- Select manual mode – so that you can set the exposure once and not risk it changing part way through
- Use manual focus and move the focus ring in small increments
- (Live view can be helpful for checking focus)
- Focus on the closest point in the scene
- Take a photo
- Turn the focus ring slightly to focus on the next focal plane
- Take a photo
- Keep going until you’ve worked through all the focal planes in the scene that you want sharp (it doesn’t have to go all the way to the background if you don’t want)
What software options are there for focus stacking?
Now that you’ve got your series of photos, the next step is to combine the photos into one photo on the computer. This is the focus stacking part of the process.
You don’t have to have Photoshop to do this. There are a number of software options available, including free ones. For example:
- CombineZP – free
- Picolay – free
- Canon software – Digital Photo Professional
- Nikon software – Nikon NX-D
Paid options all have free trials, such as:
- Helicon Focus – Focus Lite $30 a year or $115 for a lifetime license
- Zerene Stacker – lifetime personal licence is $89
- Affinity Photo – £48.99
- Photoshop – part of the Adobe Creative Cloud subscription from £9.98 per month
How do you create one image from the stacked photos in Photoshop?
Here’s how I focus stack with Lightroom and Photoshop.
I import my photos into Lightroom, make my adjustments (exposure, highlights, shadows, white balance, lens correction), which I then sync to all the images in the sequence and then edit in Photoshop.
To export to Photoshop I:
- Select all the images
- Right click
- Select “Edit in”
- Then “Open as layers in Photoshop”

This may take a while, depending on how many photos you’re including in your stack. When it’s ready I:
- Select all layers by holding the shift key and clicking the first layer and then the last
- Click “Edit” in the menu
- Select “Auto-Align Layers”

A box will pop up with options. Select Auto-Align and let Photoshop do it.
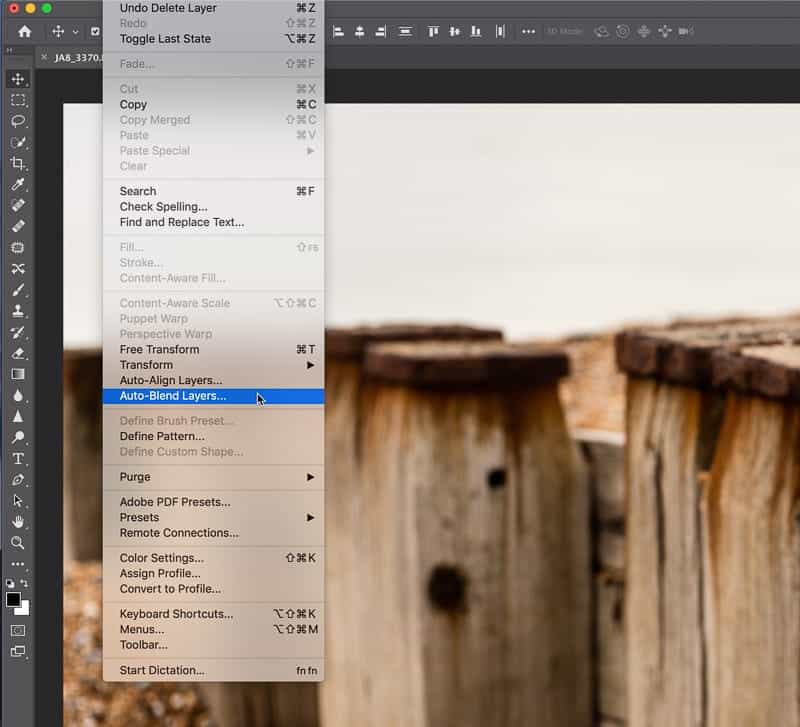
- Click “Edit” in the menu bar
- Select “Auto-Blend layers”
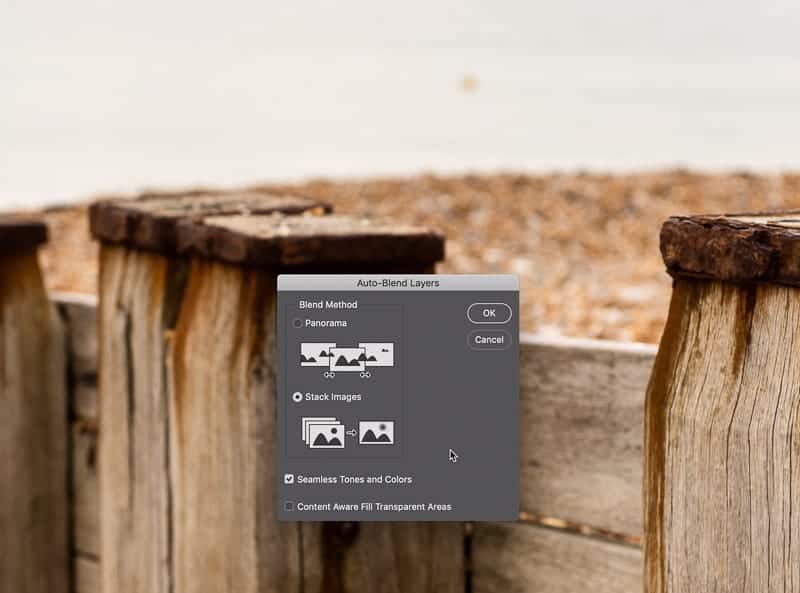
Then, in the box that pops up, check:
- Stack Images
- Seamless Tones and Colours
- Content Aware Fill Transparent Areas
- Then click “OK”
Photoshop will then blend the layers and choose the sharpest part of all the layers.
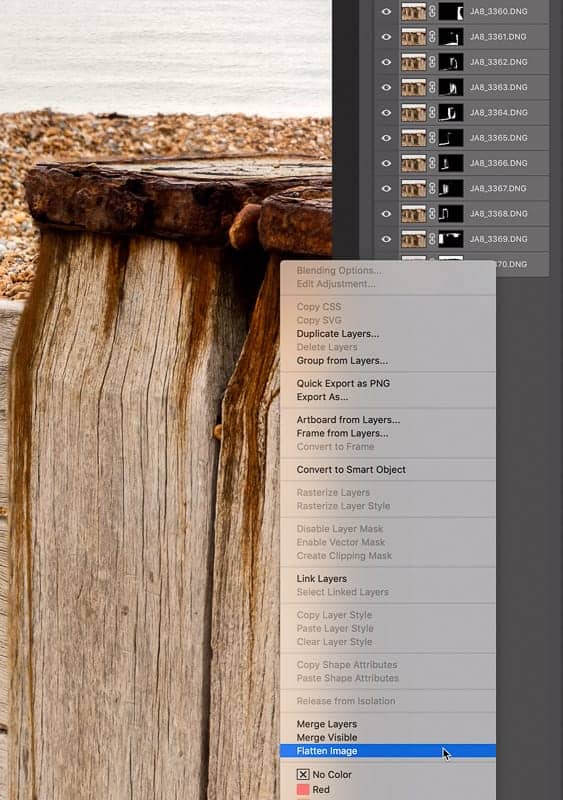
Finally, select the layers, right click and select “Flatten Image”.
If necessary, crop the very edges off where the final image might be smudgy.
Then save your composite and exit Photoshop.
Lens breathing / focus breathing
I mentioned that the edges might be smudgy. This is due to lens breathing, also called focus breathing.
Unless you shoot macro photography, you might not have noticed lens breathing.
This occurs when you change focus on a lens. It happens with both high quality and entry level lenses and applies to both zoom and prime lenses.
Focus breathing is simply the very, very small change in the framing of the photo when you change your focus point.
The change is caused by the shift in the angle of view of the lens by the change of focus. It zooms out when you adjust your focus from infinity to a closer subject in the frame. Even with a prime lens, the lens appears to zoom in or out slightly when you adjust the focus from one extreme to the other.
To experiment with lens breathing / focus breathing:
- Switch your camera to manual focus
- Mount it on a tripod and frame the scene
- Focus at the closest point and then at the furthest point and pay attention to the edge of the frame, which is where you’ll see the change
This is why, when you stack your photos in Photoshop, you might need to crop in fractionally, as the edges of the images in your stack might show the focus breathing.
2 things to watch out for with focus stacking
Exposure
The more photos you take to create your stack, the longer the process will take.
So, if photographing with natural light, be aware of the change in the light, especially on a cloudy day. The light change will affect the exposure from one image to the next.
Subject movement
Subject movement will of course, also impact your image. So, if for example, you’re photographing a flower, it’s probably better to do it inside.
That said, for landscape images that involve flowing water, the movement will be fine as your focus points will be on the solid, unmoving elements, such as rocks and trees. Also a landscape is a much larger area than a close up of a flower.
Leave a comment
If you have any questions about focus bracketing or focus stacking, let us know in the comments.
Also, I love good news, so if my photography tips have helped you to understand how to achieve maximum depth of field, share that too.
Love the well-written article. Can one focus stack in Lightroom Classic?
My Nikon D850 has both focus stacking and HDR capabilities. Can both be used at the same time.