If you’ve never heard of the zone system, or you’ve heard that the zone system is no longer needed, because our cameras have in-built light meters, you’re missing a great exposure trick!
The zone system a way of looking at the world in black and white from your camera’s point of view to help with setting exposure. It was developed by Ansell Adams (landscape photographer) and Fred Archer (portrait photographer) in 1939-1940.
We’ll have a look at:
- How your camera’s exposure meter works
- Why you need to know zone system
- How to use the zone system

How your camera measures light
Did you know your camera’s exposure meter thinks in black and white?
When it comes to exposure, color doesn’t matter to your camera, because it measures exposure in various tones from black to white.
However, its favorite tone is neither black nor white, it’s medium gray, also called 18% gray. Your camera wants to make everything medium gray.
Sign up to get this handy zone system cheatsheet – I’ll explain how to use it in a moment.
Type of exposure meter on digital cameras
Your camera’s inbuilt metering system is a reflective light meter, so it measures reflected light when metering exposure.
Understanding this is really important to remember, because it’s the basis of your camera’s exposure metering system.
Reflected light is light bouncing off a surface. This matters, because:
- White surfaces reflect more light than medium gray surfaces
- Black surfaces reflect very little light, if at all
So, when your camera meters off of a white surface, it’ll see a lot more light than when metering off of a black surface.
That affects the exposure reading, which affects your camera settings, which makes the difference between an underexposed, overexposed or accurately exposed image.
If you use a handheld light meter, it measures incident light so isn’t affected by the tone of your subject. I prefer to use an incident light meter, but it’s not always possible. However, the zone system helps me to set accurate exposure with my camera’s light meter.
Why you need to know the zone system

To demonstrate why you need to understand exposure and the zone system, meet our cat models Sooty, Smokey and Snowy.
Let’s say they’re lying near each other in the same patch of light. We’ll use spot metering to meter the exposure and we’ll position the point on the lightest part of their fur.
Sooty
- Black cat, Sooty, does not reflect light.
- Your camera’s exposure meter thinks that Sooty is too dark, because there’s very little light coming off him.
- The camera wants to set a slower shutter speed or wider aperture to lighten him up.
- But this will overexpose Sooty and make him medium gray, like Smokey.
Smokey
- Medium gray cat, Smokey, reflects some light.
- Your camera’s exposure meter is happy with how much light he is reflecting and sets a shutter speed or aperture to expose him correctly.
Snowy
- White cat, Snowy, reflects lots of light.
- Your camera’s exposure meter thinks that snowy is very bright so wants to darken him down.
- The camera sets either a faster shutter speed or a narrower aperture.
- But this will underexpose Snowy and make him medium gray, like Smokey.
Your camera can record Smokey accurately without your assistance, because he’s the tone your camera thinks everything should be. For Sooty and Snowy, however, you need to help out by adjusting the exposure.
Use exposure compensation when photographing in:
- Program mode
- Aperture priority mode
- Shutter priority mode
If you’re using manual mode, just increase or decrease the exposure by the appropriate amount.
Great! So now you know how to fix this exposure problem and ensure that all your cats are correctly exposed.
But by how much do you need to adjust the exposure?
Knowing how much exposure compensation to use for correct exposure of tones above and below medium gray is crucial. Just guessing at the exposure adjustment you need to dial in, won’t ensure an accurate exposure.
This is exactly why the zone system is still hugely relevant today! Even with our fancy digital cameras.
How to use the zone system for exposure settings
It’s a lot simpler than it sounds.
The zone system is a tonal scale, from pure black to pure white to cover the full tonal range. There are 10 zones and each zone on the scale represents a 1 stop difference in exposure. In other words, with each step along the scale you need to adjust either:
- Shutter speed,
- Aperture or
- ISO
…by one stop.
Zone system chart
Medium gray, which your camera thinks is the correct exposure, on the zone scale is shown as V (5).
You can see on the right of the table the changes you would need to make to the exposure for each zone for it to be accurately recorded.
The zone system and color photography
But you don’t see the world in black and white, so trying to figure out what color equates to what tone of gray isn’t easy.
So here’s the zone system in color.
This chart is also on the cheatsheet and is a really handy reference to keep in your camera bag until you know the zone system well enough not to have to refer to it.

Are you seeing where this is going?
Steps for using the zone system for photos
If you understand how your camera meters color, you’ll know how much to adjust your exposure.
USEFUL TIP: If you want to meter off something that’s medium gray and you don’t have a gray card or Smokey, with you, point your camera at:
- The nearest healthy green grass in the scene
- The north sky (with no clouds)
- Weathered wood
Why?
Check out V on the zone system – it’s medium gray and that’s where these colors are on the zone system. Ta da!
I meter off green grass a lot for outdoor photoshoots as the sky is very often washed out or gray where I live.
What if nothing is medium gray? I’ve got you covered… in a moment.
Use spot metering
When using the zone system for accurate exposures, switch your camera’s metering mode to spot metering. You need to meter only a small part of the image, not the whole scene, or even the middle of the scene.
Spot metering is ideal for measuring exposure of the smallest area possible – just a small patch of medium gray

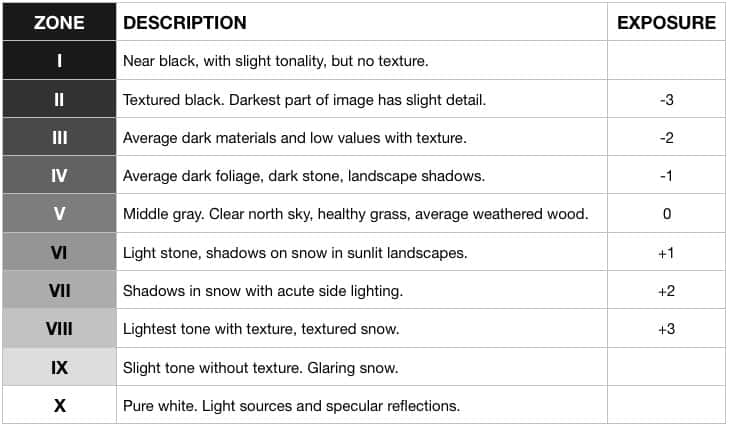
In these examples you can see how different colors can look the same in black and white, because they have the same tonal value. If, for example, the green was a pastel green, it would be much lighter than the others in the black and white photo.
The zone system for portraiture
Using the zone system for portrait photography is fairly easy, because when we photograph people, we meter exposure for the subject’s skin tone. The most important part of the photo is the person, so they must be correctly exposed.
The difficulty is that skin tones vary so much, so we can’t just give a one size fits all answer. Learn to judge skin tones and use this table as a rough guide for setting the correct exposure compensation.

Exposure metering for portraits
To meter your subject’s skin, use spot metering and take your exposure reading off of the brightest part of their skin. This is usually the cheek closest to the light.
As your camera’s exposure meter will want to make everything Zone V (medium gray), all you then need to do is adjust the exposure by however much you think is needed for their skin tone. Just refer to the zone system chart for skin tones.
Did you sign up for the cheatsheet? Here it is again.
Remember each zone represents 1 stop of exposure. So, for example, average white skin would require +1 stop of exposure compensation.
If you want to be certain, you can double check your readings by spot metering their skin and then metering a gray card. The difference between the two should match the table.
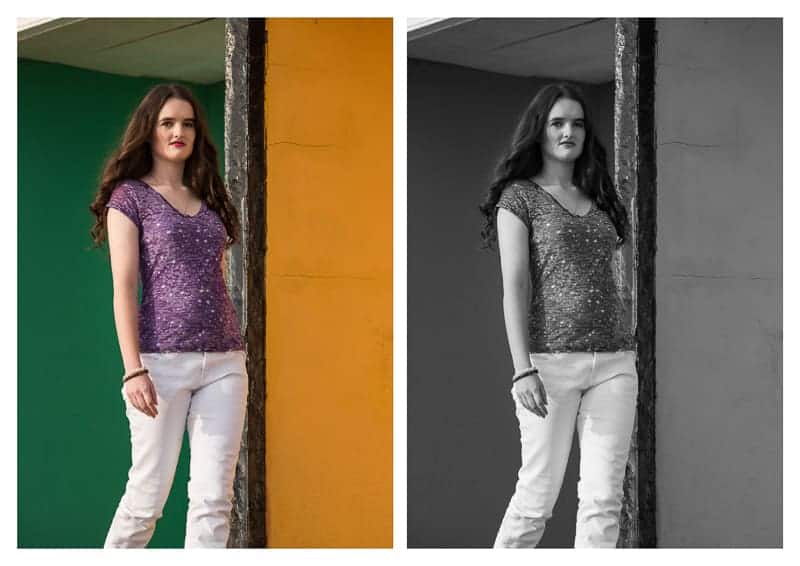
The zone system measures tonal value from low (white) to high (black). Pastel colors have a low tonal value in a black and white image, which you can see with the boys’ shorts in particular when compared with the darker blue of the sky, which has a higher tonal value.
Using the zone system for black and white photography
When planning a black and white photoshoot, think about what colors to include for better photos. Did you notice on the color chart that yellow is the same tone as average white skin?
Yellow clothing on someone with average or light white skin in a black and white photo will look very washed out as there’ll be very little tonal contrast. On someone with dark skin, it’ll contrast beautifully.
If, like me, you like contrast you can also increase the contrast when editing black and white images.
As a boudoir photographer with a high contrast style, choice of clothing color makes a huge difference to my images. So I always talk through lingerie color in detail with my clients.
If they want a mix of color and black and white images, they need to wear colors that work well with their skin tone for both black and white and color images. For example, red looks great on all skin tones in color, but is particularly suited to my high contrast style in black and white on pale skin. It’s not as effective (for my style) in black and white on dark skin.
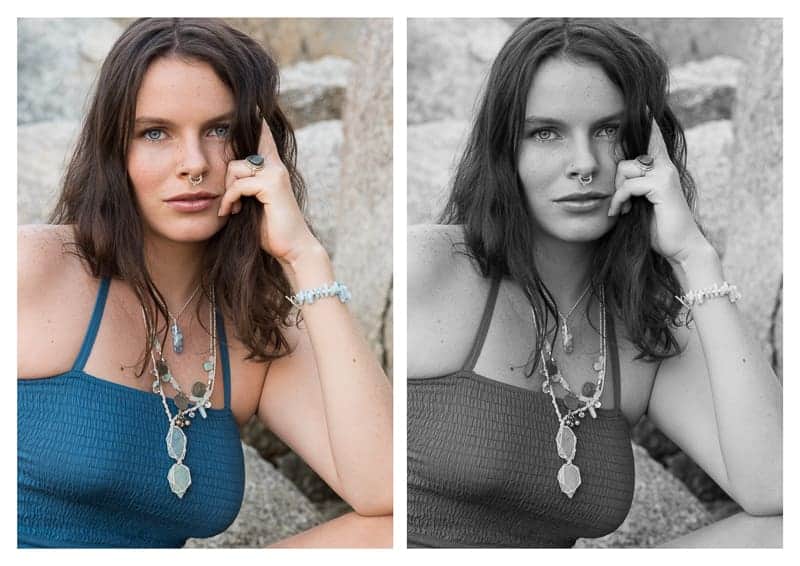
Using the zone system, you’ll see that average white skin is the same tone as light stone. Both are VI on the zone scale. In this photo the boulders behind the model are granite.
Recap of the zone system in photography
Here are the key points of using the zone system:
- The zone system was developed for black and white photography, but is relevant to color photography too.
- Different colors can have the same tonal value (blue, green, red).
- Skin tones vary, so have different tonal values.
- Use spot metering to meter your exposure when using the zone system.
- Medium gray, for spot metering your exposure, can be found in healthy grass, a clear north sky, weathered wood.
- Once you’ve taken an exposure reading, adjust your exposure according to the tonal values of the zone scale.
- Adjust exposure using exposure compensation if in program mode, aperture priority mode or shutter priority mode.
- In manual mode, simply adjust your shutter speed or aperture according to your requirements.
Leave a comment
If you have any questions about the zone system and exposure metering, let us know in the comments.
Also, I love good news, so if my zone system tips have helped you to understand exposure metering, share that too.
Thank you, thsnk you for explaining exposure compensation in a way that I can understand
That’s great news, Judy! So glad I could help you.
Hi, Jane. Great explanation on the Zone System as it applies to exposure. Remarkable content as always.
QUESTION: So what do you do if you have Snooty, Smokey, and Snowy in the same scene? How do you expose properly for three subjects that varied?
Thank you for this amazing content!
Hi Janine
The simple way forward – I would meter for Smokey and adjust Sooty and Snowy in Lightroom if needed.
To get it exactly right – I’d bounce light into Sooty, without letting it spread onto Smokey and Snowy, and use a diffuser to reduce the light on Snowy, while making sure that neither Smokey nor Sooty are affected.
Thanks, Jane, for your generosity of information!