


I spend so much of my working life creating photo albums for clients that when it comes to printing my own photos, I struggle to find the time and enthusiasm at weekends. Plus, I don’t live in a palace, so have a limited amount of space on my walls for photos.
Making a photo book in Lightroom Classic is a great solution, because it:
- Takes up less space than a box of prints and sits on a bookshelf within easy reach, so is much more accessible
- Is an affordable way of printing and organizing printed photos
- Can be done quickly using the Lightroom Book Module
- You can make adjustments to a photo in the Develop Module and it’ll automatically update the image in your book design

While a photo book isn’t something that I’d print for a client, it’s perfect for my own memories of family life and vacations.
However, you can use a Lightroom photo book template to upload an album design to a professional photo album printing company, particularly for a 12 x 12 inch album, which most of my clients order.
However, this post is about how to make a Blurb photo book in Lightroom and order it directly from the Lightroom Book Module.
How is that possible?
Adobe Lightroom partnered with Blurb Books to offer Lightroom users this fantastic solution to making and ordering photo books online really easily.
How to make a photo book in Lightroom book module
1. Select photos
How you select photos is a matter of personal choice and depends on how you use folders and collections in Lightroom. I use Lightroom collections a lot! Here’s my process:
- Import images into a Lightroom folder
- Select my favourites and save them to a collection
- Refine my keepers further so that I keep only the best
- Rename my keepers
- Delete photos that didn’t make the grade
Pro tip – it helps to have a good photo filing system for finding photos in Lightroom.
When you create a photo book you might want to include photos taken on different occasions. In which case, depending on your filing system, they might be in different Lightroom catalog folders.
Here’s what I do:
- Add photos I want in the photo book to a quick collection by pressing B on the keyboard as a shortcut when on the photo
- Once I’ve chosen my images I select all photos in the quick collection by pressing Cmd A and save them to a collection for the photo book
Now all the photos I want to use are gathered together in one place, ready to make a photo book in the Lightroom book module.
2. Design your Lightroom photo book
Open the Lightroom book module by clicking on “Book” in the module picker at the top right.

Toolbar
To help you move around your book, the toolbar at the bottom has three icons on the left to view:
- All pages
- A double page spread
- A single page
You can also double click on a page to open just that page.
In the middle of the toolbar you can see which page you’re on. Plus, you can move to the next, or previous, page by clicking on the relevant arrow next to the page number.
The thumbnail slider on the right works the same way as it does in the Library Module grid view to increase or decrease page thumbnail size.

Book settings
On the top right, under book settings, click on the two triangles to open the book options to begin designing your photo book.
For the purposes of this Lightroom photo book tutorial we’ll choose Blurb Photo Book.
However, if you want to use another book printer, you can choose pdf or jpeg. In this case you’ll export your album design as either a pdf or jpegs to be uploaded manually.
Next, choose the size of the book you want.
Photo book sizes
The book size refers to a single page. A double page spread would of course be twice that size.
Lightroom photo book template sizes are:
- Small Square – 7 x 7 inches
- Standard Portraits – 8 x 10 inches
- Standard Landscapes – 10 x 8 inches
- Large Landscapes – 13 x 11 inches
- Large Square – 12 x 12 inches
As you toggle through different book sizes in Lightroom’s book module the price of the photo book changes, indicated at the bottom of the book settings panel. Make sure it’s set to your country’s currency.
Unfortunately, this service is not available in all countries. To design and order a Blurb photo book in Lightroom Classic you need to be in:
- Canada
- Europe
- UK
- USA
- Australia
For other countries using other photo book manufacturers you can create a pdf or jpeg book design to export from Lightroom and upload to the website of the company you choose. The only restriction is book size, because of the photo book templates offered.
Next, select the type of cover you want.
Photo book cover
Your options are:
- Hardcover Image Wrap – this is my preference as it’s more hardwearing than the other option
- Hardcover dust jacket
Now select the paper type.
Photo book paper
My preference is Premium Lustre paper, because it feels nice and has the slight sheen that you’re used to seeing in a coffee table style book.
As you toggle through different paper types the book price changes accordingly.
While it’s not a paper type, one of the options here is standard lay flat. Select this if you want the pages to lay flat when open. In other words, you won’t have the middle dip where the pages meet. A lay flat design is ideal for creating a photo album with a single image layout on a double page spread.
To logo or not to logo?
The last option under book settings is logo. This is for the Blurb logo, not yours. Your options are:
- On
- None
It costs less to have it on, but it also means that the Blurb logo will be printed on a separate page at the end of the photo book. For personal use, that doesn’t bother me, so I leave it on. However, I wouldn’t have it on client photobooks.
3. Customize photo book layout
Lightroom comes with three default photo book layouts. You can choose to use the Lightroom photo book templates for very quick design, or you can design your photo book page by page.
I prefer to design each page as I go so that I can mix up the design and the photo book doesn’t become repetitive.
You can design page layout individually in the Page Panel.

Page Panel
First, decide on whether you’ll have page numbers and if so:
- Where they’ll be
- If you want them on each page
Now you’re ready to design your first page and you’ll see why it’s so helpful to have all your photos already collected into one folder, sorted by capture time.
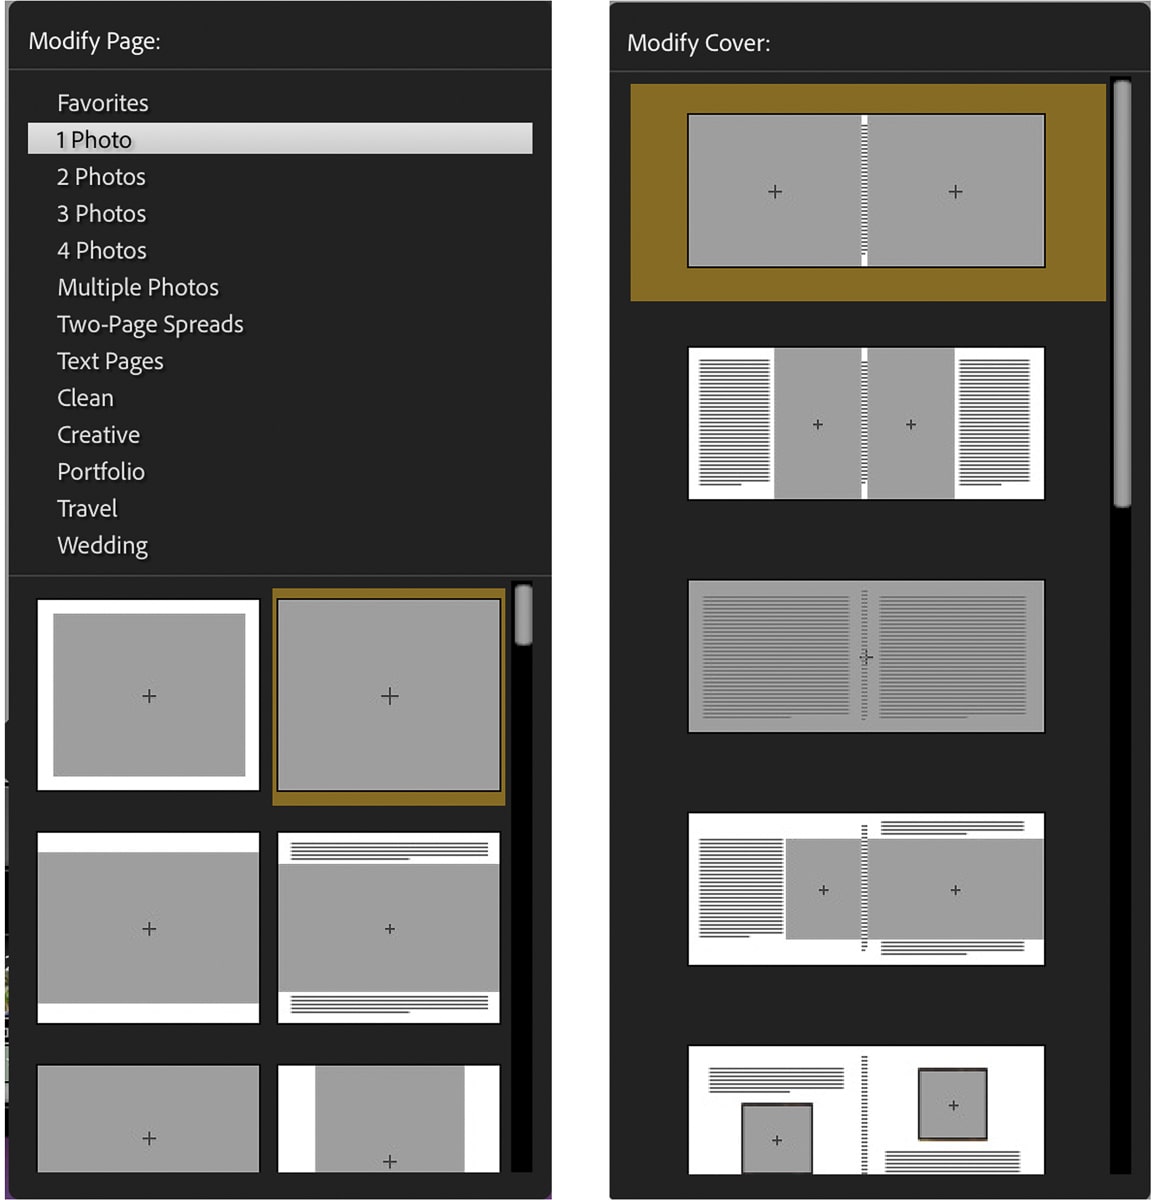
To select a Lightroom page template:
- Select the page you want to design
- Click the blank square in the Page Panel
- Select your page layout from the drop down box.
Alternatively, click on the triangle in the black square at the bottom right of the page. This will also open a panel of page options.
You can change your mind at any time by going back to the page you want to change and clicking on the blank square and selecting a different page template from the drop down menu.
To add a page, either:
- Click the Add Page button or Add Blank button
- Or click the triangle in the black square to the right of the page template to open a drop down menu of page templates for your additional page

Guides Panel
If you don’t intend altering the Lightroom photo book templates, you won’t need to use grid snap, so you can switch it off or set it to Cells.
The guides are just that – guides to help you with your design. They don’t show up in print. I prefer my layout to be as uncluttered as possible, so I have just the first three guides checked. Namely:
- Page bleed (so that you can see the printable area of the page – anything between the guide and the edge of the layout won’t be printed)
- Text Safe Area
- Photo Cells
Cell refers to the box in which you place the photo.

Again, you have options, depending on personal taste:
- Adjust the size of the image in the cell with the Padding slider
- I prefer a minimalist design for photo books, so I don’t use photo borders
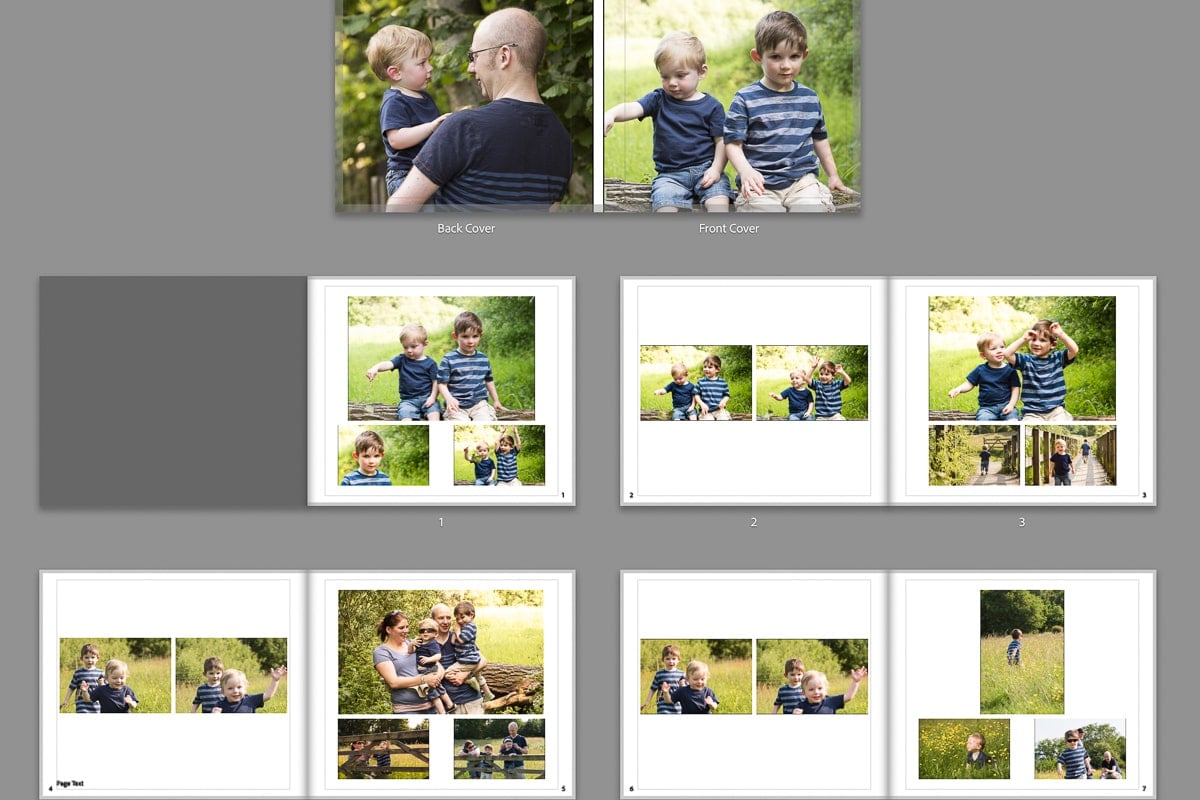
Back and front book covers
Adding photos and text to the front and back covers of photo books works the same way as pages. To modify your book covers:
- Click on the triangle in the little black square at the bottom right of the cover.
- A selection of cover templates will open up in the right hand panel.

4. Add text to photos and pages
Before we get into the details of the text panel, it’s worth noting that you don’t have to have text in photo books.
Just because the option is there doesn’t mean you have to use it. That said, it’s sometimes nice to add a comment to jog the memory years in the future.

Text Panel
The book module Text Panel deals with two areas where text can be applied.
The Photo Text check box is available only once you select a photo box. It then gives you options to add text over, above or below the photo. The above and below options depend on the type of photo box you’ve chosen. If the box is for example a full page, then of course you won’t be able to select either above or below.
You can add any text as a caption below the photo or as custom text.
Alternatively, this is where Lightroom is really clever! Automatically add photo metadata as text to photos by selecting from the drop down menu:
- Caption
- Date
- Equipment
- Exposure
- Filename
- Sequence
- Title
To customize the text, double click on it and your options will appear in the Type Panel.
Page Text is for text in the top or bottom margins and can be customized the same way by selecting the text and then changing the option in the Type Panel.
The offset sliders of both Photo Text and Page Text allow you to move the position of the text.
For a global adjustment of all the text, go to the Menu bar and click on Edit > Select All Text Cells.
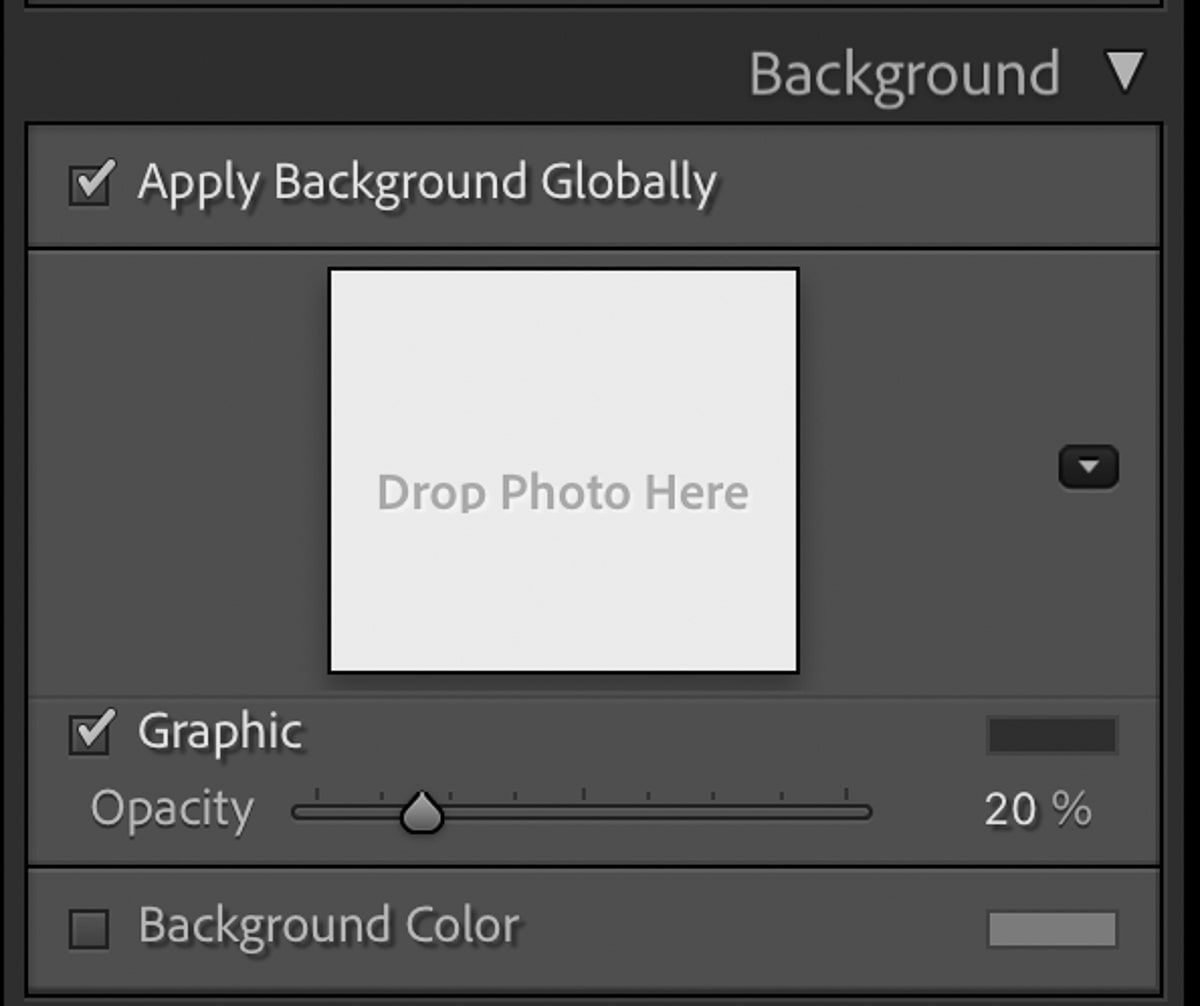
5. Customize page backgrounds
Like with text, the background is a photo book option that you can customise or leave blank.
My preference is to leave it blank, because my taste is minimalist and I feel that by cluttering the page background you draw attention away from the photos.
Your Lightroom photo book background options are:
- Photo
- Graphic (Lightroom even includes a choice of graphics to add)
- Color
Apply these preferences per page or globally by clicking Apply Background Globally. You can also alter the opacity.
6. Save Lightroom photo book
The minimum book length for a Blurb photo book is 20 pages. So, once you’ve created 20 or more pages and have finished designing your photo book:
- Click on Create Saved Book at the top of the middle panel
- Name your photo book
- Decide where you want it saved and if you want only included photos saved with it
When you hit save, you’ll see your photo book in the Collections panel on the left side of both the Book Module and the Library Module in Lightroom. Double clicking on it in either module will open your Lightroom photo book in the Book Module.

7. Order Lightroom photo book online
Now you have two options for printing your Blurb photo book:
- Export Book to PDF
- Send Book to Blurb
Before doing either of these, you first need to create a Blurb Books account. After that when you click on Send Book to Blurb it does exactly that without any extra fuss.
You’ll be asked to fill in your email and password for access. Then simply follow the instructions. Enter:
- Book Title
- Book Subtitle (if you wish)
- Book Author
Click Upload Book.
Once you upload a book to Blurb you can print it straight away, or you can allow up to 15 days before sending it to print. After 15 days without ordering it’ll be deleted.
Leave a comment
If you have any questions about how to make a photo book in the Lightroom book module, let us know in the comments.
Also, I love good news, so if my Lightroom tips have helped you, share that too.