Color settings and camera color calibration sounds very dull and technical, but it really isn’t at all. It’s so simple! It’s the first step in how to process RAW images. And a great way of achieving a variety of different looks right there in the camera!
Now that’s interesting.
Have you noticed that the image on your camera’s LCD looks different from the photo you import to your computer?
Do you wonder why the photos on your computer look washed out when you first import them?
There’s a very easy answer and a very easy fix, but first I’ll explain why, plus the consequences of your choice.
Why do RAW images look washed out on my computer?
What you see on your camera is not a RAW file, even if you shoot in RAW. It’s a JPEG. To get the most out of a RAW file you need to process it, just like film had to be developed in the dark room.
The good news is that setting color profiles will immediately improve your photos, and it’s nowhere near as technical as it sounds! Well, it probably is quite technical behind the scenes, but for us photographers, they’ve made it really easy to adjust color profiles in camera, as well as in post processing.
There are two places where we need to adjust color profiles for better color in digital photography:
- Camera color calibration
- Lightroom picture profiles (or similar photo processing software)
Camera color calibration for creative JPEG shooters
If you photograph in JPEG, your camera color settings have more of an impact than if you shoot in RAW. You can instantly take photos that look like they’ve been processed on the computer, even as you shoot.
However, your camera settings could also be misleading you into making the wrong exposure decisions, even if you shoot in RAW!
Image quality – RAW vs JPEG
I won’t go into detail here on the differences between RAW and JPEG, or the benefits of choosing one over the other. Just click on the link below for all you need to know about RAW vs JPEG.
The reason I mention RAW and JPEG as file formats for this tutorial, is because of how your choice will impact your workflow and the final image.
The most important point to note is that, regardless of whether you shoot in RAW or JPEG, the image you see on your LCD screen is a JPEG. Yes, even if you’re shooting in RAW.
That’s why when you import your photos into Lightroom, the RAW files look different from what you saw on your camera.

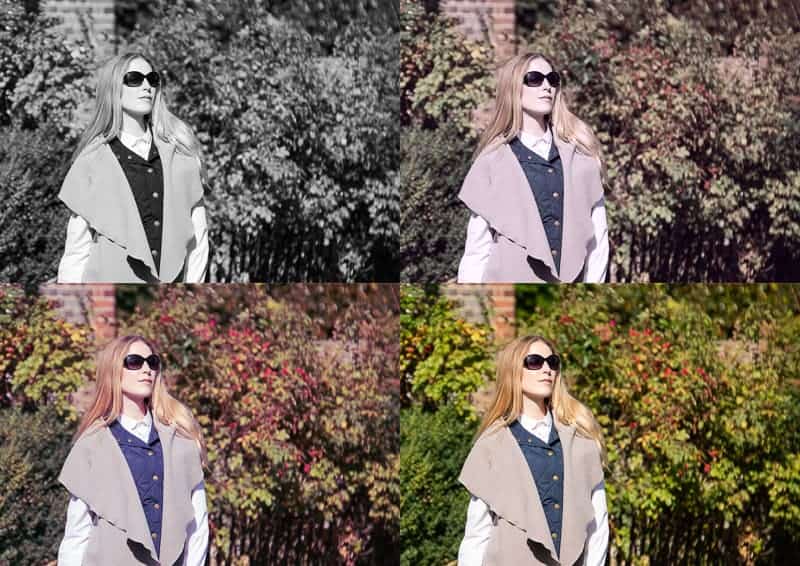
Above is the RAW file straight out of camera and below after processing the photo in Lightroom Classic.

Why you need to know about camera color settings
To color calibrate your camera, simply choose a color profile, or picture profile, you like. I thought I’d mention that first so that you know it’s actually really interesting and not at all difficult.
Color profiles are like different types of film
With film cameras, to get a certain look photographers would use a particular type of film.
Well, that’s exactly what camera color calibration is for digital cameras. Color settings are a way of selecting a particular look for your image, from very flat images with minimal contrast and color to vibrant images, as well as black and white photos.
Color settings for shooting in JPEG
Color profiles are a great way of applying a particular look right there in camera!
If you’re photographing in JPEG, you won’t be able to change the color profile much afterwards in post production as the image is processed in camera. Yes, you can edit to an extent, but the color profile will already have been set and so will limit what you can do.
Unlike when shooting in RAW, if for example you choose a black and white color profile, you won’t be able to make it color in post production.
Setting color profiles in camera
The easiest way to explain how in camera picture profiles work is to show you…
These three sets of photos are all RAW files straight out of camera with no processing. The exposure settings remained the same throughout.
The first set are photos that I took of the back of my camera to show the JPEG files with different Nikon picture profiles already applied in camera. The photo on the left was shot with the flat profile and the photo on the right I used the vivid profile.

Next are the photos as they were imported into Lightroom with Adobe’s default color profile, Adobe Color, applied during the import process. As you can see, the camera picture profiles were not carried across with the RAW files.

Once imported, I applied Camera Matching color profiles in Lightroom Classic, but made no other adjustments. The photo on the left is the flat profile and on the right the profile is set to vivid. As you can see, it’s similar, although not exactly the same, as the JPEG preview on the back of my camera (shown further up).
Further processing is needed to replicate the JPEG preview.

As I mentioned earlier, when you import your RAW photos into Lightroom, for example, the JPEG color profile set in camera is irrelevant. A RAW file needs to be processed to shine.
Having said that, if as a Nikon shooter, I used Nikon’s own processing software, the color profile would be carried across when I imported the RAW images.
What’s the point of camera color calibration when shooting RAW?
You might well ask then why should you worry about setting a color profile (also called picture profile) on your camera if:
- what you see on the back of the camera is a JPEG,
- but you’re shooting in RAW,
- and what’s imported to the camera won’t look like that,
- and you have to make the changes in post production
That’s all true, but you if you look at that image on the back of your camera to make decisions about exposure, you’re making decisions based on inaccurate information. If you have “blinkies” (highlight warnings) turned on, the information you see is also based on the JPEG image.
So, although the color profile has no impact on the RAW image, because of what you see on the back of your camera, you might make decisions that result in over or under exposed photos.
These photos demonstrate what I mean…
The camera settings remained the same and the photos were taken seconds apart. The only change for each image was the picture profile. I had the highlight warning turned on, which shows as blacked out bits where the highlights are blown, and this is where you’ll see the difference between picture profiles.
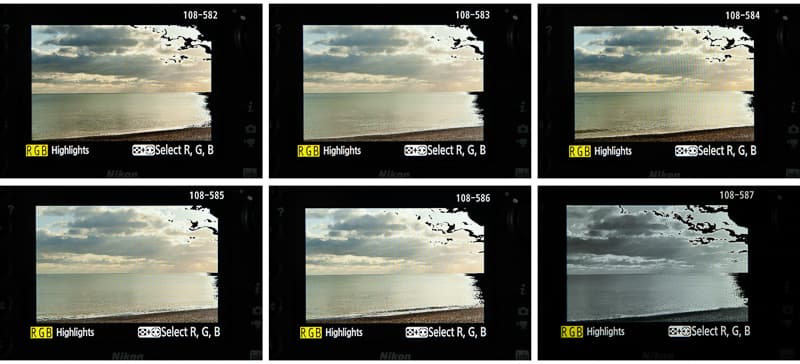
Did you know that your histogram is based on the JPEG preview of your photo?
This is the real reason, if you shoot in RAW and refer to your histogram to make exposure decisions, to set your color profile to as flat an image as possible. In other words make the JPEG preview as close to what your RAW photo will look like when you import it for processing.
After all, what’s the point of referring to a processed JPEG on the back of your camera if that’s not what it actually looks like. Even more importantly, why influence your camera’s histogram to give you inaccurate exposure information about what you’re actually capturing?
Here’s an example…
The photo on the left is a flat profile and the one on the right is a vivid profile. Do you see how different the histograms are? Yet the same data is recorded, as you will see further down.

How to change color profiles on your camera
So, now that you know why you need to set your color profile, even if you photograph in RAW, here’s how to do it.
Every camera manufacturer has their own name for camera color calibration and their own way of accessing the menu to change color settings. So, here’s a list of camera brands and what to look for in their various menus:
- Nikon – Picture Control
- Canon – Picture Style
- Sony – Picture Profile
- Fuji – Film Simulation Mode
- Olympus – Picture Mode
- Pentax – Custom Image
As I shoot Nikon, I can show you how to access Nikon picture control. For other brands, I’m afraid you’ll have to refer to the manual (or YouTube), but I’m sure it will be just as easy.
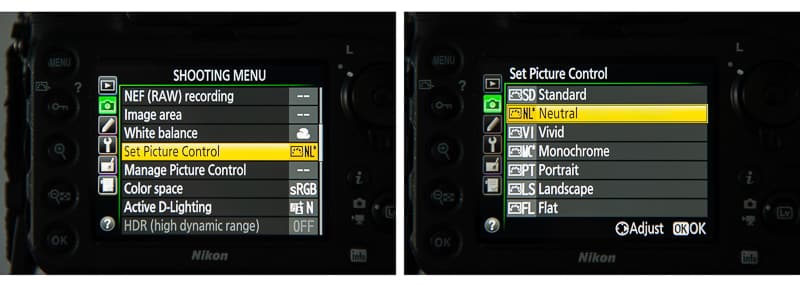
The Nikon picture control I use is Neutral. I’ve made a few adjustments to flatten out images so that I view the most accurate version of my images on the LCD screen and histogram. The asterisk next to Neutral indicates that I’ve customised it (so that my histogram reads more accurately). The Flat Profile would also be a good choice.
So that’s half the story of picture profiles, aka color profiles, aka picture styles, aka camera color calibration.
How Lightroom color profiles spice up your photos
This is a much shorter explanation of color settings. Again, it’s easier to show you in pictures.
I processed the original image in Lightroom Classic and made all the usual adjustments to change a flat RAW file into an image with contrast and all the good stuff. The only change I then made to get the following three versions was to select a different Lightroom color profile for each version in the Develop module of Lightroom Classic.

Lightroom Vintage color profile
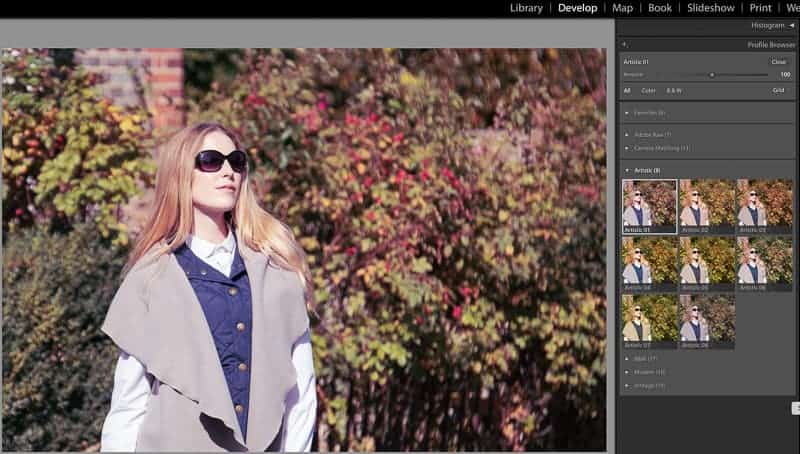
Lightroom Artistic color profile
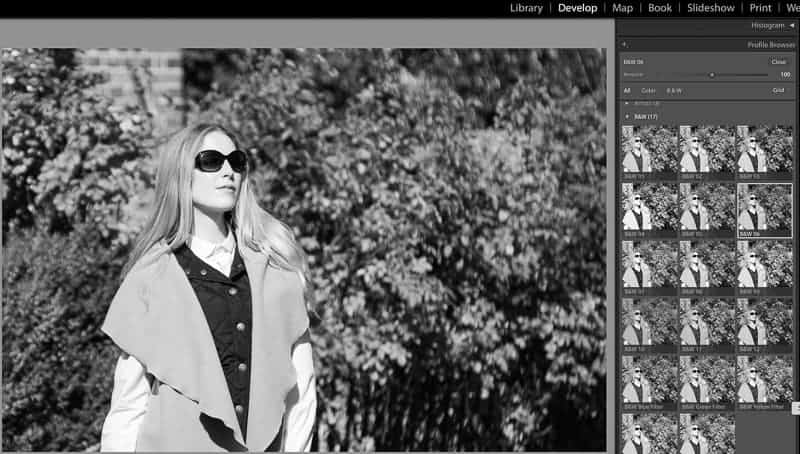
Lightroom Black and white color profile (one of many)
How to set color profiles in Lightroom Classic
The best part of using picture profiles in Lightroom to instantly change the look of a photo is that it’s the easiest thing in the world! Here’s what you need to do in the Develop module:
- In the Basic Panel, click on the currently selected profile, which by default is Adobe Color (For photos after April 2018. Before that it was Adobe Standard)
- Select a profile, or select browse to open a panel of profiles to choose from
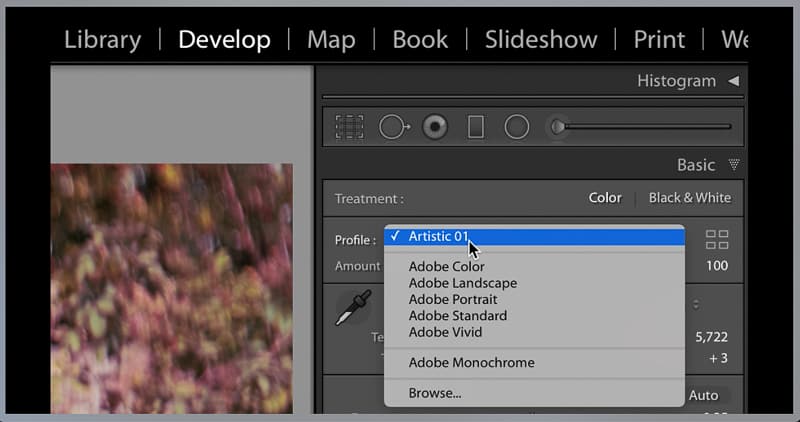
- To see all the options in a category, such as Artistic, click on the little triangle to the left of the category
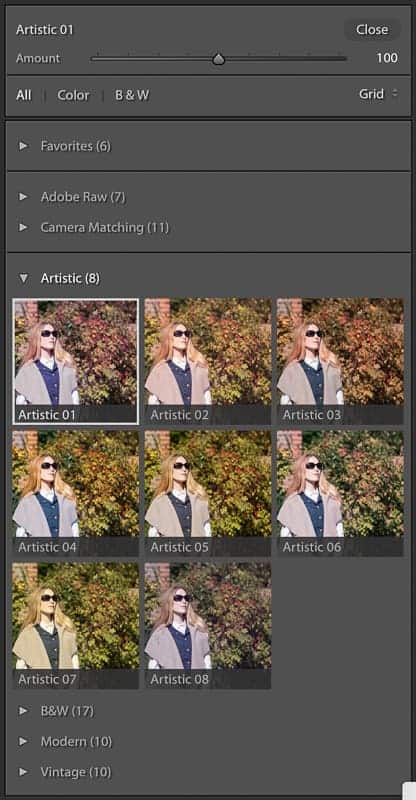
- As you move your mouse over each option your photo will change to show you a preview of the profile
- Click to select the color profile you want
- Adjust the intensity slider, which is set to 50 by default (applicable to all except for the 7 Adobe Raw profiles and Camera Matching profiles)
- Then click close at the top of the profile browser to return to your basic panel
To skip the first two steps and go straight to your profile options, just click on the little grid to the right side of the profile.
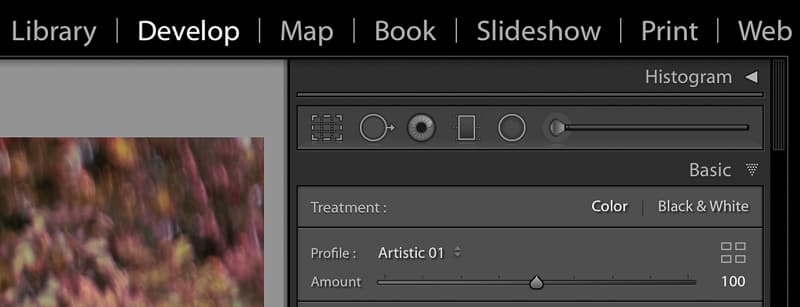
You can favorite a profile to make it easier to find next time. Just click the star in the top right corner of the profile thumbnail and it will be added to the Favourites profiles.
Want to speed up your workflow? Change the color profile of the entire shoot at once with batch editing in Lightroom.
One last tip on Lightroom color profiles
Profiles aren’t like presets
Unlike Lightroom presets, Lightroom profiles don’t affect any of the changes you make to your photos. You won’t wipe out any of the adjustments you’ve made if you decide to change the color profile part way through your editing, or even afterwards.
You can select a Lightroom color profile before you make adjustments or after. However, I recommend doing it before you start processing your photo as the outcome will then determine what you do to the photo.
Leave a comment
If you have any questions about color settings or how to process RAW images, let us know in the comments.
Also, I love good news, so if my camera color calibration tips have helped you to understand your camera’s LCD preview, histogram or how Lightroom color profiles work, share that too.

Hi Jane, I have a D7200. I was told not to change the picture control if I shoot RAW as it only makes changes if shooting jpeg. Can you advise please. If this is wrong what settings have you changed from Nikon in Neutral.
Kind Regards
Russell
Hi Russell
In one respect that is absolutely true – it does only change the JPEG. However, if you change the picture control, then the preview that you see on your camera’s screen (which is a JPEG preview anyway) will change accordingly.
I find it particularly helpful to know what the RAW file actually looks like so that I can keep an eye on highlights and shadows, rather than base my exposure decisions off of a more processed JPEG preview.
The change I made to the neutral setting was simply to remove the sharpening that neutral automatically applies. To do this, once you have neutral highlighted, select it to open up the neutral menu, then reduce the sharpening to 0:00. Be careful not to go too far to the left as it will then set it to “Auto”. Then push OK to save it.
HI Jane, appreciate your time to answer my question. I have set sharpening to 0.00. All the other settings on my camera are also 0.00. Are yours the same?
your tutorials are a great learning tool.
Hi Russell
That’s correct – I adjusted only the sharpening and left the other settings at 0.00.