

You have two ways to create a watermark in Lightroom, so I’ll show you both and explain why you need more than just one watermark. I’ll cover:
- How to add a watermark in Lightroom Classic
- How to reset watermark presets in Lightroom
- The pros and cons of using watermarks
Plus, if you want to know the four misconceptions about photography watermarks, keep on reading after my step by step guide to Lightroom watermarking.
How to add a watermark in Lightroom Classic
Adding a watermark in Lightroom Classic is ridiculously easy. Promise. As I mentioned, there are two ways to do it:
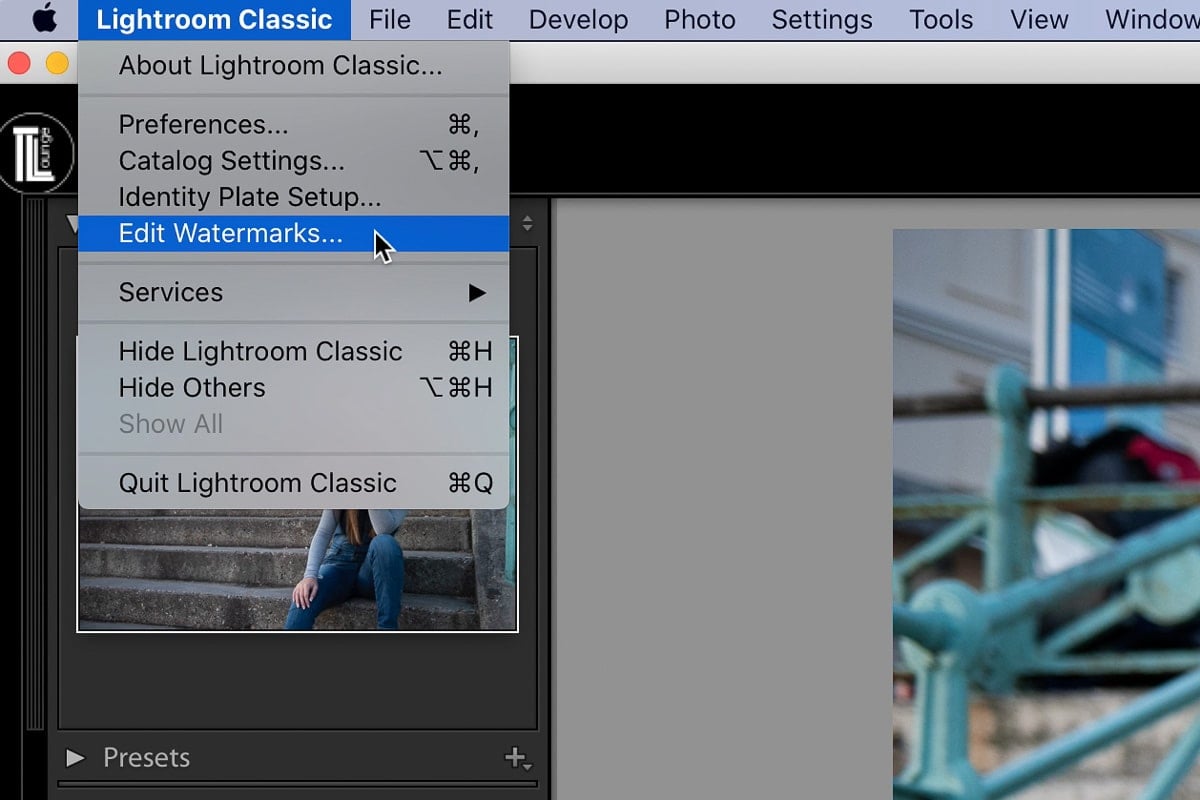
- In any of the Lightroom modules, click Lightroom Classic in the menu bar, then select Edit Watermarks from the dropdown menu
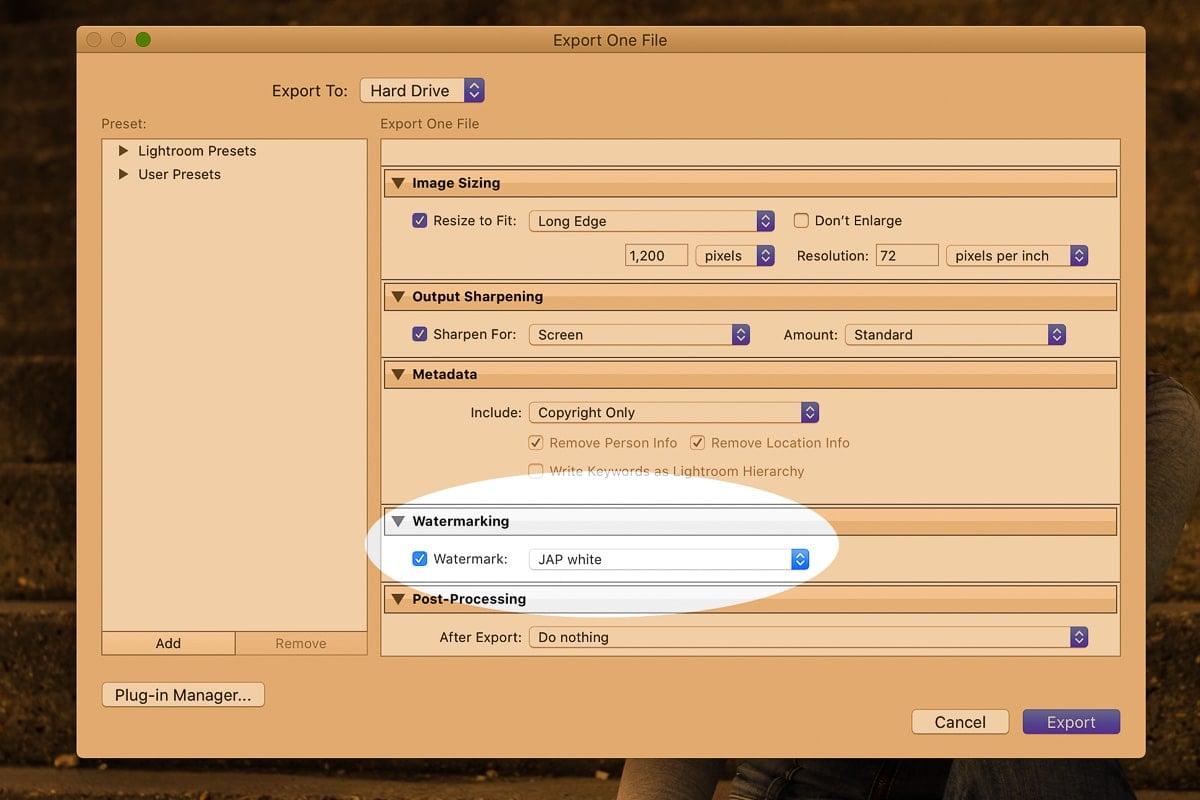
- Apply a watermark as part of the export process from Lightroom. Check the Watermark checkbox in the export panel and select an option from the dropdown menu
You can also create three different types of watermarks in Lightroom Classic. They are:
- Simple watermark
- Text watermark
- Graphic watermark
The default position for every type of watermark is at the very bottom left of the photo, but you can position it wherever you want. I’ll show you how to change the opacity, size and position of the watermark in a moment.
But let’s first start with the easiest Lightroom watermark and how to make it…
The simple watermark is the default watermark setting in Lightroom. So, naturally it’s the easiest to do.
The name you entered when you set up your Adobe account will appear as your default simple watermark, preceded by the copyright symbol.
- Click Lightroom Classic in the menu bar and select Edit Watermarks from the dropdown menu
- Click Save
- Name your watermark in the box that appears
- Click Create
OR during export…
- Check the Watermark tick box in the export panel
- Select Simple Copyright Watermark from the dropdown menu
- Click Export
That’s it!
My preference is to use apply watermarks with other Lightroom export settings when exporting photos.
And if you’re wondering how to type a copyright symbol, that’s easy too:
- On a Mac hold down the Option and press g
- In windows, hold down Alt and type 0169

You don’t have to stick with the default simple watermark, you can use personalised text to say whatever you want as a watermark. Here’s how to do it:
- Click Lightroom Classic in the menu bar and select Edit Watermarks from the dropdown menu
- The default simple watermark text will be highlighted
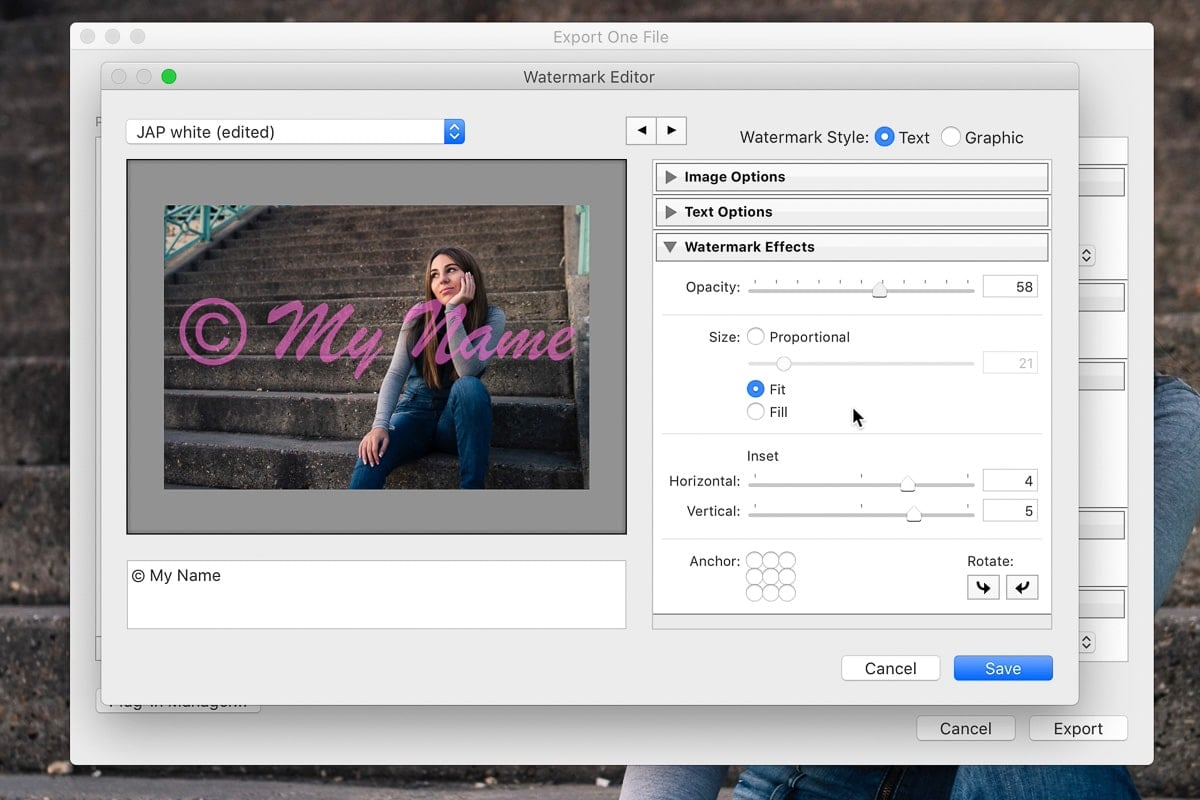
- In the text box below the image, type whatever you want
- Under Text Options, set font, style, alignment, color and shadow
- Click Save
- Name your watermark in the box that appears
- Click Create
OR during export…
- Check the Watermark tick box in the export panel
- Select Edit Watermarks in the watermark dropdown menu
- Check Watermark Style: Text
- In the text box below the image, type whatever you want
- Under Text Options, set font, style, alignment, color and shadow
- Click Save
- Name your watermark in the box that appears
- Click Create
The first step to creating a graphic watermark in Lightroom is to create your graphic. This can be:
- Your logo
- Your logo and text
- Anything you like
Over the years I’ve created several watermark graphics using:
- Canva Pro
- Photoshop Elements
- Photoshop
You can also create graphics for watermarks with free online tools.
The important thing to remember when creating a watermark graphic is to design it with a transparent background and then export as a PNG file to import into Lightroom. If you’re not fussed about having a transparent background, you can save your graphic as a JPEG.
Once you’ve created your watermark graphic…

OR during export…
- Check the Watermark tick box in the export panel
- Click Edit Watermarks in the watermark dropdown menu
- Check Watermark Style: Graphic
- If you don’t already have a graphic uploaded to Lightroom, a window to your files will automatically open
- Go to where you saved your graphic and select it
- Click the save button to Save your watermark
- Name your watermark in the new dialog box that appears
- Click Create
It’s not really obvious that you’ve done it, but if you look in the bottom left corner of the photo, you’ll just about see your watermark graphic. You might need to adjust the watermark image size before you see it.
Which leads me to the next step before you save your Lightroom watermark.
How to change opacity, size and position of watermarks in Lightroom
Once you’ve selected the watermark type you want to create for photos, set the opacity, size and position of the watermark while in the Watermark Editor.
- Select the Watermark Effects dropdown menu
- Use the opacity slider to adjust the opacity of your watermark so that it’s not screaming for attention in the photo (It’s also really handy if you have a black watermark that you want to appear gray)
- Adjust the size of the watermark using the slider
- You’ll see that you can make it proportional, in which case then you can adjust the size using the slider
- Or simply select fit or fill
I prefer proportional so that I can control the watermark size.
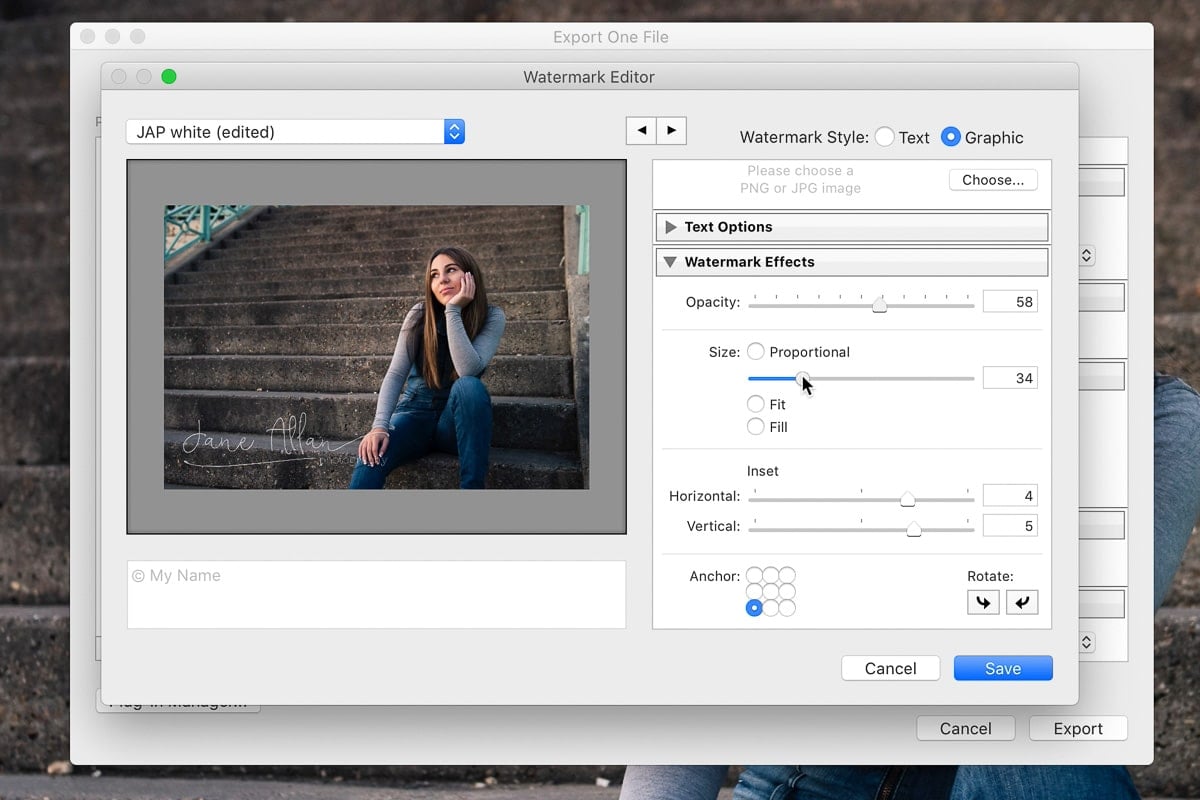
- Next, position your watermark by checking one of the circles next to the Anchor option
- My preference is to have it in the bottom left of the image as I don’t like a watermark splattered across the middle of a photo
- Adjust the horizontal and vertical inset so that the watermark isn’t mashed up against the very edge of the photo
Now all you have to do is save and name your watermark.
- Click Save
- Name your watermark (with an explanatory name)
- Click Create
After creating your own watermarks…
The next time you want to apply a watermark to photos you can simply select the custom watermark you want to use from your list when exporting from Lightroom Classic. In the export panel:
- Check the watermark checkbox
- Select your custom watermark from the watermark dropdown menu
- Click the Export button
How to create multiple watermarks in Lightroom
You don’t have to stop at one watermark. In fact, if you’re going to use a watermark on photos, you’ll need more than just one.
One reason is color. A white watermark, for example, on a white background won’t be visible. So you may as well set yourself up for all types of photos in one go, while you’re designing your first Lightroom watermark.
I have three versions of my watermark:
- White
- Gray
- Black
Just remember to use self explanatory names when creating a watermark in Lightroom. For example, I use “JAP gray”, “JAP white”, “JAP black” and even “JAP gray top left”.
It’s really easy to create multiple watermarks in Lightroom that are similar.
How to create a new watermark based on a previous watermark
- Select Edit watermark, either during export or after clicking on Lightroom Classic to open the dropdown menu
- Select the watermark you want to use from the dropdown menu in the top left of the Watermark Editor
- Adjust the settings
- Click Save and you’ll be asked to name the new preset (aka watermark)
- Enter a name
- Click Create
You can’t overwrite previous watermark settings with new settings, you need to create a new watermark and then delete the old watermark.
How to remove a watermark in Lightroom
I’m not talking about importing a watermarked JPEG image and then removing the watermark, like you would a blemish. As discussed, removing another photographer’s watermark is just plain wrong… and illegal.
I’m talking about either:
- Removing the option to apply a watermark on export
- Or removing an old watermark design from the Watermark Editor in Lightroom
1. Exporting from Lightroom without a watermark
If you want to export a photo without a watermark, you can remove the watermark option very easily in Lightroom.
In the export panel:
- Scroll down to Watermarking
- Deselect the watermark tick box
- Export as normal
2. Removing an old watermark in Lightroom
It’s very easy to end up with a long confusing list of watermarks (been there, done that). So, to cut down on time and confusion in the future, once you’ve adjusted a Lightroom watermark and no longer need the old one, delete it straight away.
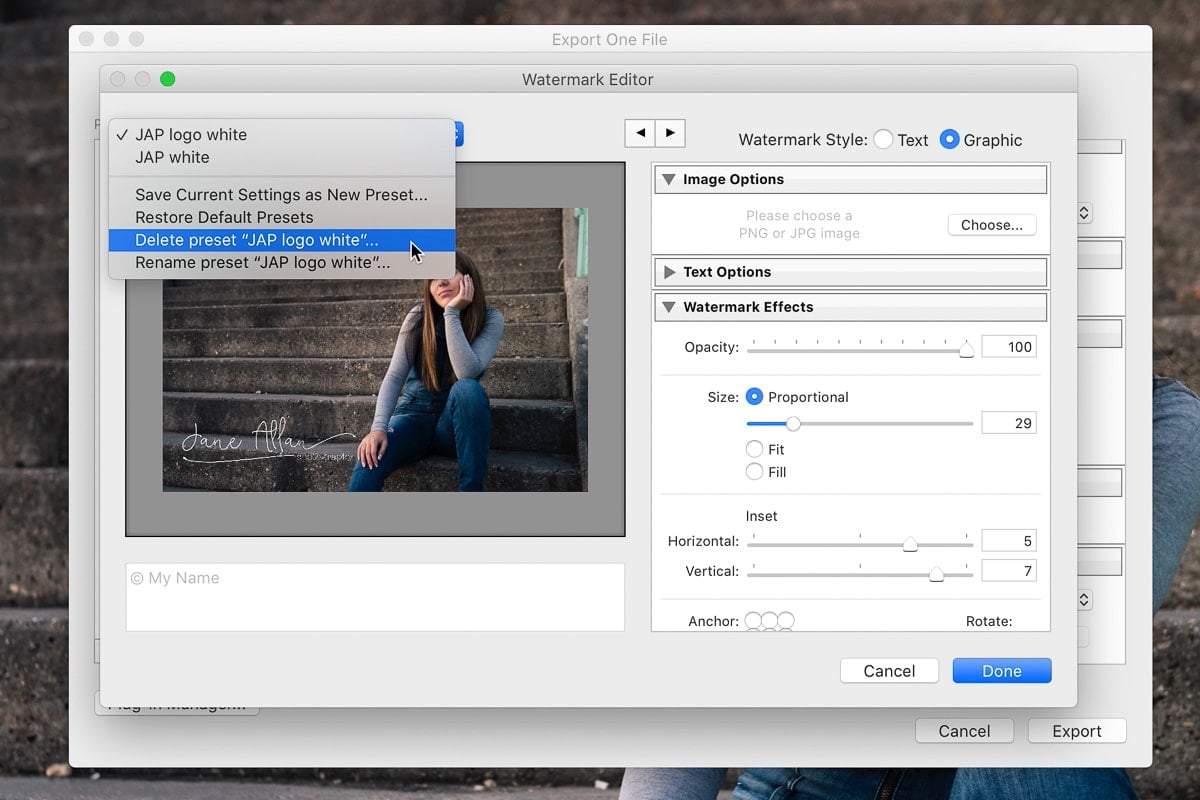
- Select Edit Watermarks either during export or using the Lightroom menu bar option
- Click the dropdown menu in the top left of the Watermark Editor
- Select Delete preset “whatever you named it”…
- A window will pop up asking if you want to delete it
- Click Delete
- Then Cancel to get out of the Watermark Editor

- Photography watermarks look professional
- A watermark will protect my photos online
- Nobody will print my watermarked photos
- A watermark is needed for copyright

Myth 1: Photography watermarks look professional – not even slightly
Just slapping a watermark on a photo isn’t going to make it look like the work of a professional photographer. It’s true that many photographers in business watermark their photos.
However, not every professional does and even those that do, don’t always watermark their photos.
In fact, some professional photographers never watermark photos.
Why do photographers sometimes use a watermark and sometimes not?
I can’t speak for all professional photographers of course, but here’s how I use watermarks in Lightroom.
You’ll already have seen that none of the photos on The Lens Lounge are watermarked. Actually, there is one, because I accidentally used the wrong version of a photo and I’ve been meaning to change it, but haven’t got around to it yet.
I don’t watermark photos on my photography business website either. Some photographers do.
Photos meant for social media get a Lightroom watermark, but only for my photography business Facebook page, not for The Lens Lounge Facebook page. I don’t watermark photos for Instagram either.
The one time I’ll add a watermark in Lightroom is when supplying clients with low res images to share on Facebook or Instagram, or wherever.
I use photo watermarks for advertising and to generate brand recognition, not to protect my photos.
Watermarking photos a great way of getting my name out there and I’ve received several bookings as a result. When friends, or friends of friends, of my client see a watermarked photo they like that my client posts they know who to contact for their own photos. Referral clients automatically trust a photographer more.
So the photo watermark is a silent referral machine reaching a wide circle of people.

Myth 2: A watermark will protect my photos online – not a chance
Nothing will protect your photos online from image theft. Sorry to be abrupt, but it’s that simple. Some (not very nice) people will still steal photos they find online, regardless of whether it’s watermarked or not. Even some of the very big photography blogs have used my photos without permission.
The only guaranteed way to protect your photos from unauthorized use is not to post them online.
We all know how clever Photoshop is, so it’s no surprise that watermarks can be removed in Photoshop. However, lazy thieves won’t even bother to remove the watermark.
Actually, it’s not fair to say that everyone who steals photos online is not nice.
Many people think that if they find an image on Google, they can use it. However, photos that appear in a Google image search are absolutely not up for grabs. It’s shocking how many people don’t realise that you can’t just go online and download or screenshot photos. For any reason.
The right thing to do is to buy images from a photo library like these big ones (to name just a few):
- Adobe Stock
- Shutterstock
- Deposit Photos
How much you pay depends on the site and how you want to use the photo (i.e. which license you buy for the photo).
Or use a free stock library. Some libraries ask only that you credit the photographer. Some don’t even ask that. Here are a few:
- Unsplash
- Pexels
- Pixabay

Myth 3: Nobody will print my watermarked photos – don’t you believe it
You’d be amazed! Yes, people will print your low resolution and watermarked photos! Not just small prints either.
Some will crop the photo so that the watermark doesn’t appear in the print, but others won’t worry about it.
Even a member of my family got so excited about photos of her kids that I put on Facebook for her that she immediately downloaded them and ordered canvas prints through an online printer.
I didn’t realise until I visited her and saw 4 canvases from the shoot on her walls, watermark and all. She’s family, I was giving her the high res photos anyway, so I was very surprised. I said she should have told me and I would have sent the watermark free, high res photos to her straight away. However, she said that she liked having my watermark on them.
Here’s two scary things about that…
- The print quality wasn’t that bad, all things considered
- The print company didn’t question the fact that the digital images were watermarked
Myth 4: A watermark is needed for copyright – so wrong
Photography watermarks and copyright are two very different things and have nothing to do with each other. Just because a photograph is watermarked doesn’t mean that it’s copyrighted.
It’s as copyrighted as an unwatermarked image.
However, the general public, and even many photographers, don’t understand how copyright works.
The person who pushes the button to take the photo, owns the copyright.
You can sell the copyright, but that usually involves a large amount of money changing hands. Many beginner photographers in business tell their clients that they can buy the copyright to the photos, when what they actually mean is that the client can purchase a license to use the digital images.
The copyright stays with the photographer, unless he or she sells it.
If you sold the copyright, you’d have to delete all your copies of that image as you would no longer own it. In fact, it would be illegal for you to have any copies without written permission of the new copyright holder.
You can use a watermark on photos to remind people that the photo is copyrighted by including this information and/or the copyright symbol in your Lightroom watermark.
Just be aware that this won’t stop some people from taking it anyway.
In Lightroom, you can add copyright information in the metadata of your images. However, it’s actually really easy to strip this information from a photo and I’m sure thieves know this.
However, the contact information is useful for someone who comes across your image, possibly in an online portfolio, and wishes to purchase a print, or license to use the image, or commission you based on the photo they saw.
Leave a comment
If you have any questions about how to watermark photos, let us know in the comments.
Also, I love good news, so if my photography watermark tips have helped you to understand how to add watermarks in Lightroom Classic, share that too.
Are watermarks really effective in preventing image theft online, or are they just an unnecessary distraction that can easily be removed by skilled individuals?